So…how’s your lockdown upskilling going? Learnt a new language yet? Studied all the classics?
My friend Dan told me recently that if she read one more annoying article about how isolation was the “perfect opportunity” to learn new skills, she might scream. I sent her this in return. I’m not sure who created it, but it’s been doing the sms rounds and is so on point at this time…

. . . . .
Now, having said that…if you did want to learn just one skill during this time, can I suggest darning? It’s a very small commitment in time, resources and emotion, but it might make you as happy as it does me. It also doesn’t require perfection – the messier it is, the more character the repaired item ends up with.
I realise the name alone makes it a hard sell – I suggested a Darning Day to my friends who attended our Sustainability Working Bee, and most of them baulked. “It all sounds a bit Victorian workhouse”, I was told. I’ll think I’ll try again after lockdown and call it a Mending Workshop instead.
But basic darning really is very rewarding, and a useful tool to have in your repertoire. So I wrote this very simple tutorial for you. The videos are a bit dodgy because I had to prop my phone up and use both hands, so the focus flickers in and out a bit, but hopefully they’ll be enough to give you an idea. After a lot of reading and watching YouTube videos, this is the method I use. I don’t believe it’s textbook, but it works for me!
Start with a hole that needs mending and some basic kit – scissors or snips, a darning mushroom, wool and a darning needle. I used rescued tapestry wool for this tutorial simply so that you can clearly see the steps. It’s thicker than the wool I use on Project Penny, and while it’s quick to work up and produces a nice sturdy patch, it’s not ideal – as Diane commented below, it can end up a bit hard and lumpy after a few washes. Do use thinner cotton or sock wool for a better result.
I personally love using the 8ply Bendigo Mills cotton I buy for my crocheted dishcloths but my all-time mending favourite is vintage hosiery floss. However, experiment with whatever you have lying around, especially when you’re still learning!

As I mentioned earlier, my favourite darning mushroom is the one I bought from Roy in West Australia. He has a few more in stock now if you’re still looking for one, but if you miss out (they’re all handmade so they take a bit of time), just put your name down on his waitlist…

If you don’t have a darning mushroom, improvise with any small, curved surface. I’ve read suggestions ranging from ceramic eggs to oranges, and have personally used jar lids, stress balls and small turned wood bowls with some success. I’ve even used a fossilised ammonite!

. . . . .
Ready? Here we go.
1. Put the sock over a darning mushroom, with the hole on the curved surface, and tie it around the handle with a scrap of yarn. Thread a length of wool (or thick cotton, if you prefer) onto a darning needle.

2. Start with a double backstitch to secure, leaving a long tail to weave in later. Don’t make any knots as they can be uncomfortable when you’re wearing the repaired sock.
3. Stitch a row of backstitcing around the hole to reinforce it. Work a few millimetres away from the edge of the hole.
4. Now bring the needle up next to the bottom of the hole, outside the backstitching.

5. Sew a long strand across the hole, followed by a running stitch. Turn the piece 180°. Make another running stitch, then another long stitch across the hole. Repeat until you’ve covered the hole.
Here’s a dodgy video…
Here’s what it will look like after you’ve finished this step…

6. If you need to change wool at this point, end with a double backstitch and leave a long piece to weave in later. Start a new colour with another double backstitch.
7. Now holding your needle BACKWARDS, weave over and under the long strands. Then sew a running stitch and turn the mushroom 180°.
Weave back over the strands in the opposite way, going over and under in reverse to what you did in the previous row (I’m sure mending experts have more succinct ways of describing this, sorry).The purpose of weaving the yarn with the needle eye first is to reduce the likelihood of splitting the wool. Here’s another blurry video…
Repeat until you’ve covered the hole…

8. Finish with a double backstitch, leaving a bit to weave in later. Remove the mushroom, turn the sock wrong side out and weave in the loose ends. Trim neatly.

9. Here’s what the finished front and back will look like…


10. Wear your visibly mended sock with pride!

. . . . .
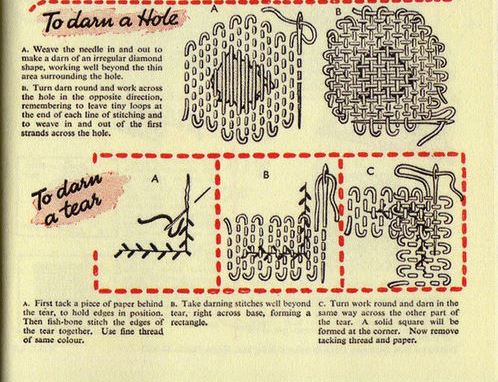
Ha! Not the slickest tutorial I’ve ever written, but I hope you find it useful nonetheless. There are oodles of different ways to darn a hole, but this technique is perhaps the oldest and most basic, and therefore a good place to start. It’s been around for a very long time, as this WWII leaflet shows. The only difference is that we now wear our mended patches with pride rather than trying to hide them!

Are you working on anything new at the moment? I’d love to know about your latest project! ♥

Thank you, I found this very helpful. Will be trying it on my holey sock 😃
Yay! Hope it works for you!
Wow! Now I begin to understand why my darning is always a tight mess. Will try again,thanks to your clear explanation.
The trick is understanding that you usually can’t just close the hole up if it’s gaping, because it almost always tears again. In effect you have to fill the hole with “new” fabric.
You could try calling it Restoration Stitching, which sounds a bit less penitential and rather more creative. I still have my mother’s marble darning egg…
Hahaha good idea!
I was taught with a light bulb. My mom was raised in the 1930’s so they were creative. I did not know about any specialty equipment for darning until i saw your site.
Excellent explanation. I have been darning socks all our married life (45yrs). There is something soothing about doing this task.
I was lucky to be gifted a mushroom from a lovely lady on the local Sewing& repair fiends (not a typo!) fb page. Nice neat tutorial. Caveat – its worth looking for darning plaits, which you will sometimes find in opshops or Spotlight. While its fun using tapestry wool, and I have lots, some brands will felt very quickly and while its a nice strong patch it can be a hard lump in your sock. For very large holes in hand-knitted socks, there are tutes about knitting in patches. I try not to let mine get to that stage but I’d love to try it!
Thanks Diane, that’s a great tip. I’ve picked up quite a lot of vintage mending yarn at the Sewing Basket. My favourite to use is hosiery darning yarn from the 1930s – it’s so smooth! But I just wanted to write this so it was accessible to folks trying it for the first time. One note too – I find the Appleton fine tapestry wools a joy to work with – have you tried those? Not the thick one like I’ve used here. Also, google a technique called Scotch darning – it’s my current favourite. :) Let me know if you’re interested and I’ll take a photo of the instructions in my vintage needlework book for you.
Isn’t it lovely! Yes, I keep a stash of Persian and Appleton when I find them; (as well as other tapestry wools) – one of my quirks is “rescuing” abandoned needlework in opshops and some need completing and others which look completed have missing stitches when you check. They make lovely tote bags & some are pincushions stuffed with soaped steelwool in an effort to ward off rust. Sorry, off track as usual. I don’t think I know Scotch but I’m sure I can look it up. I find the best bang-for-buck is to keep an eye on my Holeproof Explorers I wear much of the time, which tend to go at the heel and toe seams, and reinforce the seams when they start drifting apart.
I have wanted to learn to darn but it seemed too darned hard (ha ha). So last year I knitted a big patch to sew across a bit hole in an old jumper and just sewed up the other holes in the jumper with wool. But I would love to try this. The only problem is that often my socks are so thin once they have a hole that I worry if I darned the hole there would be another one sdevelop quickly/
My mum, bless her soul, had a large seed for sock darning. It looks like an avocado seed and it is now safely in my sewing box 😊. Heaven knows how old it would be!
A seed!!! That’s fabulous!!
My gosh this is brilliant. I was trying to explain to my niece toady about important life skills and how being able to repair something was golden.
Celia thank you so much for all the trouble you have gone to with this. I still have my dear Mums darning mushroom so I am half way there. This is so timely as I sorted all of our socks last night and of course found a couple needing darning. Your videos will be my go to for tackling the task. I knew the basics but not the intricacies. And as you say we can wear our repairs with pride. Fabulous! Best wishes, Pauline
I use sock wool as it’s the right weight and has a bit of nylon in it, which means it should last a bit longer. Also, I use the multi-coloured self patterning version as I don’t have to choose a colour. Must admit I darn a lot of holes in sweaters but only bother to darn hand knitted socks.
Excellent advice Celia. I tend to go through socks with my big toes – very annoying.
I agree with Dan about improving your skills during lockdown. Very annoying. Although I am getting much better at solving crosswords 😉
Thank you. This was very thorough and understandable!
I finally learned how to darn socks last year, and have fixed several holes so far. I just used an old plastic easter egg that was in my son’s toy box.