I wrote this bagel tutorial for friends in 2008, a year before we started FJALC. These days we bake a sourdough version as well, but the yeasted ones still make regular weekend appearances. PS. If you do make these, try to use scales rather than cup measures – you’ll get a much better result!
. . . . .
About a year ago, I put together a tutorial for some friends on making bagels at home. I thought it might be nice to upload it here, before it disappears into the ether. It’s really a fun process, if somewhat laborious , and the finished bagels are definitely worth it! Lots of photos to follow, as I think it can be hard to visualise the process otherwise.
The original recipe is based on one from the New York Cookbook by Molly O’Neill, although it’s been tweaked to reduce the amount of salt, and to include malt extract instead of brown sugar. Note that this recipe is for yeasted bagels; if you’d prefer to make a sourdough version, the recipe is here.
Disclaimer: I am neither Jewish nor American, so have never had an “authentic” bagel. Having said that, friends who are native NYers have told me that these bagels make them happy!
Ingredients :
- 4 cups (600g) bread or bakers flour
- 1½ tsps (10g) fine sea salt
- 1 sachet dry yeast (mine had 8g in it)
- 3 tsps (25g) malt extract (original recipe called for 3 tsps brown sugar)
- 1½ cups (375ml) filtered water
1. In one mixing bowl, whisk together flour and salt. In another, whisk together water, yeast and malt extract.

2. Mix flour mix into water/yeast mix. Mix together initially with a wooden spoon or spatula, and then get your clean hand right in to mix it all together. Squish the mix in your fingers to make sure it’s all evenly combined.

3. Spray a little oil on the bench, and turn the dough out, scraping out any stuck bits. Knead the dough for 5 minutes or so.

4. Oil the mixing bowl you had the dough in, shape the dough into a ball, and put it back in the bowl to rise. Cover and leave it for about an hour, or until doubled in size.


5. Tip the risen dough out onto the re-oiled bench, and punch it down. Divide into 10 equal pieces (about 100g each), and shape into balls. Then stick your finger in the middle of the ball, and twirl the dough around your index fingers.

6. Shape the dough more by squeezing the “tyre” in the palms of your hands. You want to make the hole big.

7. Place “tyres” onto baking paper on the bench, dust with a little flour, cover with a clean tea towel, and allow to rise for 30 minutes. Halfway through, put the kettle on to get the hot water ready. Also, preheat oven to 400F (200C) fan-forced.


8. Fill a wide shallow pan with boiling water, with 1 Tbsp salt and 1 Tbsp malt syrup added. Bring to a rolling boil, and add bagels gently – don’t overcrowd. Boil or kettle the bagels for 1½ minutes on each side, turning them with a plastic slide, then fish them out and drain them on a rack covered with a clean teatowel.

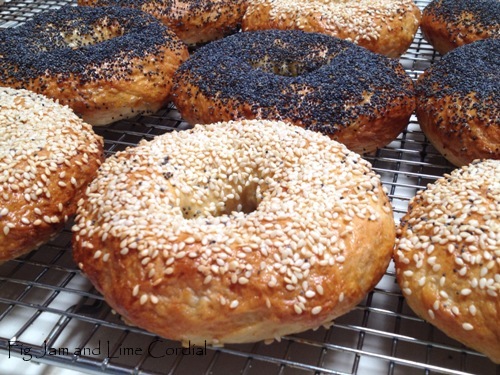
9. Gently dry the bagels with a clean, lint-free towel (I use a cotton/linen napkin). Place onto baking tray lined with Bake, and brush with eggwash (1 egg beaten with 1 Tbsp water), then sprinkle on toppings.


10. Bake in oven for 12 minutes, then rotate the tray to brown evenly. Bake for a total of about 20 minutes or until golden brown.


© copyright 2009 by Fig Jam and Lime Cordial. All rights reserved.

I must make bagels again one day, I always get in a bit of a mess but maybe I will try your way and see if I have learnt to be tidier over the years… xxxx
Hey, I recognise the kitchen now :)
Your bagels look seriously perfect. Dense, chewy and deliciously golden on the outside! I’m glad you reposted this as I missed it completely. I’m going to give it a go, thanks Celia! xx
homemade bagels sound great!
Your bagels look perfect…it has been a while since I last made some! Happy Easter!
Your bagels look great!
When I first came to Darwin, Australia 30 years ago there was not a bagel to be seen. So I made them a couple of times. Now that I can’t eat wheat any longer, bagels are readily available! That’s Life! Good demonstration/explanation post!
I haven’t had a decent bagel in years. Maybe it’s time to make my own. :)
I am going to have to try this soon!! I am from the Northeast of the US and I miss bagels so much. I haven’t found anyone in Perth who makes them like I like them! They are always too bread like and have no chewiness to them. Thank you!
They look like works of art to me! I can’t wait to try this recipe!
This is really impressive. I’ve certainly never thought of making bagels! I don’t really even eat bagels all that often – mostly because good ones are hard to source. These do look very inviting xx
Wonderful tutorial, I’ve always wanted to try making bagels from scratch, the right way! This is perfectly authentic:)
I had no idea!! Wow– I really would love a taste. Thanks for sharing!!