
Warning: an über-geeky bread post follows!
. . . . .
The other day, I caught Pete spraying one of my hot ciabatta loaves with water. When I asked him what he was doing, he replied “the crust hurts the roof of my mouth, so I’m spraying it to soften it before I eat it”.
Clearly, it was time to change my approach. As with all things in life, my bread making is constantly evolving to meet the needs and tastes of our family. For the past few years, we’ve mostly eaten heavily crusted, chewy loaves, but these can be hard on the teeth and palate – it was time to add alternatives to our repertoire.
The first thing I tried to do was to increase the water content in my sourdoughs. This is known as the hydration of the dough, and it refers (as a percentage) to the amount of water used compared to the quantity of flour. For example, if there is a kilo of flour and 700g of water in a recipe, then the hydration of the dough is 70%.
My standard formulas are between 65% (rolls and baguettes) and 77% (ciabatta). As I usually use a mix of bakers/bread flour and remilled semolina flour (semola rimacinata), these numbers tend to be a little higher than doughs made with just bakers flour, as the semolina flour absorbs more water.
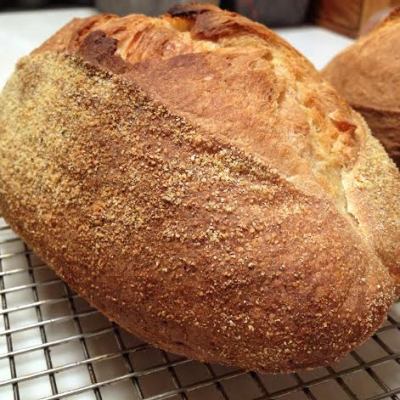
My first attempt at an 82% loaf produced a great result, but still with a thick, hard crust…
I felt that the dough could take even more water, so I upped the hydration to 90%. I also tried baking the bread in a covered pot – which involved preheating one of my Emile Henrys to blazing hot, then dropping the risen dough into it. This worked brilliantly – the steam released from the high hydration dough was captured in the pot, and kept the crust from hardening up before it had risen to its full potential. The finished crust was crispy yet thin, and the crumb was tender and elastic.
However, it was all a bit intimidating – manoeuvring the flaming hot, heavy pot out of the oven, then trying to get the dough in without burning myself on the high sides of the base. In addition, I was a bit concerned about heating my empty clay pots to such high temperatures on a regular basis.
After bouncing ideas off my friends Joanna and Carl on Twitter, I invested in a couple of enamel roasters from Falcon. These oval pots are lightweight, oven safe to 270C, and fairly reasonably priced – the 30cm one below was just $32 at Peters of Kensington. They also have low sides and a high domed lid, and fit the doughs shaped in my oval bannetons perfectly.
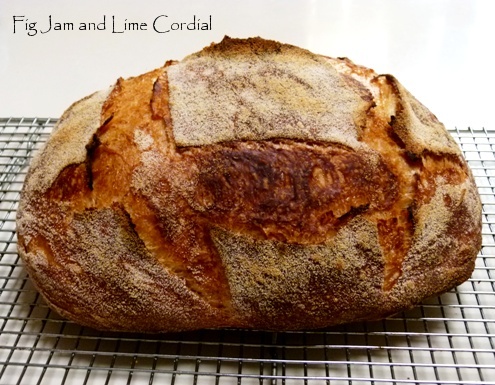
The first 90% loaf I baked in it was a glorious success…

The pot was preheated to the maximum oven temperature, then the dough was plonked in, slashed, covered and put back in the oven. I reduced the temperature to 220C with fan and baked it for 20 minutes covered, 20 minutes uncovered, then a further 10 minutes at 175C with fan…

See how thin the crust is? The crumb was surprisingly closed for such a wet dough, which of course made me think that I could add even more water…

I also attempted some 90% hydration ciabatta loaves – the wet dough handling and shaping took a bit of getting used to, but ample dusting with fine semolina made it all much easier…

The extra water gave the ciabattas a thinner crust and a very moist, slightly rubbery crumb (which is a good thing, despite how it sounds)…

I’d bought both the small and large roasters, and found the larger one perfect for baking two small round loaves in – those below were dipped in sesame seeds prior to baking.
A note on the pots – I can just fit a large and a small one side by side in my 90cm freestanding oven, but most ovens could only take one at a time. The 36cm is huge, and if you’re only baking one loaf at a time, the 30cm one is a great size.

So…could I make a 100% hydration loaf? My friend Kevin the miller insisted it was possible, and now that I knew the pot baking worked, I figured it was worth a try. I was a bit worried though when the dough I mixed at 6am looked like a thick soup…

Over the course of the day, I gave the dough a couple of folds whenever I walked through the kitchen, and was astonished to watch it develop tension and body. At 3pm, I turned it onto the bench, folded it onto itself a few times, and let it rest.
After half an hour’s bench rest, I dusted and gently shaped it into a large flat rectangle – that was all the shaping the dough would allow. It proved in this form for a further 40 minutes…

I slashed optimistically and then scooped the dough into my large preheated roaster…

And this was how it came out of the oven! I was so pleased…
The crust was crispy and thin, with a tender yet elastic crumb…

The extra water content increased the keeping time of the loaf – it was still fresh and tender two days later…

Here’s the basic formula:
- 300g active sourdough starter (fed at a ratio of 1 cup water to 1 cup flour)
- 500g bakers/bread flour
- 500g remilled semolina flour (semola rimacinata di grano duro)
- 20g fine sea salt
- water: 820g (90% hydration loaf) or 930g (100% hydration loaf)
Place the covered pot in the oven as it preheats to 240C with fan, then carefully take it out of the oven and remove the lid. Gently (don’t burn yourself!) put the shaped and slashed dough into the base and replace the lid, then return the pot to the oven, dropping the temperature to 220C with fan immediately. Bake for 20 minutes with the lid on, 20 minutes with the lid off, and then an additional 10 minutes at 175C with fan (if needed).
. . . . .
Are you still with me? I did warn you that this was a very geeky bread post!
I’ll still be baking loaves the “old” way as well, but it’s nice to add something different to our bread line-up. I’ve wanted to do more pot baking in the past, but have always found taking heavy, blazing pots from the oven a bit intimidating. The enamel roasters really do overcome that issue.
Do you bake your bread in a pot? My friend Emilie does, and she puts hers into the oven cold! Have a look at her amazing loaves here.
. . . . .
More geeky bread experiments here!

I so WANT Bread Now – YUM :)
Renee, you’re too far away, or I’d share! :)
Amazing looking bread!
Thanks Mo! Has your starter arrived? :)
Wow, it’s amazing how you can get such variety Celia! I’m so glad you found a workable solution, especially one that didn’t break the bank :) I’d so love a huge chunk of that warm loaf- I don’t feel any pangs when I walk past a bakery and smell the deliciousness, but your close up shots are enough to make me risk the wrath of the gluten! Xox
Becca, the roasters are so lovely – I bet they’d roast meat beautifully as well! I’m sorry to torture you with bread pics, darling xxx
Your breads look fabulous. The ciabatta recipe by Carol Field is super wet- I am not sure of the ratio- but it makes a lovely holey product. I wish I could get onto sourdough- it is on my to do list after my trip to china and I will be following your bread tutorials closely. F
Francesca, I still haven’t bought that book, but your comments make me very tempted! I’ve heard from others that it’s fantastic too!
Your bread posts are so inspiring – I just love reading them. I used to make my bread in a dutch oven, heated before the dough was flopped in and did manage to burn myself several times. I mix my dough in a stainless steel bowl before it is put into a food safe plastic container where I fold and leave to bulk ferment. I shape and second rise in the fridge overnight. The next morning I tip the dough out of the banneton onto a tray which is placed in the preheated oven with the stainless steel bowl inverted over the top. I bake for 30 mins then remove the stainless steel bowl and leave for a further 15-20 minutes. This way still makes fabulous bread and so much safer and easier for me.
Carol, I’m so glad that works for you – I think when we bake bread, we have to find something that can work for us, and maneouvring hot heavy pots just wasn’t an option for me. Even the clay pots, which are 30% lighter than the cast iron ones I used to use, made me a bit scared (I’m such a chicken, but I KNOW what a klutz I am!). I tried using a mixing bowl, but didn’t have a good result – I suspect because I tried inverting the bowl over my pizza stones, and the steam escaped from under the rim. A tray would work much better, I think!
I really love how you experiment, Celia! Such a clever cook!!!
Hello darling, have to do something with the 4am waking! It’s been a blast playing around too! :D
I look at this bread and read your words and all I can think of is warm bread, slathered with butter and when I take the first bite there’s a dribble of melted butter slowly making its way down my chin and onto my shirt.
:)
Darn it, woman, move to Sydney! I’d deliver, I tell you! :D
this was a really interesting read – I have done that jim lahey overnight bread in a pot but never sourdough – but I am interested because I have lately been doing the Dan Lepard method which is great but Sylvia doesn’t like the thick crusts so they idea of softer crusts is something I need to think about – can’t stand discarded crusts and she has never been in the habit of it so I would like to nip it in the bud
Johanna, I had a very interesting discussion with my friend Jo recently on this – for a while now, the heavy, well-set crust has been in vogue, but it’s really not for everyone, especially the young and old, and those with dental problems. It’s really been nice to find some options!
Hi Celia – your experiments/posts are always interesting. Have you ever tried doing this for gluten free bread? I haven’t done much baking as I’m off carbs and my partner is gluten free and gluten free baking is quite tricky :-)
Sue, I tried Dan Lepard’s gluten free bread once with some success, but there are now quite a few really good gf options. There is also an amazing seeded gf bread doing the blog rounds at the moment – here’s Josey Baker’s version of it:
http://www.davidlebovitz.com/2014/05/josey-bakers-gluten-free-recipe-adventure-bread/
Hi Celia: If you butter your loaves as they come out of the oven, it will keep the crust soft.
Have a Joyful Day :~D
Charlie
Thanks Charlie, that’s a good tip to keep in mind! :)
Would loved to have known how to do this when I was still able to eat bread and was baking my own. Wonderful to read about, geeky or not! They look picture perfect.
Ardys, you’re so kind to read and comment even when you don’t eat bread! Thank you! xx
Love your geeky post, how many days did all these experiments cover? Glad you were successful.
Norma, I’ve taken to waking up at 4am (dreaded peri-menopause hours, I suspect) and so I figured that since I was keeping bakers’ hours, I might as well bake. :) I played around for over a week on the experiments in this post and the next one. My neighbour has a broken foot as well, so he was a willing eater of all our surplus loaves! :)
Great post, Celia, although I had a good laugh imagining your beloved spraying the bread with water… :-)
I have two enamel roasting pans, very very cheap indeed, and they work great for bread baking, yours is much more beautiful, though.
I ve been using my Le Creuset to bake loaves of simple bread (not sourdough or rustic shapes) – and it’s amazing how much better it works, I guess any bread benefits from a little extra steam during the initial stages of baking
As usual, you compose bread posts like a professional baker!
Sally, are you using that magnificent tomato shaped pot to bake your bread? I actually suspect the cast iron works the best of all – it’s like placing dough into a properly hot oven – but it was just too hard on my hands and my nerves! Best your loaves are coming out amazing! :)
I’m with Pete, I have to saturate the sourdough crusts… and find they are best nibbled with an accompanying glass of white… after wine o’clock.
I need to bake you some bread! :)
I’m still baking my own but haven’t ventured yet with your Priscilla starter. It’s the café-bought stuff that’s hard on the roof of the mouth. You should bake for them.
That crust looks absolutely fantastic! Thanks for the detailed step-by-step too.
Most welcome! More in the next post as well!
Celia!!!!!!!!! These loaves are STUNNING! Those slashes… I’m still staring at them. Just beautiful. I am so glad that you gave this method a try. I must say, it is very consistent and an excellent way to control your bloom. I used to have difficulty getting the dough in and out of the hot pot as well, and after burning my forearms one too many times I ditched preheating altogether. It made absolutely no difference to my bread at all. I’ve baked hundreds of loaves in a cold pot and it comes out beautifully browned every time. I also (generously) coat the bottom with cornmeal so that it doesn’t stick. Baking cold not only saves on time and electricity, but when it’s sweltering hot, every minute counts in those summer months! PS- if you want a slightly thicker crust, try baking with the lid on for only 10 minutes (vs. 20). I’ve done that a couple of times depending on what I was making- just play around. And thanks for the shout out too! You’re so sweet!! xoxoxox
Emilie, I tried your methods in the next post, and they all worked brilliantly! The only differences really were in the crust, I was still getting lots of rise and oven spring! I think because we’re trying to achieve a thin crispy crust that preheating the pots does make a difference, but I’ll definitely be using the cold pot, cold oven technique come the middle of winter when it can get to 40C in my kitchen! Thanks for all the inspiration! :)
Hi Celia, great post. I use a cast iron pot which is a bit heavy but makes great bread. I put two sheets of baking paper down (cross ways) and pick up the bread with the paper and plonk it in. It is so much easier. Also, Jim Lahey, the no knead bloke, uses the base of his Romertopf. He heats it up when he is heating his oven. He puts the bread on his tile and then covers it with the Romertopf base. I am yet to try it but intend to.
Glenda, you inspired me to revisit the Romertopf in my next post! Thank you!
Love your bread work Celia! I have recently been working getting my ‘standard’ loaf to be softer with a more open crumb so this is really interesting. I have not cooked bread in a pot before but I really like the look of those enamel dishes. The fact that enamel is so light makes it so much safer to handle. Happy baking x
Jane, I *think* the hydration of the dough is equally as important as baking it in the pot, because there needs to be enough water in the dough to create steam. In the past I’ve tried with lower hydration doughs (60%) and not noticed much difference, but I think 70-75% doughs should work.
There’s always a lot of experimenting going on in your kitchen. How funny to see Pete spraying his bread before eating it! Good on you for developing a loaf that’s softer on the palate xx
Charlie, he was really cute. He looked quite guilty when I caught him at it. :)
I know how Pete feels, I experience that, too sometimes! You’re a problem solver – kudos! And thanks for the technique, appreciate your sharing it!
Julie
Gourmet Getaways
Julie, it’s always so much fun to experiment! Pete will appreciate the empathy – I gave him a hard time about it! :D
Hubby and I also prefer a thinner crusted sourdough. He’s more bothered by the palate thing than I. Great tips on getting it thinner-it looks noticeably different! :D
Lorraine, it was really great – almost paper thin in parts!
I am so pleased you found a pot that works for this project! The breads look stunning! I am always a bit stressed by ultra soft doughs and their alarming tendency to run off the worktop (bench). I was wondering if you have looked at Tartine 3 yet? He also incorporates extra water in his doughs by virtue of fermented and cooked off soakers, which he refers to as porridge breads. I have tried a couple of them and they have a similar crumb, very moist and elastic. He uses what seems like a lot of processes to get where you get so elegantly and simply. I think he could take some tips from you :)
You are very kind, I’m a huge Chad Robertson fan, and was inspired to try pot baking mainly because of his first book on bread. I have Tartine 3 as well – must get into it soon. Porridge breads do sound intriguing! :)
Beautiful loaves of bread. Whenever I make rye bread the loaves tend to have a thick crust. I usually cover the loaves with a damp/wet dish towel as soon as they come out of the oven, leaving it on until the loaves are cool.
Manuela, that’s a great tip, thank you!
This is interesting Celia, thanks for getting all the bits and pieces together. I know Mum would like a thinner crust on the sourdough so this is quite appealing to me. I’m printing out the post right now so I can refer back to it.
Rose, I’ve tried baking in my Romertopf baker (as opposed to the loaf tins) and it produces a lovely soft sandwich style loaf. Details in the next post! :)
Lovely post Celia I been told if you put melted butter over the loaf when it comes out the oven it gives you a soft crust and not a hard one tried it on one of my lasts loafs and one was crusty and one was soft
Thanks for the tip Linda, I’ll bet the brushed butter crust tastes amazing as well!
sure does I got some dough proving at the moment
Loved this post Celia! It’s incredible what you can do. I sometimes use a dutch oven type dish (covered) and I find that a good gloop of olive oil into the mix gives me a softer crust too.
Chica, our very first breads had olive oil in them, and they were delicious – must think about adding it to our current formula, thank you!
I did a similar way of baking in the dutch oven as yours but on 230 degrees with 20 mins lid on then 20 mins lid off. It gave me a nice crust that my 2 & 5 yo kids can chew on it. I love this way as it made no mess from spray and easy to remember lid on/off. Lucky I came across your SD tutorial as I was about to give up my SD making, I have never looked back since last 18 months so thank you for your passion. I’ve tried pumpkin, beetroot, kale and spinach SD, it gave a lovely taste and colourful bread.
Yvonne, that’s fantastic to know, thank you! Glad your sourdough journey has been so rewarding!
I’m with Pete on this one 😊 Good reponse by you & tips from others.
Hehehe…I’ll let him know! :)
Hi Celia, I’m thinking you could open a little bakery :) You know I love sourdough but there are occasions when they can be just a tad hard on the crust. I remember my parents having it for the first time at my place and they struggled a little, mum was worried she would break her teeth! Plus I hard to explain the sour taste was normal :) x
Stefanie, my folks are the same – they’re used to white fluffy bread, so heavy crusted sourdough is too much like hard work for them. Thankfully they really like my faux brioche loaves! :D x
Celia, when I have my family over for NYE my parents bring their own bread from their local Vietnamese Dulwich Hill bakery :) I confess as much as I like all the fancy loaves I still like that kind of bread also x
Just spent a lovely bit of time reading some of your previous posts.So informative, practical and all displaying a real affection and passion for what you do. Can never get too many tips and I’m dying to try some of your bread baking hints. Cheers, Maree
Maree, thanks for your kind words! So glad you’re enjoying the older posts! :)
This is such an interesting post Celia and it’s such a lovely reason for your experimenting. I quite like handling the higher hydration doughs – which mine most often seem to be – so I’m keen to give your recipe a go. I love the feel of the dough and find it so interesting that the sloppy Joe dough becomes quite polite and nice given a little time and gentle handling. Patsy is the most wonderfully obliging creature. I tried to send you a photo of her at Easter almost leaping out of the bowl after digesting an overnight feed but I’ve had iPad and computer problems – technology can be the dumbest thing sometimes!
Jan, I think your doughs would work really well baked in a pot – the pot itself seems to help the loaves keep their shape and control how they rise. Hooray for Princess Patsy too! :)
Crusty or not, this is one beautiful bread!!!
Thanks Mimi! :)
So, so beautiful – send a batch my way ;)
Too far, you’ll have to bake your own! :) How’s your starter going, btw? :)
Don’t ask… You’d cry…
They look like wonderful loaves. I had no idea what % hydration I was working at and this post has helped. I bake in loaf tins (The Management likes the shape *sigh*) and manage a chewy crust that suits us but I couldn’t explain how. You are a baking genius :)
Kim, you are very kind, but hardly a genius. If anything, just a bit persistent when I have an idea in my head.. :)
Very geeky! I keep playing around with my recipe, but I’m waaay behind you with experimentation, so shall just follow in your footsteps a few paces back.
My mother used to roast our Sunday joint in an oval roaster exactly like yours – except our was well seasoned with decades of encrusted roasts. I can almost see her pulling it out of the oven now. What memories. I’d forgotten all about that.
Anne, the roasters are so very beautiful! I did worry about chipping the enamel, but the Falcon website reassures me that it’s completely safe if it chips, and that it will in fact develop “character” by doing so. I think that’s very clever on their part.. ;-)
What an exciting post! Stevie-boy has a tender mouth and hard crust bread tends to be avoided. This offers me the chance to muck around in the kitchen with starters (my favourite thing :) ) AND produce something that is going to be eaten (always good). Cheers for this Celia, I am hyperventilating with joy :)
Fran, thank you for being so excited along with me, makes me feel less of a nutter when I write posts like this! :D
I LOVE your bread posts and the experimentation is the bomb. I loved Joanna’s (Zeb Bakes) experiments with bread and think that we can only do great things and produce amazing results if we share the love and the knowledge around. I bow to your bread knowledge and love reading about it every time you post about bread :)
Geeky is good and gives me something to experiment with. I’ve been baking from a cold oven too, a la Linda. Makes workday baking easy and I can’t notice the difference (not that my bread is great but it’s no worse!)
Jo, I tried the cold oven baking in my next post, and it worked really well! Thanks for the reminder, I hadn’t done it for quite a while!
Great to read all this together Celia – lovely loaves. As well as enjoying that thin crisp crust and tender crumb I’m sure they kept really well, if called on to do so!
Craig, the keeping time of the 100% loaf surprised me, it was fine to eat untoasted for three days. As always, dear man, your advice and patience with all my questions was invaluable, thank you! :)
Celia, one’s got to be impressed with your passionate pursuit of the perfect crust. Monsieur Poilãne, in bread heaven, and his legendary boulangerie in Paris, would be so pleased and proud of you ;-) Thanks so much for sharing with your exquisitely detailed instructions and gorgeous photos. I just love your posts … all of them. Have you considered having a book published – your journal combined with tried and tested recipes from your kitchen? It would surely be a best seller!
Charmaine, that’s high praise, thank you very much! :)
Ok, Celia this post hurt my head a bit as percentages STILL do my poor head in. I thought I did 100% hydration, but now I’m completely confused. The spraying with water and a thin crust I definitely do though, otherwise my Monkeys will be leaving crusts left right and centre. As another dear blogger put it once, you shouldn’t have to work so hard for your bread :-) (and he was referring to Bourke Street breads…errr, not mine)
Brydie, I just had a look at your everyday sourdough bread recipe.
Your starter is at 100%, which means you feed it with equal amounts by weight of flour and water. So here’s the maths.. :)
Your 400g of starter has 200g of flour and 200g of water in it.
You add 750g flour, to give a total of 950g flour.
You add 500g water, to give a total of 700g water.
So you have 700g water to 950g flour – 700/950 x 100 = approx 73.68%
Your dough therefore has a hydration of about 74%.
Hope this makes sense! :) xxx
Your breads look just stunning, so professional like,..really appetizing! xxxx
Sophie, thank you darling! xxx
😃😃 👻
I’ve made a lot of bread in my lifetime- but I’m fairly new to using only sourdough for leavening. My sourdough skills are really coming along thanks to you- I like the extra hydration- so I’m going to follow you down this road, as well. Whenever I go back to yeasted breads it always seems like it is too easy- and not quite flavorful enough.
So thank you for the geeky bread post. I NEED geeky posts that are full of !instructions and tips!
Heidi, I’m so glad you found it useful! Pot baking is so much fun, and I think you’d end up with a loaf that Frank would probably love, as the crust wouldn’t be as heavy! :)
Thanks Celia. I followed you proofing basket link as I have no oval ones and I am not even going to mention how much I paid for my round one!
Gail, I know! Before Chefs’ Warehouse starting bringing them in, each basket was like $70-$80 dollars! But I’m sure you’ve had good use from your round one! :)
I’m so addicted to sourdough bread making too, love the geeky bread post! Interesting to see how the high hydration loaves came out, I might have to give that a go soon!
Have fun with them! :)
Bread geeks unite. Love this post – I learned so much from it. Just want to tear a bit of that crust off now.
I know I always say this, but it would be so nice if you lived closer and I could share.. :)
I can’t say I have ever seen bread that awesome.
[…] post of hers I read, makes me feel like I want to jump up and give it a shot. Well Celia, from Fig Jam and Lime Cordial, I have jumped up and given this a crack! With only having my ‘toy oven’ to use for […]
Hi Celia I use a Le Creuset to bake my sourdough but put the dough in a cold pot, slash it, then into a cold oven. Turn the oven on to 240 then count how many minutes it takes to come to temperature, subtract that from 1 hour and cook it for that long, Since my oven takes 8 minutes to get to 240 from cold I bake between 48 and 52 minutes. This method is from Clotilde Dusoulier at Chocolate and Zucchini. Works a treat!
[…] I’ve also been playing around with my new baking vessel; enamel roasters. After hearing about my friend Celia’s success, my mom got me a set for my birthday. These roasters are much lighter than a Dutch oven, yet […]