I wrote this bagel tutorial for friends in 2008, a year before we started FJALC. These days we bake a sourdough version as well, but the yeasted ones still make regular weekend appearances. PS. If you do make these, try to use scales rather than cup measures – you’ll get a much better result!
. . . . .
About a year ago, I put together a tutorial for some friends on making bagels at home. I thought it might be nice to upload it here, before it disappears into the ether. It’s really a fun process, if somewhat laborious , and the finished bagels are definitely worth it! Lots of photos to follow, as I think it can be hard to visualise the process otherwise.
The original recipe is based on one from the New York Cookbook by Molly O’Neill, although it’s been tweaked to reduce the amount of salt, and to include malt extract instead of brown sugar. Note that this recipe is for yeasted bagels; if you’d prefer to make a sourdough version, the recipe is here.
Disclaimer: I am neither Jewish nor American, so have never had an “authentic” bagel. Having said that, friends who are native NYers have told me that these bagels make them happy!
Ingredients :
- 4 cups (600g) bread or bakers flour
- 1½ tsps (10g) fine sea salt
- 1 sachet dry yeast (mine had 8g in it)
- 3 tsps (25g) malt extract (original recipe called for 3 tsps brown sugar)
- 1½ cups (375ml) filtered water
1. In one mixing bowl, whisk together flour and salt. In another, whisk together water, yeast and malt extract.

2. Mix flour mix into water/yeast mix. Mix together initially with a wooden spoon or spatula, and then get your clean hand right in to mix it all together. Squish the mix in your fingers to make sure it’s all evenly combined.

3. Spray a little oil on the bench, and turn the dough out, scraping out any stuck bits. Knead the dough for 5 minutes or so.

4. Oil the mixing bowl you had the dough in, shape the dough into a ball, and put it back in the bowl to rise. Cover and leave it for about an hour, or until doubled in size.


5. Tip the risen dough out onto the re-oiled bench, and punch it down. Divide into 10 equal pieces (about 100g each), and shape into balls. Then stick your finger in the middle of the ball, and twirl the dough around your index fingers.

6. Shape the dough more by squeezing the “tyre” in the palms of your hands. You want to make the hole big.

7. Place “tyres” onto baking paper on the bench, dust with a little flour, cover with a clean tea towel, and allow to rise for 30 minutes. Halfway through, put the kettle on to get the hot water ready. Also, preheat oven to 400F (200C) fan-forced.


8. Fill a wide shallow pan with boiling water, with 1 Tbsp salt and 1 Tbsp malt syrup added. Bring to a rolling boil, and add bagels gently – don’t overcrowd. Boil or kettle the bagels for 1½ minutes on each side, turning them with a plastic slide, then fish them out and drain them on a rack covered with a clean teatowel.

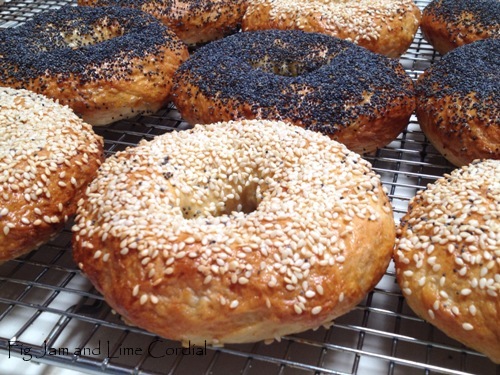
9. Gently dry the bagels with a clean, lint-free towel (I use a cotton/linen napkin). Place onto baking tray lined with Bake, and brush with eggwash (1 egg beaten with 1 Tbsp water), then sprinkle on toppings.


10. Bake in oven for 12 minutes, then rotate the tray to brown evenly. Bake for a total of about 20 minutes or until golden brown.


© copyright 2009 by Fig Jam and Lime Cordial. All rights reserved.

Thanks for the great instructions. I tried making sourdough bagels a few weeks ago. I must say it was a spectacular failure. They looked like dried apples!! It all went wrong when I was trying to boil them and I had a pretty wet dough.
Your instructions with the pictures look to be simple enough so I will give the bagels another go.
thanks again
Nice blog you have started so don’t be discouraged by lack of responses. Keep up the good content.
cheers…
Thanks for the encouragement, Johnny! I should have mentioned that the dough is very stiff – will edit accordingly. Good luck with these bagels. Sourdough bagels are wonderful, but they’re a lot more work. (Just don’t let the guys on the Sourdough Forum hear me saying that.. :))
Cheers, Celia
You must have read my mind. We are off to Cananda and New York at the end of the year and the only thing my son wants to experience there is the bagels. We often tell him how good the bagels in Canada are. Anyway, he asked me the other day if we could try and make some. I think I shall try and make some on the weekend.
Yummmmmy,
Just tried one of the Bagels I made today following your instructions. This time I had a much stiffer dough. I am very happy with the results. I only did half the amount suggested because this was my first try after the last disaster (the dried apple look) still being talked about by my family. But now I have made a Bagel to be proud of. I used some Barley Malt and added a bit of light rye into the mix. They taste delicious and have a very nice texture. Thanks again for the tutorial Celia..:-)
Johnny, you’re a star! They look fantastic! Thank you so much for letting me know – I’m delighted they worked out well for you!
I just made the bagels. They are great, although I don’t think I dried them enough before I baked them. I was a bit impatient. The kids are a bit worried too as they don’t think the holes are big enough. Shall have to work on that.
Thanks for letting me know, Christina! The holes do close up, so you have to really give them a good tug when you make them – funny how kids get caught up on things like that though.. :)
These look fab, I’ll have to give them a try, my hubby will be tickled pink. He loves bagels with all his heart, and I just don’t buy them that often because, well, because I love them too and they are not so easy on the hips, so to speak! LOL
Hope you enjoy them! :) Cheers, Celia
Oh, Celia, you are a pro!
do you think you could help me adapting a recipe for cinnamon raisin? (beloved’s request…. cannot say no to beloved! :-)
I came across your site tonight as I did a search on Romertopf clay cookers (yanked mine out of storage after about 30 years)…
Anyway, started looking at the BAGELS section and chuckling to myself since there are websites dedicated to where the best bagels in the world are, and MONTREAL, Quebec, CANADA is where they are…(NY bagels are like large pieces of bread shaped like a bagel)…They say it is our water….and I wish I could send you some (who knows, maybe I can…:-) )….but they are amazing and delicious and whenever anyone visits and tastes them, they have to return to Montreal or grab someone they know from their town who might be visiting and just BEG them to tote some Montreal bagels back…
I do wish you could try them……I always wondered what I would do if I moved away….My boyfriend lives in NY..was born there and has always lived there…and even he has to admit…there is nothing like the Montreal bagel…
Hehe…I’ve heard this before – apparently Montreal bagels have egg in them? They sound delicious! I do have a recipe for them somewhere…
Leslie, have you made them? Are they kettled before baking like the NY ones?
Thanks!
Celia
Celia..I never have to make them because they are a 5 minute walk from my house…(amongst other nearby places)…They are boiled if that is what you mean by kettled…and then they are put in on open ovens……(and of course there are eggs….! A true baked good must have an egg…..
(I am going to send you a link so that you can see the ovens that they are made in….Every bagel place does them in front of you and it is really neat…)
Here is a recipe from a well known Montreal Chef/baker..
Montreal Bagels
Adapted from A Treasury of Jewish Holiday Baking, by Marcy Goldman.
Makes 12 bagels
•1 1/2 cups warm water
•5 tablespoons sugar
•3 tablespoons canola oil
•1 package dry yeast
•1 tablespoon beaten egg
•1 tablespoon malt powder or syrup
•* 4 1/2 to 5 cups unbleached white bread flour
•1 teaspoon Kosher salt
•1/2 cup poppy seeds or sesame seeds
•6 quarts water
•1/3 cup honey
1. In a large bowl stir together warm water, sugar, oil, yeast, egg and malt until yeast dissolves. Stir in salt and 1 cup flour. Fold in enough flour to make a soft dough, about 3 cups.
2. Knead dough for 10-12 minutes, incorporating additional flour as needed, until dough is firm and smooth. Cover with inverted bowl and let sit 10 minutes.
3. Divide dough into 12 pieces. Roll into 10-inch ropes. Curve each rope around hand, pressing together ends to make a bagel shape. If necessary, apply drops of water to help ends stay together. Let bagels rise for 30 minutes.
4. Fill a large kettle with 6 quarts water and honey. Bring to a boil. Preheat oven to 425 degrees. Line 2 baking sheets with parchment paper.
5. Boil bagels in honey-sweetened water for 1 1/2 minutes, turning once. Drain on dish towels and place on baking sheets.
6. Generously sprinkle both sides of bagels with seeds.
7. Place bagels in oven and bake until golden, about 20 minutes, turning once.
*Available in homebrew stores, some health food stores, or from King Arthur Flour (800-827-6836).
About the Recipe Author
Marcy Goldman is a professional baker and pastry chef from Montreal. She authored the Julia Child First Book-nominated A Treasury of Jewish Holiday Baking (l998, Doubleday), now in its third printing. Goldman, a regular contributor to the Washington Post, La Times Syndicate, and the Detroit Free Press as well as many other American and Canadian food magazines and newspapers, also hosts the award-winning Baker Boulanger Web site, where more than 900 of her original recipes are available. Her second book, The Coffee Bistro Baking Book, is coming on in 2001. Goldman lives with her three incredible sons, those fabulous baker boys! in Montreal, Canada.
http://www.stviateurbagel.com/content/?id=53
http://www.fairmountbagel.com/eng/index.htm
Ok..Celia…here are the two oldest bagel places in Montreal both well over 50 years in operation…
On both sites you can see the ovens and there is a plethora of information as well….
ENJOY!
Leslie
I so wish I could send some to you…They are truly like no other and in all the articles written about Montreal bagels, they do say it is our water..
Leslie, you’re very kind, but they’d never make it into Australia. We have the strictest quarantine laws in the world, and fresh produce almost never makes it through. Thank you anyway! And I will go check out the sites you’ve linked – it must be really something special for you to feel so passionate about it! :) Thanks again… Celia
LAst but definitely NOT least, I am so very impressed with your website and all the neat things on it…the way it is presented..the recipes…and as well, your links to other wonderful sites.
I have to say that although I am a FOODIE and have a collection of Australian and New Zealand cooking magazines (as well as US, Canadian, French, etc..) like Delicious and Donna Hay, the magazines coming from your part of the world and the websites I have linked onto because of your website, put anything North American to shame!!
I am going to refer all my Foodie friends to these sites…
You are amazing…..
L.
Leslie, thank you! You’ve made my day! :)
I’m glad you’re enjoying the site – it’s a great passion of mine, and it’s very encouraging when people read it!
Celia
Beautiful….you did amazing job making those bagels!
Sandra, thank you!! :)
Lovely tutorial! I make bagels often. If you put 1/4 cup honey or 3T malt syrup into the water bath, you can put the moist bagles directly into a bowl of toppings and they’ll stick: no drying, no egg wash. Keep baking!!!!
Thanks Corrin! :)
Wow! Always wanted to make these…never got proper instructions…Love these…many thanks….How long will they keep?
-Shilpa
Hi Shilpa, hope you have fun with these! We freeze them, and find they defrost and toast up well. Left in a plastic bag on the bench they would probably need toasting the following day. Cheers, Celia