Feeds:
Posts
Comments

Archive for the ‘Recipes’ Category

Remember these gorgeous President plums?  We turned them into plum jam and plum sauce recently.

A couple of weeks ago, we took a jar of each to the markets and gave them to the grower – we thought it might be nice for him to see what we were doing with his produce.  Last week, we passed by his stall again, and saw the last of the season’s plums for sale at $10/box.  When we tried to buy a box, he very kindly insisted on giving us two for $10, which meant we suddenly had 12kg of ripe plums to process!

After sharing with the neighbours, we turned the remainder into…

…twenty jars of plum sauce, half with the addition of star anise.  Essential as Big Boy has taken to eating this with a spoon!

. . . . .

…two litres of “Plumbeena”, using a recipe from Pam Corbin’s wonderful little book, Preserves. It’s a great way to turn any seasonal fruit into cordial:

  • 2kg fruit (I used 1.6kg plums and 400g frozen boysenberries)
  • water
  • granulated (white) sugar

1. Put fruit in a large saucepan.  I cut the plums in half, but left the pips in.  Pam’s rule of thumb is to add:

  • 600ml water to each 1kg hard fruit, blackcurrants or apples
  • 300ml water to each 1kg stone fruit
  • 100ml water to each 1kg soft berries or rhubarb

So for my 1.6kg of plums and 400g of boysenberries, I added 540ml water (yes, I know, I can’t do maths).  Bring the pot to a boil and simmer until the fruit is completely soft and has released all its juices.  Crush the pulp with a potato masher as it boils.

2. Pour boiling water through a clean calico cloth or fine tea towel, then use it to line a sieve and place the whole thing over a large mixing bowl.  Pour the fruit and liquid in and allow it to drip through without pressing.  Leave for several hours or overnight.

3. Measure the strained liquid and pour into a clean pan.  For every litre of juice, add 700g sugar (or to taste).  Heat the mixture gently to dissolve the sugar, then remove from the heat.  Pour into warm, sterilised bottles and seal.  Store in the fridge.   Apparently this will keep for several months, but I’d be surprised if there’s any left by the end of the week!

Click here for a printable version of this recipe

. . . . .

…and finally, a tempting batch of plum liqueur, using this recipe.

This will now sit and brew in my hall cupboard for the next three months.  I’ll let you know how it turns out in June!

Update: Here’s how the plum brandy turned out!

Read Full Post »


Pete bought me Alice Medrich’s Bittersweet recently, and I’m thoroughly enjoying it.  I love reading the words of someone so enthralled in her art, and so specific about her recipes.

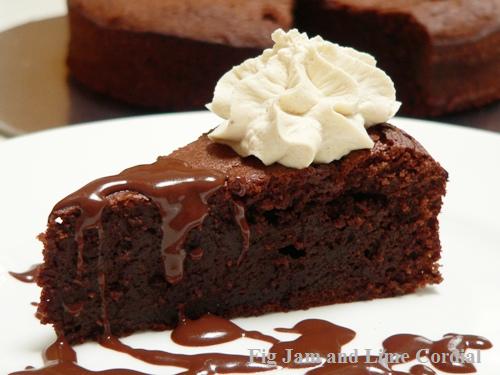
Last weekend, I christened the cookbook by trying out three of her recipes.  You can see them all in the photo above – the Queen of Sheba torte, topped with Cocoa Bean Cream and Alice’s Chocolate Sauce.  The thing to note about all these recipes is that they are, as inferred by the book title,  dark dark dark.  The cake is made with 70% cacao bittersweet chocolate, the sauce with 75% Tanzanie origin chocolate, and the cream is infused with bitter cacao nibs and sweetened with just a whisper of sugar.  It was almost too dark for Big Boy, but Pete loved the combination.  I do think the chocolate sauce was probably overkill, but hey, I was on a roll.

. . . . .

Cocoa Bean Whipped Cream

  • 1 cup (250ml) heavy cream
  • 2 tablespoons cacao nibs
  • sugar to taste

Bring the cream and nibs to boil in a small saucepan, remove from heat and cover.  Allow to infuse for 20 minutes.  Strain the cream into a bowl, pushing down on the nibs to extract all the flavour.  Chill the strained cream until cold (at least 6 hours) – if it’s not cold enough, it won’t whip up.  When ready to use, whip the cream, adding sugar to taste.

This is seriously good, a subtle black chocolate flavour with just enough sugar to take the edge off the bitterness.  Slightly reminiscent of coffee cream, but much nicer.  We made this first, and then had to find a cake to go with it – or risk eating it all with a spoon!

A note to Sydneysiders – you can buy Callebaut cacao nibs at Chef’s Warehouse in Surry Hills.  They’re a fun ingredient to play around with.

. . . . .

Queen of Sheba Torte

I asked Pete to choose a cake to try, and this is the one he picked.  It’s very dark, and I personally found the brandy a little overpowering, but Pete loved it, particularly with the cocoa bean cream.  I’ve included metric conversions –  it’s so much easier to work with a set of scales!

  • 6oz (170g) dark chocolate (66% – 70% cacao), coarsely chopped
  • 10 tablespoons (155g) unsalted butter, cut into pieces
  • 3 tablespoons (45ml) brandy
  • ¹⁄8 teaspoon fine sea salt
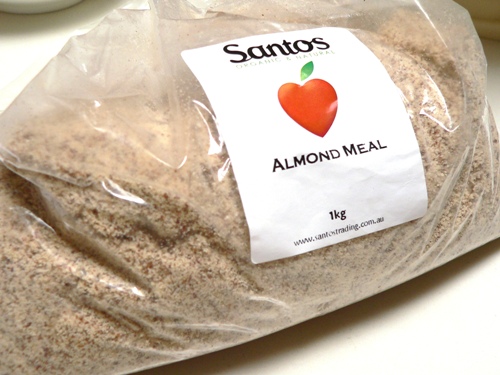
  • ½ cup (70g) unblanched whole almonds (I used unblanched almond meal)
  • 2 tablespoons (20g) plain (AP) flour
  • 4 large (59g) eggs, separated, at room temperature
  • ¾ cup (165g) sugar
  • ¹⁄8 teaspoon cream of tartar

1. Preheat oven to 375F (190C, or 175C with fan).

2. Grease an 8″ (20cm) round springform pan, and line the base with parchment paper.

3. Melt the butter and chocolate together in a heatproof bowl, either over a pot of gently simmering water, or in the microwave in 30 second increments. Stir until smooth, then stir in brandy and salt.  Set aside to cool.

4. If using whole nuts, pulse them in a food processor with the flour until the mixture is crumbly.  Or, stir together the almond meal and flour in a small bowl.

5. In a large mixing bowl (it needs to be big, as this is where the final mixing takes place), whisk the egg yolks with ½ cup (110g) of sugar until well blended.  Stir in the cooled chocolate mixture.

6. In another large mixing bowl, use an electric mixer to beat the egg whites and cream of tartar on medium until soft peaks form, then gradually sprinkle in the remaining ¼ cup (55g) sugar and beat on high until peaks are stiff but not dry.

7. Scoop a quarter of the egg whites and all the nut/flour mixture on to the top of the chocolate batter, and fold in with a rubber spatula.  Then gently but thoroughly fold in the remaining egg whites.  Pour the batter into the prepared tin.

8. Bake for 25 to 30 minutes, or until a toothpick inserted 1½ inches (4cm) from the edge comes out almost clean, but a toothpick in the centre is still moist and gooey (Ms Medrich is very specific about this!).   Set the pan on a rack to cool completely (it will sink as it cools), before releasing from the pan and setting on a serving platter.  You could dust this with a little icing sugar before serving.

. . . . .

Alice’s Chocolate Sauce

Ok, the cake really didn’t need this, but I was having too much fun with my new cookbook.  I found the recipe as written a little too thick, so I’ve provided the quantities I used here.  Note the absence of any sugar whatsoever – this is a seriously dark sauce!

  • 10 ounces (285g) dark chocolate (54% cacao upwards – I used 75%), finely chopped
  • 1½ (375ml) cups milk, cream or a combination of both (I used 125ml cream and 250ml milk). Note: original recipe specified ½ – 1 cup milk/cream.
  • 2 tablespoons unsalted butter (optional)
  • pinch salt
  • ½ teaspoon vanilla extract

Over a double boiler, melt 125ml milk or cream with the chocolate, stirring frequently until the chocolate is smooth.  Now add as much extra liquid needed to achieve your preferred consistency.  If the mixture appears to thicken too much or curdle, add more milk and whisk until it becomes smooth and pourable.

If desired, you can add the butter a little at a time to adjust the intensity of flavour.  Remove from the heat and stir in the vanilla and salt.

The sauce will keep for a few days in the fridge, or frozen for up to three months.  I’m planning to use it as a base for dark hot chocolate!

Read Full Post »

009

Maude’s influence again – her oven is broken, which means the only bread she can make at the moment are these English muffins.  She cooks them in a frypan and then finishes them in her toaster oven.

I made a dozen on the weekend, and they were eaten before the day was out.  They’re based on Peter Reinhart’s formula in The Breadmaker’s Apprentice, but use my preferred methodology for mixing yeasted breads.

Makes 12 English muffins
(Click here for a printable version of this recipe)

  • 600g (4½ cups) bakers or bread flour
  • 15g (1 tablespoon) white sugar
  • 10g (1¼ teaspoons) fine sea salt
  • 10g (2½ teaspoons) instant yeast
  • 30g (2 tablespoons) unsalted butter, at room temperature
  • 340g – 455g (12 – 16oz)  milk, at room temperature
  • cornmeal for dusting

A note on the milk: I used 420g UHT (long life) milk, at room temperature.

1. In a large mixing bowl, whisk together the flour, sugar, salt and yeast.  Rub the butter into the flour mix until it’s well incorporated.

2. Add the milk and mix together, first with a spatula and then with a clean hand, scrunching the mix together to form a shaggy dough.  Scrape off your hand, then cover the dough with a tea towel and allow it to rest for 10 minutes (this will make kneading much easier).

3. Turn the dough onto a lightly oiled bench and knead until smooth. (For more information on dough handling, have a look at our Bread Tutorial).  Oil the scraped out mixing bowl, then return the dough to it, cover and allow it to rise for an hour, or until doubled in size.

4. Line the bench with a large sheet of parchment paper.  Spray lightly with oil, then dust with cornmeal.

5. Knock back the risen dough and divide it into 12 x 3oz/85g pieces, then shape each piece into a tight ball.  Place these, seam side down, on the parchment paper, allowing room for spreading.  Lightly mist the tops of the balls with oil spray, then sprinkle on more cornmeal.  Cover loosely and allow to rise for a further hour.  Preheat oven to 175C (350F) with fan.

003

6. Heat a heavy based frypan over medium heat – we used nonstick.  Using a spatula, gently transfer the risen muffin dough in the pan, keeping the remaining dough covered to prevent it from forming a skin.  Cook for 5 – 8 minutes on each side, or until the dough can’t go any browner without burning.

005

007

7. Transfer the browned muffins to a tray lined with parchment and finish them by baking in the oven for an additional 5 – 8 minutes.  Repeat with the remaining muffin dough.

Our favourite way to eat English muffins? Fork-split, toasted and smothered in fresh butter and a little Vegemite!

Read Full Post »

My friends Mark and Bruce at Real Food Has Curves have been creating again – this time it’s these fabulous fig cookies.  They’re ludicrously delicious and great fun to make.

Here is my take on their recipe – I had to adjust a few things to account for the lack of certain ingredients here, and I’ve also converted them to metric  measurements.  For more details and photos, please check out the original post here.

Click here for a printable version of this recipe

. . . . .

Filling (make this the day before):

  • 450g dried Persian or Turkish figs (I used a mix of mostly Persian figs and a few glace figs leftover from Christmas)
  • 225g raisins
  • 165g light brown sugar
  • 85ml lemon juice
  • 85ml water
  • 45ml brandy
  • ½ teaspoon ground cinnamon

1. If the figs are very hard and dry (like mine were), soak them briefly in boiling water, then drain well. Pulse all the dried fruit together in a large food processor until the mixture gathers together and forms a ball of fruit mince.

2. Turn this into a heavy based pan and add the remaining ingredients. Stir  constantly over a medium heat until the mixture bubbles, the liquid evaporates and the filling cooks down to a paste-like consistency.  Scrape the filling into a bowl and allow to cool, then cover with cling film and chill in the fridge overnight.

Dough:

  • 225g plain flour
  • 225g bread or bakers flour
  • ½ teaspoon baking powder, sifted
  • ½ teaspoon fine sea salt
  • 125g unsalted butter, at room temperature
  • 55g light brown sugar
  • 150g white sugar
  • 3 large (59g) eggs, at room temperature

1. Take the eggs out of the fridge and leave them on the bench before you start. Also take the filling out of the fridge as well. Preheat the oven to 200C (I used 190C with fan) and line a large baking sheet with parchment.

2.  In a large bowl, whisk together the flours, baking powder and salt.

3.  With an electric mixer, beat the butter and sugars together until light and fluffy.  The mix needs a really good beating at this point, so let the machine go at full speed for several minutes.

4. Beat in the eggs one at a time, beating each one until fully incorporated before adding the next.

5. Turn the mixer off and add all the flour at once.  Turn the mixer onto low and mix until just combined – do not overbeat at this stage or the cookies will be tough.

Assembly:

1. Gather the dough into a ball and divide it into three parts.  Between two sheets of parchment, roll out a third of the dough into a rectangle approximately 30cm x 13cm.  Carefully lift off the top sheet of parchment.

2.  Spread a third of the filling over the centre of the dough, spreading it out carefully to within 2cm of the edge.  Now using the parchment paper, fold the top of the dough over the filling, then fold the bottom over to seal the dough into a long tube. Seal the ends of the tube and carefully turn the log onto the lined tray, seam side down.  Repeat with the remaining dough and filling.  Make sure you leave some room between the logs, as they’ll expand a bit during baking.

3. Bake for 15 – 18 minutes, until light golden brown.  Allow the rolls to cool on the tray for 15 minutes, then on a wire rack for a further couple of hours . Once the rolls are completely cold, they’re much easier to slice without cracking.

4. Using a long, thin knife, slice the cooled rolls into 2cm pieces.  Now find some neighbours to share them with!

Read Full Post »

Fried rice is the epitome of Chinese homecooking. I’ve discovered that adding Italian dry cured pancetta lifts the dish to a whole new level, infusing it with a delicious, smoky flavour.

Our fried rice has a multicultural slant – it’s a traditional Chinese recipe made with Indian Basmatti rice, Italian pancetta, Spanish onions, Korean enoki mushrooms and Japanese Teriyaki sauce.

When I was child, my mother would often make this for breakfast, using the leftovers from the previous night’s dinner.  I guess that makes this the Chinese equivalent of bubble and squeak!

Click here for a printable version of this recipe

  • cold, leftover rice
  • dry cured pancetta, or bacon
  • eggs
  • stir fry vegetables, such as onions, carrots, green beans, mushrooms, leeks and peas
  • soy sauce or teriyaki sauce
  • sesame oil
  • vegetable oil for frying
  • salt and pepper

1. In a large frying pan or wok, heat  up a vegetable oil with a high smoking point.  Add the chopped pancetta and fry briefly to render the fat.

2.  The vegetables we use change every time depending on what’s in the fridge.  This batch had Spanish onions, garlic, carrots, enoki mushrooms and frozen peas.    Peel and chop the fresh vegetables and add them to the wok, stir-frying until tender crisp.  Don’t add the frozen peas at this stage.

3. Push the vegetables to one side of the wok, and add the eggs.  Some Chinese chefs work on the basis of one egg per person, but I just use whatever I have on hand. Scramble these a little, then mix them in with the rest of the ingredients.

4.  Before the eggs set firm, add the peas and all the rice.  Keep stirring over high heat.

5.  Season with a little salt, pepper and soy sauce to taste.  Tradition in my family dictates that we use Kikkoman Teriyaki sauce, but I think most  Chinese cooks would use a light soy.  Finish by adding just a little sesame oil for extra aroma, giving the rice one final stir over the heat before dishing out.  Enjoy!

Read Full Post »

« Newer Posts - Older Posts »