Feeds:
Posts
Comments

Archive for the ‘Recipes’ Category

A Really Good Chocolate Cake

These days, I buy almost all my books on the Kindle.

Unlike some people who are attached to the physical aspects of a book (my friend Michelle adores the way they smell), I’m incredibly happy not to have to store any more in my house. The Kindle is easy on my hands, and I love the fact that e-books are a planet (and tree!) friendly option.

The exception to date has been cookbooks. Kindles are designed to facilitate reading from start to finish – they automatically open to the last page read – and the basic model I have is best suited to photo-free text.

All this changed recently when I discovered that it’s possible to read Kindle books on my PC and iPad via the Amazon Cloud Reader and Kindle App. Suddenly, I could flick back and forth through the book, and view all the photos in glorious high-res colour. My darling husband is delighted – finding storage for my cookbooks has been an ongoing issue for years.

One of the first Kindle cookbooks I bought was Alice Medrich’s Sinfully Easy Delicious Desserts. Apart from saving over 60% on the price of a paper copy, I also didn’t have to pay for shipping…

Ms Medrich’s recipes are detailed and very reliable – I don’t think I’ve had one fail yet. She writes in a precise, clear tone, and provides a swag of options for customising a recipe to the reader’s own tastes.

Those of you who’ve been reading along for a while now will know about my chocolate cake quest. I’m perpetually on the look out for the perfect cake, and over the years, I’ve come across quite a few that I’ve been delighted with (which I’ll list below in case anyone is interested). This latest one is easy and economical, yet tender and delicious. It’s definitely a keeper!

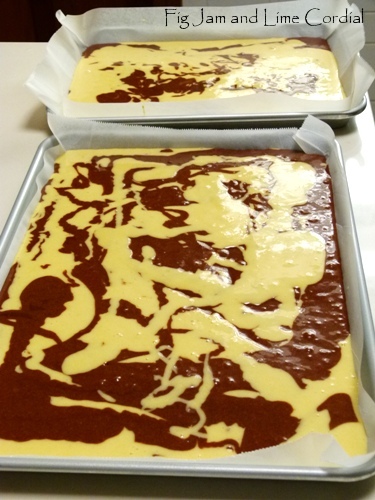
The batter is made in a single bowl, using a whisk. It was supposed to be baked in a 20cm (8″) round pan, but I poured it into a lined loaf tin instead and it worked very well. I’ve topped it with a half batch of my ever reliable Jamie Oliver icing. Get the scales out for this one, and make sure you use natural (not Dutch processed) cocoa – Ms Medrich says so!

  • 128g (4.5oz) plain (AP) flour
  • 35g (1.25oz) unsweetened natural cocoa
  • 225g (7.9oz) white sugar
  • ½ teaspoon bicarbonate of soda (baking soda)
  • good pinch of fine sea salt
  • 115g (4oz) unsalted butter, melted and cooled slightly
  • 2 large (59g) free range eggs
  • ½ cup (120ml) hot water
  • ½ teaspoon vanilla extract (I used homemade)

1. Preheat oven to 175C/350F or 160C/320F with fan. Line a loaf tin with paper, or grease and line a 20cm/8″ round tin. I used this Chicago Metallics tin (21.5cm x 11cm or 8½” x 4½”).

2. Sift the flour, cocoa and bicarb soda into a large mixing bowl. Add the salt and sugar, and whisk to combine.

3. Add the eggs and butter and stir to combine, then whisk vigorously – Ms Medrich recommends “30 to 40 strokes”. Make sure you don’t pour boiling hot butter over the eggs, or you’ll cook them! The batter will be very thick and stiff at this point.

4. Using a silicon spatula, stir in the hot water and vanilla. Keep stirring, gently, until the batter is just smooth and silky – don’t whip too much air into it. The batter will now resemble a thick hot chocolate.  Pour into the prepared pan and bake for 35 to 40 minutes (the loaf pan took 40 minutes) until a cake tester inserted into the centre comes out cleanly. The cake is quite soft, so I let it cool mostly in the tin before taking it out and placing on a wire rack. Once cool, top with icing.

Icing:

In a bowl over a saucepan of simmering water, combine 50g (1¾ oz) each of chopped dark chocolate, sifted icing sugar and unsalted butter. Add 1½ tablespoons of milk, and stir constantly until well blended.

I didn’t think a cake flavoured with cocoa (and without melted chocolate in it) could taste this good. But I made it on faith,  because as I said, I’ve never had an Alice Medrich recipe fail. I’m really pleased with how well it turned out!

Tell me, are you a fan of e-books? Or do you prefer hard copies?

. . . . .

Our All-Time Favourite Chocolate Cake Recipes

Read Full Post »

Thai Panang Pork Curry

Can I let you in on a secret about Malaysian curries?

They’re almost always made with purchased curry powders. The majority of my relatives live in Malaysia, and I don’t know a single one who grinds their own paste. They do, however, put enormous time and energy into sourcing the most flavoursome curry powder they can get their hands on, then tweak it with their own touch, adding a little star anise, a twig of cinnamon, some bruised lemongrass, as so on.

I suspect, but can’t be sure, that a lot of Thai curries are made in a similar way.  There are certainly some fabulous commercial Thai curry pastes on the market, and it can be hard to replicate their pungent, heady flavours from scratch. Both the Mae Ploy and Maesri brands are excellent, and very reasonably priced (the Maesri tins below were just $1.20 each)…

This recipe is based on one from Charmain Solomon’s Thai Cookbook – a birthday present from Maude many years ago (it’s now out of print, but there’s a generous preview on Google Books).

Here is my slightly modified version:

  • 500g (1lb) belly pork, cut into bite-sized cubes
  • 1 tablespoon fish sauce
  • 1 tablespoon palm sugar (I used gula melaka)
  • 375ml (1½ cups) coconut milk
  • half a small tin of Maesri Panang curry paste (about 2 tablespoons)
  • handful of basil leaves
  • snake beans (or whatever else you have in the garden)
  • red chilli for garnish

1. Place the pork, fish sauce and palm sugar in a small saucepan, then add just enough cold water to cover. Bring to a gentle simmer and cook until the pork is tender. Scoop out the pork with a slotted spoon, and keep the stock.

2. In a wok or clay pot (I used my Emile Henry baby risotto pot), heat up one cup of the coconut milk. Add the curry paste and simmer until fragrant, then add the pork. Cook gently until the oil separates from the gravy, ladling in the reserved stock as needed.

3. Add the snake beans or other vegetables, and cook for a further few minutes until softened. Just before serving, toss in the basil leaves and allow them to wilt. Spoon over the remaining coconut milk, then garnish with a little chopped chilli and serve with steamed rice.

The following day, I took a small quantity of leftover curry and heated it in a saucepan with a container of homemade chicken stock (from the freezer). Once it was boiling, I added a handful of rice vermicelli noodles. It was the perfect faux laksa! I can see myself stashing small containers of leftover curry in the freezer just so I can make this at a moment’s notice…

This dish was supposed to be made with strips of belly pork, but I quite liked the rustic look and taste of the chunky cubes. As I mentioned earlier, much of the Charmaine Solomon book can now be viewed via Google – definitely worth a peruse if you don’t already own it!

Read Full Post »

Marble Sheet Cake

Thank you all for your lovely responses to my silver anniversary letter to Pete – we were very touched by your kind comments and good wishes. Thank you for letting us share a little of our story with you. x

As you might have figured out by now, we’re not big on gifts in our family. So our anniversary presents were two new fish tank pumps for Pete, and a set of baking pans for me. And to be honest, I’m more excited about these than I would have been about a pair of silver earrings, because I don’t actually have any small flat trays (or sheet pans, as they’re known in the US).

These ones by Nordic Ware are heavy, non-stick and beautifully finished. At $26.50 for the set of three, they were very reasonably priced, and as you can see, they’re kind of silver coloured…

I thought it might be fun to try baking a “sheet” cake, so I whipped up a batch of our tried and tested Tiger Cake recipe. The batters were dolloped Picasso-style into the lined small and large pans…

After 25 minutes in a preheated 160C fan-forced oven, this is how they came out…

The Tiger Cake recipe usually makes enough batter to fill an enormous bundt or two large loaf pans, so I was surprised that it only resulted in two flat slabs. Once I started cutting them up though, I was astonished how much there actually was – I sent three boxes home with my friend Joyce, and there was still a mountain of cake leftover.

There wasn’t room for lots of marbling, but it was a delicious experiment nonetheless…

I was really pleased with how the pans worked in the oven – they stayed dead flat and baked very evenly. A chocolate sheet cake next, I think!

Read Full Post »

My family adores pailleté feuilletine, the crushed wheat wafers that I use to add crunch to our milk chocolate treats.

The problem though is that in order to get it at a reasonable price, I buy it in bulk from Chefs’ Warehouse, and then I struggle to use it all up before it goes stale or passes its expiration date.  So last week, I tried adding my last cup of feuilletine to a cookie dough. The results were quite delicious, giving the cookie an extra crispy texture…

I used a mix of three types of chocolate – Amedei Toscana Nut Brown (hazelnut), Amedei Toscana Black 63%, and Callebaut 44% cacao baking sticks…

  • 300g (2 cups) plain (AP) flour
  • pinch of fine sea salt
  • ½ teaspoon bicarbonate of soda (baking soda)
  • 110g (½ cup) white sugar
  • 100g (½ cup, packed) brown sugar
  • 185g (¾ cup) unsalted butter
  • 1 large (59g) free range egg
  • 2 teaspoons vanilla extract (I used homemade)
  • 75g (1 cup) pailleté feuilletine (*see note below)
  • 250g (about 1½ cups) chocolate chunks

* These cookies were inspired by an old Mrs Field’s recipe, which used  a cup of crispy rice cereal – if you can’t  track down some feuilletine, you might want to try that instead (but I haven’t, so I can’t guarantee how it will work).

1. Preheat oven to 150C (300F) with fan. Sift together the flour, salt and bicarb (if you sift nothing else, make sure you sift the bicarb). Stir in the feuilletine (gently!) and the chocolate chunks.

2. In a large mixing bowl, beat together the butter and both sugars until just combined, then beat in the egg and vanilla.

3. Add the flour mixture, feuilletine and chocolate, and beat on the lowest speed until just combined, being careful not to overmix the batter.

4. Shape the dough into walnut sized balls  (I used a small icecream scoop) and lay these on parchment lined baking trays, allowing room for a little spreading. Bake for 18 – 20 minutes, then immediately transfer to a wire rack to cool.

The cookies were a big hit with Pete and Small Man, but please note that they’re best eaten within a day or so of being made. They’re a nice change from all the slice cookies we’ve been making recently!

Read Full Post »

Tromboncino Fritters

A post for our dear friend Chicago John, who was sure
we had one more trombie post left in us this year…

. . . . .

Remember our self-sown mutant  tromboncino plant?

It’s now producing fruit which looks like a cross between a trombie and a butternut pumpkin. We’ve cut up the smaller one and it tastes just like a tromboncino – as you can imagine, I’m pretty chuffed to have them growing in the garden again…

As the plant is just starting to take off, I thought it might be a good idea to eat up some of the frozen stash we had from last season. The recipe for marrow omelettes in Abla’s Lebanese Kitchen sounded very appealing, and quite different from normal fritters (of which I’m not usually a fan). These were absolutely delicious – the addition of parsley, mint and allspice gave them an exotic flavour which everyone found very moreish.

Here’s my take on the recipe:

  • 1kg grated tromboncino pulp (the original recipe used 750g grated Lebanese zucchini)
  • 1 large onion, finely chopped
  • ½ cup chopped continental parsley (flat leaf)
  • ½ cup chopped mint
  • 1 teaspoon fine sea salt
  • several grinds of black pepper
  • ½ teaspoon pimento (allspice)
  • ½ teaspoon Kashmiri chilli powder
  • 110g (¾ cup) self-raising flour
  • 4 large (59g) free-range eggs
  • 180ml (¾ cup) light olive oil, for frying

1. Squeeze the pulp firmly to remove as much liquid as possible. My grated trombie had been frozen and then defrosted, so I was able to squeeze quite a lot of liquid out.  Place the well-drained pulp a large mixing bowl with the onion, parsley, mint, salt, pepper, pimento and chilli. Add the flour and stir well to combine.

2. Beat the eggs in a small bowl, then add them to the other ingredients and mix well to combine.

3. Heat the oil in a frying pan over high heat, then drop in a tablespoon of the mixture, flattening it out with the back of a spatula. Fry a few fritters at a time, being careful not to overcrowd the pan. Cook until golden brown (about 3-5 minutes per side), then drain on a paper towel. We served ours with a little yoghurt on the side.

These fritters are delicious hot or at room temperature. They’re a wonderful vegetarian main dish, but equally as good on top of a slice of sourdough the following day. They keep well in the fridge for a couple of days.

Hope you’re all having a fabulous festive season! x

. . . . .

Previous Trombie Recipes:

Read Full Post »

« Newer Posts - Older Posts »