Feeds:
Posts
Comments

Archive for the ‘Recipes’ Category

Sarah’s Ginger Tea

I’m down with a bad sore throat and a chesty cough, courtesy of Small Man who brought it home from school last week.

It’s time for Sarah’s ginger tea.

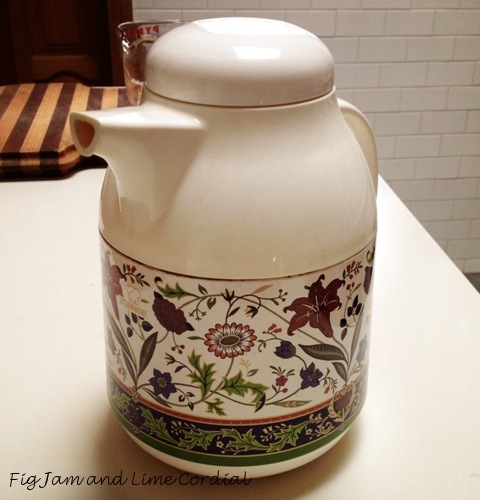
Many years ago, when I was visiting my sister in Singapore, I was very unwell with both conjunctivitis and tonsillitis. My sister’s housekeeper Sarah made me her ginger tonic, and I swear it cured me (although the antibiotics probably helped too).  It’s basically just ginger and honey, although Sarah goes the extra step of boiling the ginger for a minute to really intensify its flavour.  The other key element is a good thermos – the idea is to drink small cups of the tea over many hours, as the ginger flavour brews and intensifies.

I use a generous amount of peeled ginger, but Sarah simply washes the root, cuts it into chunks and bruises it.  Try to use old ginger if at all possible, as young ginger isn’t nearly as potent…

Put it in a large pyrex jug and pour boiling water over it. Then put the jug in the microwave and heat it on high for one minute, watching carefully to make sure it doesn’t bubble over.  If you don’t have a microwave, put the ginger and water into a saucepan and heat it on the stove…

Stir a couple of tablespoons of honey into the tea until dissolved, then pour the whole lot, ginger and all, into a thermos that will keep it hot for several hours.  The tea will taste quite sweet at first, and slowly get hotter from the ginger as it steeps. Let it sit for at least half an hour before drinking…

I’m drinking my first cup as I type this, knowing that the next one will be eye-wateringly hot from the ginger.  If it gets too strong near the end, I will occasionally add more boiling water and honey to thin it out a little.

Do you have a sure-fire cold remedy?

My Pete sips a combination of lime cordial, Rochester Ginger and Bacardi, mixed with just a little water to make it palatable. One of our Italian neighbours adds mystery ingredients to Coca Cola and then boils it down to a concentrated syrup.

I’d love to know your home cures!

Read Full Post »

The lovely Barbara runs the dried fruits and nuts counter at Harkola.

I love shopping when she’s there – apart from being great fun, she’s also an extremely kind soul who will often teach me new recipes as she’s weighing up our purchases.  She called this one out over the counter to me, and I noted it down on my iPhone.

Like most experienced cooks, Barbara’s instructions can sometimes be a little vague…

“What temperature is the oven?”

“Usual oven temperature..”

“How much milk do I need to add?”

“Just whatever you need..”

As always, her recipes result in a mountain of food, so feel free to scale the quantities down.  I made it as I was instructed – and took a sample back to Harkola for Barbara to try.  She advised me that the cookies are traditionally baked a bit harder than mine were (to ensure a longer keeping time), but I was pretty happy with how they turned out.

The cookies are known as Kaak, and they’re flavoured with mahlep – a spice made from the ground kernels of the St Lucie cherry tree.  It’s wonderfully aromatic and often used in baklava…

  • 1kg (6¾ cups) self-raising flour
  • 440g (2 cups) white sugar
  • 3 large (59g) free range eggs
  • 250g (1 cup) unsalted butter
  • 160g (2/3 cup) milk, or as needed
  • 1 – 1½ teaspoons ground mahlep (or try vanilla or ground aniseed)
  • sesame seeds for topping

Barbara’s instructions were simply to “mix everything together”. Here’s a workable method I came up with after a little trial and error…

1. Preheat the oven to 175C (350F) with fan.  Line as many oven trays as you can with parchment paper (you’ll need lots!).

2. Pulse the flour, sugar and butter in the food processor until the butter is incorporated and the mixture is crumbly. I had to do this in two batches, as the quantities are enormous, even for the Magimix!

3. In a large mixing bowl, stir the mahlep through the flour-butter mixture.

4. In a small jug, whisk together the eggs and milk. Pour this into the flour mixture, and work the ingredients together with your hands to form a stiff dough.

5. Roll the dough into smooth, walnut sized balls.  Flatten them out, dip them in sesame seed and lay them on the parchment lined trays, allowing a little room for spreading.  The sesame seeds are optional, and the cookies are also quite nice without them.  I bought decorative moulds at Harkola, and pressed some of the dough balls against them to form a patterned top – although a lot of the detail is lost as the dough bakes…

6. Bake for approximately 20 minutes, rotating the trays halfway through the baking time, until the cookies are well browned.  Store in an airtight container. Any excess can be frozen quite successfully.

These chunky cookies have a texture reminiscent of both shortbread and rock cakes, and they’ve been surprisingly popular. Which is just as well, as Barbara’s quantities make a huge batch. I’m off to deliver some to the neighbours now!

Read Full Post »

Speedy Mayo

We used to make mayonnaise the old-fashioned way.

Then last week, my darling friend Lisa sent me Annabel Langbein’s Simple Pleasures cookbook…

Not only is Annabel a completely gorgeous person whom I’ve chatted to occasionally on Twitter, but she’s also a brilliant cook. I’ve made several of her recipes in the past, and they’ve always worked.

Her Speedy Mayo requires a stick blender and the jug it came with.  It also needs:

  • 1¼ cups of neutral oil
  • 3 tablespoons of lemon juice
  • 2 super-fresh free range eggs
  • ½ teaspoon salt (I used Maldon flakes)
  • 1 teaspoon dijon mustard
  • a pinch of ground white pepper

All the ingredients go into the jug…

…and are blitzed together with the stick blender in a matter of seconds. I was a little concerned that the mix might overflow the jug, but the 500ml capacity was just right…

I added chopped capers and dill to half of the mayonnaise…

We’re dealing with a raw egg product here, so please do use the freshest free-range eggs that you can get your hands on!

Annabel advises that the Speedy Mayo will keep for up to two weeks in a jar in the fridge (the dill and caper version keeps for one week). However, since reading Meg’s comments here, I now won’t be keeping mayonnaise for longer than 24 hours.

It was so easy! The jug went into the dishwasher, the filled jars into the fridge, and tonight we’ll make coleslaw!

Read Full Post »

Six Week Ten Minute Pasta

Sometimes…a combination of flavours comes along which is very simple, yet mindblowingly delicious.

Our version of pasta con cime di rapa is based on a recipe that the lovely Claire kindly sent me.  We created this vegetarian version for our neighbour Shaun. In days gone by, this traditional peasant dish would have been made with some form of fatty salt pork – pancetta was specified in the original Guy Grossi recipe, but we’ve also used guanciale with great success.

This recipe takes six weeks and ten minutes to prepare, although you could circumvent the time substantially by buying your broccoli rabé rather than growing it.  The other ingredients are pasta, chilli, garlic, butter, olive oil, salt and pecorino cheese. The chilli and garlic are essential – both flavours combine beautifully with the bitterness of the rabé leaf.

. . . . .

Step 1: Six weeks before preparing the pasta, plant some broccoli rabé seeds in starter pots. As soon as they’re large enough, transfer them into the garden beds.  Water them and encourage them to grow.  As soon as the leaves are large enough, you can prepare this dish, but it’s even better if you can include some of the flowering heads…

Step 2: Put a large pot of salted water on to boil. Go outside and harvest a big bunch of broccoli rabé.  Wash well to remove any wildlife, then chop roughly. I usually remove most of the stems from the leaves, but this is optional and a textural preference on my part.  Put the chopped rabé and 400g of dry pasta into the boiling water and cook until the pasta is al dente

Step 3: Finely chop up peeled garlic cloves and deseeded hot chillies – both to taste…

Step 4: In a large wide pan (I used my Emile Henry wok), heat a generous slab of good quality salted butter with a little olive oil, and fry the chilli and garlic over a low heat until pungent. Add salt to taste…

Step 5: Drain the pasta and broccoli rabé and tip it carefully into the butter-chilli-garlic sauce.  Add a ladle or two of the pasta boiling liquid, and stir over a low heat for a couple of minutes until combined.  Stir in a generous handful of grated Pecorino cheese, adjust seasonings, and serve.

Remember last month when we were uncertain about the value of growing broccoli rabé in the garden?  Since then, this robust leafy green has proven to be a mainstay in our kitchen. This pasta recipe is an easy vegetarian dish, yet fancy enough to serve at a dinner party. Best of all, the wolves (and the neighbours) absolutely love it!

Read Full Post »

Valrhona Double Choc Cookies

A nice change from our usual chocolate chip cookies, this double choc version was very popular with the tribe!

I had some Valrhona Caraïbe 66% dark chocolate to use up and this twist on an old Mrs Fields’ recipe seemed the ideal foil for it…

  • 375g (2½ cups) plain (AP) flour
  • ½ teaspoon bicarbonate of soda (baking soda)
  • ¼ teaspoon fine sea salt
  • 55g (½ cup) Dutch-processed cocoa powder
  • 210g (1 cup, packed) dark brown sugar
  • 165g (¾ cup) white sugar
  • 250g (1 cup) unsalted butter
  • 3 large (59g) free range eggs
  • 2 teaspoons vanilla extract (I used homemade)
  • 350g (12oz or about 2 cups) semisweet chocolate chips (I used 250g Valrhona Caraïbe and 100g Callebaut 811 54% dark)

1. Sift together the flour, bicarb soda and cocoa powder. Don’t skip this step, or the bicarb and cocoa will leave hard bitter lumps in your finished cookie dough. Stir in the sea salt.

2. Using an electric mixer, beat together the sugars and butter until just combined.  Scrape down the sides and add the eggs and vanilla, beat until combined.

3. Add the flour mixture and all the choc chips (I cut the Valrhona fèves in half), and beat until just combined – do not overwork the dough.  Cover the mixing bowl with cling film and refrigerate until firm (I left my dough in the fridge overnight).

4. Preheat oven to 150C (300F) with fan.  Line two large baking trays with parchment paper. Use a greased icecream scoop to measure out rounded portions of dough onto the tray – the dough will be stiff.  Allow room to spread.  Bake for 18 – 22 minutes.  Transfer cookies to a wire rack to cool.

This recipe makes about 40 cookies.

All the cookies were gone within days, and the boys have already asked me to bake another batch!

Read Full Post »

« Newer Posts - Older Posts »