Feeds:
Posts
Comments

My beloved friend Dan and her family are over for a visit from the US, so I’ll be taking a small break from blogging to spend a bit of time with them.  I’ll be back next week. ♥

Oh, and don’t forget that the second week in August is Scone Week!  I’m hoping to try and master traditional scones once and for all this year (instead of the cheaty Lemonade version I always make).

Anyone feel like baking scones next week?  I’d love to see what you come up with!

In my kitchen…

…is dark golden hazelnut praline. These pieces were eaten straight, and the rest went into a large batch of dark chocolate…

In my kitchen…

…are new beechwood utensils from Chefs’ Warehouse. After several years of using silicone spatulas, we’ve gone back to wooden spoons…

They’re made in France from sustainably harvested timber…

In my kitchen…

…is a simple lemon bar, made with June’s shortcrust pastry

…Katey’s lemons from her new garden…

…and a recipe from Chicken and Egg by Janice Cole. If you have chickens in your backyard, this is the book for you – the recipes are quite good, but the stories are just fabulous…

In my kitchen…

…are 73 mini chocolate chip cookies

Here’s a cherry tomato for scale…

In my kitchen…

…and two different butters. This Italian one was bought at Johnny’s shop

It’s very tasty – quite salty and pale in colour…

The next one is a completely Australian product – Pepe Saya butter is handmade in nearby Tempe using organic cream from Country Valley in Picton, NSW and seasoned with Murray River Pink Salt…

It’s absolutely delicious! At $8.50 for 225g, it’s not cheap, but I think it’s worth it to a support a local company that’s striving so hard for quality…

In my kitchen…

…is lemongrass from the garden.  We’ve just divided up our large clump – it was suffering a bit from all the rain…

In my kitchen…

…is a dedicated clay pot cookbook, by Paula Wolfert. Given the number of Römertopf and Emile Henry pots I own, I felt it was a justifiable purchase!

  . . . . .

Tell me, what’s happening in your kitchen this month?

If you’d like to do an In My Kitchen post on your own blog, please feel free  to do so. We’d love to see what’s happening in your kitchen this month!  Please link back to this blog, and let us know when your post is up, and we’ll add it to our monthly listing.

. . . . .

Here are this month’s posts…

Siobhan @ Garden Correspondent

Christine @ Food Wine Travel

Johanna @ Green Gourmet Giraffe

Sue @ Sous Chef

Mel @ The Adventures of Miss Piggy

Tania @ My Kitchen Stories

Emilie @ The Clever Carrot

Claire @ Claire K Creations

Pamela @ Spoon Feast

Misky @ Misk Cooks

Mandy @ The Complete Cookbook

Linda Maree @ My Garden Feast

Mrs Mulberry @ Mulberry and Pomegranate

Heidi @ Steps on the Journey

Anne @ Life in Mud Spattered Boots

Pam @ Grow, Bake, Run

Tandy @ Lavender and Lime

Jane @ The Shady Baker

Lorraine @ Not Quite Nigella

Lizzy @ Bizzy Lizzy’s Good Things (Anniversary Post!)

Glenda @ Passion Fruit Garden (check our her Sydney shopping spree!)
. . . . .

Inspired by Shady Baker Jane’s gorgeous fruit buns, I baked a batch for Pete last weekend.

I used a variation of my sourdough fruit loaf recipe, increasing the water just a little as the mix seemed to need it on the day.  According to my iPhone note, the buns included walnuts, sultanas, dried sour cherries, cranberries, sunflower kernels, golden raisins, candied orange rind, Greek figs and dried blueberries.

  • 200g active sourdough starter ( 166% hydration, ie. fed at a ratio of one cup water to one cup flour)
  • 700g bakers/bread flour
  • 375g – 400g water
  • 15g extra virgin olive oil
  • 12g fine sea salt
  • 1 teaspoon mixed spice (I used Herbie’s)
  • 10g brown sugar
  • 600g mixed dried fruit and nuts

Note: 600g of fruit and nuts is a ridiculous quantity for this much dough and made shaping the buns very difficult.  If you’ve just starting baking bread, you might want to use a much smaller quantity (say 300g), which will make the mixture far more manageable.  As so often happens, I got carried away.

1. In a large mixing bowl, combine the starter, water, oil, mixed spice, brown sugar, fruit and nuts.  I cut the figs up into smaller pieces, and finely chopped the candied rind, but otherwise left the other inclusions whole.

2. Add the flour and sea salt and mix to form a shaggy dough.  Make sure all the dry ingredients are incorporated. Scrape off your fingers, cover the bowl with clingfilm or a tea towel, and allow to rest for 30 minutes.

3. Uncover the bowl and give the dough a quick knead.  Cover again and allow to prove until double in size – in my winter kitchen, this took about 8 hours (in summer, it might take half the time).

4. Turn the dough onto an oiled surface, give it a couple of folds onto itself, then divide it into 12  – 13 equal portions.  The weight of each bun will depend on the quantity of fruit and nut you’ve used – I made 13 x 150g buns.  Shape each portion as best as you can into a tight round bun – try to get as much fruit inside the dough as possible to minimise burning.  Mine were pretty messy…

5. Lay the buns out on a parchment lined tray, cover loosely with a teatowel and allow to prove – mine didn’t expand much at stage, maybe 50%. Preheat oven to 220C with fan.

6. Slash a cross into the top of each bun and spritz with a little water, then place the tray into the oven, dropping the temperature to 200C with fan as you do.  Bake for 20 minutes, then rotate the tray and reduce the temperature to 175C with fan for a further 10 minutes, or until well browned.  Fruit buns have a tendency to burn because of all the sugar, so please keep an eye on them.

Pete loved these, but as you can see, there’s not a lot of dough holding all the fruit together!

Mrs M’s glasses, which were given to me when she passed away…

I love Italian nonnas.

When we moved into this house over twenty years ago, our neighbour Mrs M was already in her mid-70s.  She’d arrived from Italy at the age of thirteen and had gone straight to work in the canefields of Cairns.  She was sharp as a tack, stubborn as a mule and tough as nails – she used to trim the edges of her lawn with a cane knife (machete).  I adored her.

Our house was a deceased estate that had been empty for nearly two years, which gives you some idea of the state it was in.  There was no shower or inside toilet, the kitchen had 53cm (21″) of bench space – divided into three sections, and the front bedroom had layer upon layer of rotting carpet.

We were in our early 20s, and had borrowed money from everyone we knew to make the purchase price.  We were also stupid. We laid a white tiled kitchen floor – because I liked how shiny and clean it looked – and spent $2500 of the $3500 we had allocated for furniture on an antique Kilim hall runner.  We sat on beanbags for the first year.

Mrs M, bless her soul, took pity on us.  She would bring over covered plates of pasta and peas, and vegetables from her garden, and figs from her enormous trees.  She would make me espresso coffee strong enough to dissolve a spoon, and hem my jeans so that I didn’t have to pay $12 to the drycleaner. She taught me how to be a good neighbour.

And I grew to love the older Italians in our neighbourhood.  They’re incredibly kind, brutally honest, and passionate about life.

. . . . .

Jump forward twenty years to last week when I was having a chat with Chicago John about his Zia’s tripe dish which traditionally began with a batutto.

Batutto is a soffrito which uses a specific type of Italian salted pork.  I decided to see if it was available at the cheese shop.  When I arrived, Johnny’s mum Rita and her friend Teresa were both there.

I couldn’t see anything marked as “batutto” in the fridge cabinet, but I did find guanciale, speck and pancetta. I asked the ladies if one of those would do.

No, no, no, batutto had to be made at home, using pork belly bought from a butcher in Campsie (not from a regular butcher, as the pork would be too lean).

What, I asked, was the difference?  The guanciale, speck and pancetta  were all salted pork products – couldn’t I substitute one of those?

The speck, I was told, was too smoky, the pancetta wasn’t the right flavour for tripe, and guanciale could only be used in Amatriciana sauce.  A vigorous discussion then ensued as to whether Amatriciana sauce should or shouldn’t have onions in it.

As I said, I love Italian nonnas.

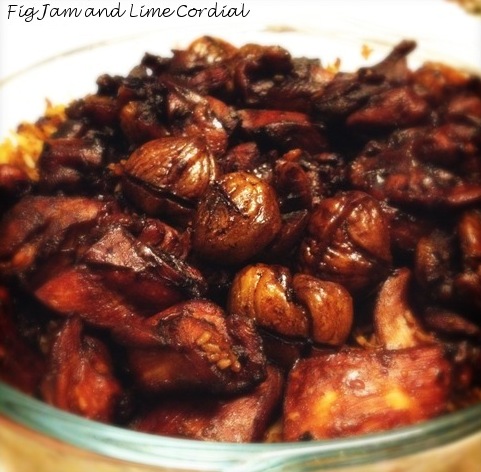
So I bought some guanciale, made from the jowl of a pig, and used it to create Spaghetti all’Amatriciana.  My apologies, Teresa – the only recipe I could find included onions.

I followed this New York Times recipe very closely, substituting half a fresh cayenne for the dried chilli flakes.  If you need guanciale or San Marzano tomatoes, Johnny carries them in his cheese shop, but ring first to check, as both items are frequently out of stock.

Here are the ingredients I used:

  • 1 tablespoon oil
  • 1 medium onion, very thinly sliced
  • 3 cloves of garlic, thinly sliced
  • 100g guanciale, chopped into 5mm thick slivers
  • 2 x 400g tins San Marzano tomatoes
  • half a red cayenne pepper, chopped
  • salt to taste
  • ¼ cup (3 – 4 tablespoons) grated pecorino
  • 400g dried pasta

The recipe only required a small square of guanciale, but the flavour was strong enough to permeate through the whole dish.  Make sure to remove the tough rind before chopping it up.  (More about guanciale here.)

It was a big hit with the boys – while I was taking the photo above, they ate the entire pot!

I remember Donna Hay saying on the first Masterchef series that taking photos of brown food was hard.

Writing a recipe for this dish was also hard, because I never follow one, but I made an effort to keep track last time, so that I could at least offer you a rough guide.  Please treat it as such, and change whatever you feel like to make the dish your own.

  • 6 chicken thigh fillets, cut into chunks
  • 20 cooked peeled chestnuts, or tinned chestnuts
  • 3 cloves garlic, peeled and chopped
  • small knob ginger, peeled and chopped or julienned
  • 3 tablespoons dark sweet soy
  • 1½ tablespoon light soy or Teriyaki sauce
  • ground pepper
  • 1 – 2 teaspoons sesame oil
  • vegetable oil, for frying
  • 4 – 5 cups cooked rice, hot

Note: I used a ceramic Chinese soup spoon as a measure – each holds 20ml, which is the equivalent of an Aussie tablespoon.

1. In a large bowl, combine the thigh fillets, dark soy, light soy and sesame oil.  Season with ground pepper.

2. In a wok or large skillet, heat the vegetable oil and fry the garlic and ginger briefly.  Add the chicken, all the marinade and the cooked chestnuts.  Cook, stirring, until the chicken is cooked through, the chestnuts are soft and the sauce has thickened slightly – add a little water if it gets too dry during the cooking time.

3. Have the hot rice in a microwave proof container with a lid.  Pour the chicken, chestnuts and all the sauce over the rice and stir to combine.  Pop the whole thing into the microwave for a couple of minutes to warm through before serving.

I don’t put onions in this dish simply because my mother never did.  Then again, she never put chestnuts in it either, and is quite appalled whenever I do.  And now that I think more about it, I believe she used chicken wings instead of fillets.

Despite all that, I find this dish homely, comforting and reminiscent of my childhood. As I said, please feel free to change it up however you wish – rice and meat dishes like this are incredibly satisfying in all permutations!