Feeds:
Posts
Comments

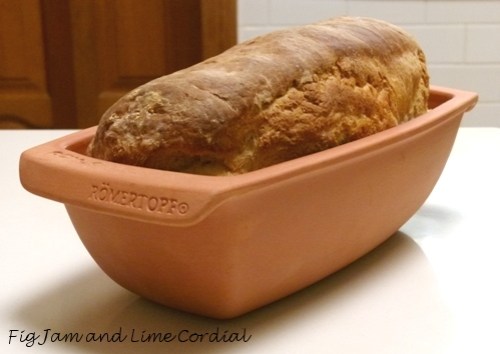
I’ve been experimenting with my new Römertopf loaf pans (yes, plural, I now have two) and have found that they work particularly well with a sourdough version of Joanna’s white bread formula.

As I’ve talked a few of you into buying the pan, I thought I’d share this recipe as well (this quantity makes one loaf)..

  • 200g active sourdough starter (at 166% hydration, ie. fed at a ratio of one cup bread flour to one cup water*)
  • 700g white bread/bakers flour
  • 375g water
  • 15g extra virgin olive oil
  • 10g brown sugar
  • 13g fine sea salt

* Note: if you’d like to try this recipe with a 100% hydration starter, reduce the flour to 675g and increase the water to 400g.  If my maths is correct, that should work!

1. In a large mixing bowl, stir together the starter, water, oil and brown sugar, then add the flour and sea salt.  Mix the whole lot together with clean hands to form a firm dough, squishing the ingredients together to ensure all the flour is incorporated. Scrape the dough off your fingers and cover the bowl; allow to rest for 30 minutes.

2. Uncover the dough and give it a quick knead in the mixing bowl. I only knead for about a minute or so, which is all it takes to get the dough quite smooth and elastic.  Cover the bowl again and allow it to rise until doubled in size (in our Sydney winter, my starter is quite sluggish and this can take 6 – 8 hours).

3. Prepare the Römertopf loaf pan by spraying the inside lightly with vegetable oil.  Do NOT preheat the oven.

4. Turn the risen dough onto a lightly oiled bench and shape it into a loaf.  Place the dough into the greased loaf pan and cover with oiled plastic wrap or a shower cap.  Fill the sink with enough hot water (ours is approximately 40C in temperature) to come up to just below the rim of the loaf pan.  Now place the pan into the water and allow the dough to rise again for another 30  minutes, or until it has filled the pan and risen nearly to the top.

5. Remove the pan from the sink, and slash the top with a serrated knife or razor blade.  Place the wet, dough-filled pan into a cold oven and then turn the heat up to 200C with fan.  Bake for 40 minutes, then remove from the oven and carefully turn out the loaf from the pan (I wear my welding gloves to do this).

Warning: make sure you place the empty loaf pan onto a folded tea towel or other gentle surface, as it will crack if it goes onto something cold at this stage!

6. Drop the heat to 175C with fan and return the naked loaf to the oven for a further 20 minutes, sitting it straight onto the rack to allow the sides and bottom to brown up. The overall cooking time will be a little variable depending on how long it takes your oven to heat up.

This is a very big loaf – about 1.3kg in weight – and it’s been perfect for school holiday lunches.  The crumb is tender with a little elasticity, and the crust is thin and crunchy.  Best of all, it makes my Pete very happy, as it reminds him of the bread his grandmother used to bake when he was a young lad visiting her farm in Mudgee!

When life gives you lemons…make lemonade.

When life gives you just one lemon…make Pete’s lemon cordial!

As those of you who join us regularly will know, we’d been waiting and waiting and waiting for our very first lemon to ripen. It took months to finally turn yellow.

We were pretty chuffed when we finally harvested it! It had a thick rind and a respectable quantity of tart, acidic juice. It was also completely seedless – I’m not sure if that’s a product of the variety, or the plant’s immaturity.

We deliberately chose to plant an old fashioned “bush” lemon, rather than the prettier, thin-skinned varieties.  We’ve been told that the thick rind and pith offer better insect protection, which is important as we don’t use chemical sprays in our garden (although we do have to treat the leaves with organic Eco-Oil in an attempt to keep the leaf miners at bay)…

To properly showcase our one solitary lemon of the season (there are others growing on the tree, but they’re all small and green), we made Pete’s One Lemon Cordial…

  • 1 lemon, juice and rind
  • 1 tablespoon (4 teaspoons) powdered tartaric acid
  • 2 cups (500ml) boiling water
  • 2 cups (440g) white sugar
  • ¼ teaspoon lemon essence (optional)

1. With a peeler, remove the lemon rind in strips, making sure to avoid the white pith. Place this in a large heatproof jug and pour over the boiling water.  Stir well to release the essential oils.

2. Add the sugar and stir well.  Then add the tartaric acid, the unstrained lemon juice (pips and all is fine) and the lemon essence (optional, but we usually add it).  Stir well, then strain into a clean, sterile bottle and store in the refrigerator.

We mix our lemon cordial with either plain or soda water, usually at a dilution of one part cordial to five parts water.  I’ll often add a dash of bitters as well.

It’s a cheerfully refreshing drink!

. . . . .

And just for fun, here’s Kate Ceberano’s One Note Samba which I was humming as we made the cordial…

Small Man is a committed carnivore.

He will routinely consume half of whatever meat we put on the table.  I suspect it’s a product of being in his mid-teens – Big Boy did exactly the same thing at that age.  Small Man seems to be laying on muscle before our very eyes and for him, that entails a hefty protein intake.

Last week I defrosted a large slab of sublime Cape Grim scotch fillet.  We cut it into seven steaks – one each for Pete, Big Boy and I, and two for Small Man.  We hid the remaining two before he could ask for a third.

Pete has a deft touch with steaks, providing you’re happy to eat them rare.  And with this incredibly tender grass-fed meat, grown in the cleanest air in the world, it would be a great shame to cook them any longer than absolutely necessary.  The two extra steaks were seared and then stashed in the fridge overnight…

The following evening, we assembled a modified version of the Rare Thai Beef Salad recipe from Jill Dupleix’s Totally Simple Food

The steaks were allowed to come to room temperature, then sliced and topped with a dressing of:

  • half a Spanish onion, finely sliced and rinsed in boiling water (to mellow out the sharpness)
  • a few chopped spring onions
  • herbs from our garden – mint, coriander, parsley and the last of the basil
  • one of our homegrown bishops’ crown chillies, deseeded and sliced
  • the juice of half a lime
  • 2 teaspoons light soy
  • 2 teaspoons fish sauce
  • 2 teaspoons sesame oil
  • 1 teaspoon white sugar

We whisked together the lime juice, soy, fish sauce, sesame oil and sugar (quantities adjusted to taste), then stirred in the remaining ingredients.

The salad was delicious served with steamed rice.  Definitely a dish we’ll make again, and a great way to use up leftover steak!

PS. It wasn’t nearly enough to fill Small Man, who ate two oven roasted duck marylands as well!

Sorry to be posting in such quick succession, but I wanted to give my fellow Aussie bakers a headsup on these clay loaf pans while they’re on sale.

They normally retail for $45, but at the moment, Peters of Kensington have them reduced to $9 each.  They’re beautifully made (as you know, I’m a bit besotted with clay cookware) and wash up perfectly in the dishwasher, but they can’t go into a preheated oven.

Conventional wisdom dictates that to achieve a really good rise in a loaf of bread, the dough needs to go into a hot oven.  The shock of the intense heat causes the yeast to burst into action one last time before dying, in a process known as “oven spring”.  This is certainly important in traditional sourdough loaves such as ciabattas, where a holey crumb and crunchy crust are highly prized.

But there is an alternate school of thought that great, albeit different, loaves can be produced by putting the dough into a cold oven, and allowing it to heat up as the oven does.  This is how my friend Linda bakes her bread, using the same sourdough starter as mine.

I thought it was worth $9 to test this out!

The Römertopf loaf pan is a different kettle of fish yet again. The enclosed instructions recommend placing the dough into the loaf pan for its second rise (I sprayed the interior lightly with oil first). The pan is then placed into warm water for twenty minutes (I sat mine in a sinkful of 40C tap water for half an hour).  The clay absorbs water and in theory, returns it as steam once it begins to heat up in the oven.

I have to confess – I was dubious.  So much so that I didn’t fuss with shaping – I just rolled up the proved dough and plonked it in. The dough took up two-thirds of the pan to start with; by the time it was out of the warm water, it had risen to the rim.

The wet pan went into a cold oven, and the heat was turned up to 210C with fan.  I watched in surprise as the dough rose..and rose…

So what’s the verdict?

Not the prettiest loaf I’ve ever baked, according to my husband, but it is proof of concept…

The finished bread has a fine, tender crumb that is neither dense nor stodgy (I used this recipe).  We made toasted sandwiches with it today…

Pete would like me to bake more bread in this manner – he believes it will save electricity. I’m unlikely to give up my hot preheated oven anytime soon, but it’s certainly nice to have a different technique up my sleeve!

PS. No scientific conclusion is valid unless it can be repeated, so I tried the pan out again today.  I made more of an effort with shaping this time and was quite pleased with the result!

Follow up: Römertopf White Sourdough Loaf

Some recent chocolate adventures…

A batch of dark chocolate almond rochers – I tossed slivered almonds in Kirsch and icing sugar, toasted them until golden, and then dipped them in a tempered mix of dark Callebaut and Valrhona chocolate…

It doesn’t matter how many I make, they never seem to last more than a few days…

These music themed choccies were made for Chris’ birthday – they’re a 50/50 blend of Callebaut 811 (dark 54%) and 823 (milk)…

I’m always amazed that this particular chocolate mould exists – Big Boy plays the French Horn and Small Man the trumpet…

The leftover chocolate from the musical pieces went into a fruit and nut bark, filled with cranberries, ginger, candied peel and roasted skinned hazelnuts…

It makes a very nice after dinner nibble!