
We love our ciabatta recipe so much that I thought I’d try and come up with a similar recipe using yeast, for folks who don’t have a sourdough starter on the go. Pete took lots of pics as I was making it, so be warned – this is a very photo heavy tutorial!
The finished loaves are slightly different from the sourdough version, but they’re even easier and quicker to make. The recipe makes four small loaves, all with an elastic crumb and chewy crust. The semolina helps them to keep well for a couple of days after baking, or you can freeze them for a later date.

Because I’ve used cold water and a relatively small amount of yeast in this recipe, the proving time is longer than for regular yeasted loaves. It will vary a little depending on ambient kitchen temperatures, and is fairly forgiving – just make sure the dough is puffy before you turn it out to cut, as there won’t be a second rise.
I always use scales to measure my ingredients, but I’ve included approximate cup measures as well. If you have a smaller oven, please feel free to halve the recipe (use 4g dried yeast in that case).
Fig Jam and Lime Cordial Pane de Casa
- 500g (3½ cups) bakers/bread flour
- 500g (3½ cups) fine semolina (durum wheat) flour (we use an imported Italian flour)
- 7g (1¾ teaspoons) dried/instant yeast (or one sachet)
- 18g (2¾ teaspoons) fine sea salt
- 750g (3 cups) fridge cold water
- rye flour, for dusting
Note: don’t be tempted to use fine or coarse semolina instead of semolina (durum wheat) flour – the former is too coarse and won’t absorb enough water, and you’ll end up with a soggy mess. If you can’t find semolina flour, substitute more bread flour in its place and reduce the water by about 5%.
1. In a large mixing bowl, whisk together the flours, yeast and salt.

2. Add the cold water, and mix the ingredients together to form a sticky dough. It’s easiest if you do this with one hand, so you can hold the bowl (or answer the phone!) with the other. Really squelch the mix through your fingers until evenly combined. Scrape off your hand and cover the bowl with a tea towel. Allow to rest for 15 minutes.


3. Give the dough a quick knead in the mixing bowl – after the short rest time it will have relaxed a little. Just fold it over itself a dozen or so times, and then scrape your hand off again and cover the bowl with clingfilm or a shower cap. Allow to prove until well risen – this might take up to three hours depending on your kitchen conditions.


4. Once the dough is nearly risen, preheat the oven to 250C (480F) with fan. If you’re using pizza stones, place them on the racks to heat up, and tear off four sheets of parchment paper. If you don’t have pizza stones, line a couple of baking trays with parchment.
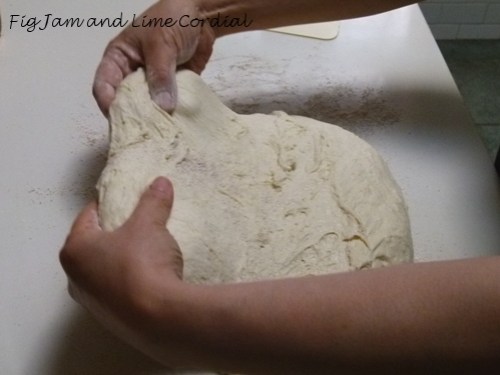
The dough is ready when it’s puffed up and airy – the photo below was taken after three hours rising time in our Sydney winter kitchen.

5. Heavily dust the bench and your hands with rye flour or fine semolina, then scrape the dough out gently – be careful not to knock all the air out of it.

6. Fold the top of the dough into the middle, and then fold the bottom over to enclose it, forming a long rectangle. It’s hard to explain, but the photos below should make it clearer. Keep your hands well dusted with flour, and use your scraper if necessary to help you manoeuvre the dough. It takes just a little practice to get this bit right.


7. Dust the top of the dough with more rye flour or fine semolina, then using your scraper, cut the dough into four roughly equal pieces.


8. Dust your hands again with flour. Pick each piece of dough up by the ends, give it a little stretch, and then place it on a sheet of parchment to go onto the pizza stones, or onto the lined baking tray.


9. Spritz the top of each loaf with a little water.

10. Turn the oven down to 220C (425F) with fan, and put the loaves in to bake for 20 minutes. Then rotate the loaves (if you’re baking on stones, remove the parchment now) or the oven tray, and lower the heat to 175C (350F) with fan. Bake for a further 20 minutes, or until the loaves are crusty and hollow-sounding when tapped. Note: please check your parchment paper instructions to ensure that it can cope with these oven temperatures.

11. Allow the loaves to cool on a wire rack before cutting.

Whew! Sorry to be so longwinded, but I wanted to make this tutorial as clear as possible. I hope you’ll give this a go – it’s a lovely Saturday morning bake – and quite forgiving once you get the knack of handling the wet dough. Every loaf looks a little rustic, but they all taste delicious!
Click here for a printable version of this recipe

AMAZING….I thank you for all of us baking challenged people out in the world.
Thanks to all the photos I think that even I can do this!!!
Judy, you really are very kind, thank you! :)
oh, yeah! I think I see what I’ll be baking on Saturday! I had a sourdough in mind, but your tutorial post is too tempting!
Loved the photos
Sally, to test it properly, I made this recipe three times before posting it – once as written above, once with fine semolina and bread flour (dough was so sticky it was almost liquid!) and once with 100% bread flour. The all bread flour version actually worked really well too, and kept much better than regular white yeasted loaves seem to. I think there’s something in the way the cold water reacts with the gluten. Would love to know what you think if you give this a go!
Beautiful loaves, Celia! This looks like a perfect Saturday morning bake!
Abby, thank you! I love that all my breadbaking buddies are going to try this.. :)
I’m sold! Now I have to go out and see if I can find someplace to purchase the semolina flour. The photos were the perfect accompaniment to the recipe too.
Thanks Cindy! As I was saying to Sally above, if you can’t get the semolina flour, it really does work almost as well with 100% bakers/bread flour. It’s quite a wet dough, so needs a lot of rye flour to stop it sticking too much!
I’m sold too. Got to try these :D
Thank you, darling! Hope you like them.. :)
Beautiful loaves with an enticing crumb!
I liked the pictorial- thanks to you and Pete for sharing this recipe.
I’m making this bread this coming week as well!
Thanks Heidi! We had quite a few loaves after I’d done experimenting with the recipe – have been handing them out to anyone who comes to the house! :)
Celia & Pete – thank you guys for such an awesome photo tute for this bread. Just gotta get me some Semolina flour & I’m going to try this – yes, you heard right ;) The photos have encouraged me to know exactly what I should do (sorta like breadmaking for dummies…. love it).
Anna, hope you have fun with this! Just remember to use lots of rye flour to help manage the wet dough! :)
Lovely – it looks as though it just came from the shop in Lucca.
That’s kind of you, Deb, thank you!
Excellent post, Celia, couldn’t be clearer! Thanks from one of those who doesn’t have a starter on the go. :-/
Amanda, that’s a bugger, I’m sorry it didn’t bounce back! :(
Yes, it’s back to the drawing board for me.
Yet another wonderful looking ‘Celia’ recipe to add to my must try list. Thanks Celia they look delicious.
When I used to work in the city my treat on market day was a little ciabatta pocket which I’d fill with gourmet cheese and put in the sandwich press. I miss it but looks like I can make my own now.
Claire, I sometimes cut the dough into smaller rolls for the boys to take to school – they work well, but need good strong teeth! :)
Ooh, where to start?! Bravo to Pete for being so snap happy! You just can’t beat a detailed sequence of pictures in my humble opinion.
Your peel! And your stones and oven! I don’t think I’ve caught sight of these before.
@bagnidilucca – I had a friend come back from Italy this week and was raving about Lucca!
Pondering (again) if semolina run through the coffee grinder could work in place as semolina flour..
Rustic loaves are the best ;)
Aaah the peel, isn’t she a beauty? And our oven (“Bob”) is affectionately known alternately as a “four fruitcake oven” and a “whole pig oven”. The semolina flour is very fine – the Italian version we buy is actually known as “remilled semolina flour”. It really does work almost as well with straight bread flour, but the flavour is a little different.
Wonderful tutorial Celia! You’re lucky to have Pete snapping away for you :-)
Imagine a world with out bread….oh!
Brydie, yes I am very lucky! :)
Excellent tutorial Celia. Thanks for clarifying the semolina flour thing – I have never seen it so assumed before that semolina was what was being specified. I have used it in bread recipes (where it worked well actually!) I’m sure that the dough is different here though. I really like good ciabatta but it is hard to find really excellent ones here so I’ll give this a go (especially as still struggling with sour dough).
Thanks Sally – I’ve used fine semolina in breads before and it’s worked well, but this recipe is quite high hydration and when I tried it with fine semolina (instead of semolina flour), it turned into soup. I still baked it of course, but it was a little flat loaf. :)
Semolina flour is sometimes marketed as pizza or pasta flour – it should tell you on the packet. What you’re looking for is durum wheat flour, as opposed to regular flour. Oh, I should update that to the post!
Hi Celia, completely off track but I didn’t know where else to put this. I made a freeform apple pie last night using June’s pastry and your microwave custard. Yum yum yum. Thanks for the recipes and the inspiration! I made a slight change to the method for the custard (because I didn’t read the recipe properly) – whisked the yolks, sugar, cornflour and vanilla together and then just whisked the milk in before microwaving. It worked and there was one less bowl to wash up!
Jo, that’s great news, thanks for letting me know! Glad to know the custard works well even without the extra step. Isn’t June’s pastry lovely? She was just over having a cup of tea.. :)
WOW! Thanks Celia and Pete for putting this brilliant tutorial together! I cannot wait to work with this dough once we are home. The recipe is printed and safely put away.
:-) Mandy
Thanks Mandy! I hope the trip home goes well! :)
That looks fantastic Celia! And remind me to tell you about a Pana de Casa story that Mr NQN’s brother told us :P
Sounds intriguing, Lorraine.. ;-)
thank you! The tutorial is fantastic :) I have a bread oven and am so spoilt by the fact that I don’t need to knead :)
Tandy, thank you! I barely knead either – I’m quite a lazy breadmaker! ;-)
Thanks for this, Celia! I’m too lazy to fuss with sourdough starter.
So what’s the deal with rye flour? What does it do?
Maz
Maz, the rye flour is remarkably unsticky, whereas regular bread flour often isn’t. Plus it adds a lovely flavour to the loaves!
Oooh! I’ll have to try that. Right now, with all the tomatoes and fresh basil, I’m experimenting with thin crust pizza. Getting close!
Maz.
Beautiful looking loaves you’ve made there Celia & another great tutorial. I will try & give it a go this weekend. Haven’t been doing much baking of late but am keen to give this one a try. Maybe mine will this time look as fine as yours! Great photos Pete.
Keri x
Thanks Keri, just remember to buy a little rye flour – the bench and your hands need a fairly heavy dusting. This dough is just a little bit wetter than the one we made the other day!
Wheat! Gluten! Arrrrrrrgh! Still seeking the perfect non wheat flat bread to go with middle easten food. This morning I made buckwheat and chia pancakes and they were great. Maybe I will try buckwheat and chia flat bread.
My friend the Spice Girl makes mung bean wraps that you might like, Frances.
Well illustrated. When’s the video coming out?
Hehehe…thanks Peter!
Thank you for the tut. Will be giving this a try at the weekend! Looks like my kinda bread.
Thanks for stopping by, Jon, hope you have fun with this!
On my list……’the Italian slipper bread’. Your tutorials give me so much comfort. Celia…I love the step by step
Thanks Oz – I hope you get to give these a go. After a while they really do get easy – I baked eight loaves yesterday and seemed to spend very little time on it!
Celia this is the most marvelous resource – my mind is busy working out how I can explain to my husband that I want a computer screen in the kitchen – it would be like having the most marvelous baker holding my floury hand.
Aaah Jan, you’re so sweet – comments like this make it worth getting my new camera covered in flour.. ;-)
What a terrific step-by-step Celia! It makes it all so clear, thankyou!
Thanks Becca! Wish I could come up with a gf version for you!
Roll on August when it will be me and my ipad with your tutorial in the kitchen!
Cool! Are you coming out then?
Hey Celia,
Had a go with yum result today. Of course had the wrong semolina even though the packet said wheat semolina – it was made in Australia and therefore different to the Italian flour semolina as you said ( I love learning all this stuff!) so I just used more flour. Halved the recipe (tiny oven) and used loaf tins as my baking paper doesn’t take the higher temp. Perfectly yum, hot, drizzled with golden syrup. One loaf down, one to go!
Thanks for the opportunity to try something new and healthy for my family. :)
Lisa, thank you for trying this out!! I’m so glad you were able to modify the recipe to suit you. You could try plonking the dough onto clean baking trays and then baking them without the parchment – my trays are all so grotty that I always line them. :) Re the semolina flour – it’s often sold as pasta or pizza flour, you just need to check out the ingredients on the back of the packet. I find anything labelled just “semolina” is too coarse, even if it says “fine semolina”. Having said that, I think the loaf works perfectly well with all bread flour too! :)
PS. If you’re using Glad Bake, it should be fine up to temps of 230C. It will go quite brown in the oven though! :)
What a fabulous step by step tutorial. Thank you Celia (and Pete!). I must have a go at these some time soon!
Thanks C!! I hope you enjoy it! There’s a sourdough version too – link is in the post, near the top.. :)
Oh wonderful! I’ve played off and on with sourdough but just don’t have baking patience to keep it alive and well for very long – I’ve wanted to try your Pane de Casa so now I can! All the males in my house are gone for the week so I’ll plan to surprise them with some fresh bread when they get home. Thanks Celia
Thanks Lynn, I hope the tribe all enjoy it! :)
[…] an assortment of cheeses brought straight from the City of Light. My mind was already set on this great post by Celia with a step-by-step tutorial for making her “pane de casa,” a variation of […]
Those look wonderful. I really need to get into a routine of making a loaf each weekend, as well as tasting so good it gives you a good workout as well!
Susan, these freeze really well. Last weekend I made 12 loaves! They really don’t give you a good workout though, as they is only the smallest bit of kneading involved here…