
We love our ciabatta recipe so much that I thought I’d try and come up with a similar recipe using yeast, for folks who don’t have a sourdough starter on the go. Pete took lots of pics as I was making it, so be warned – this is a very photo heavy tutorial!
The finished loaves are slightly different from the sourdough version, but they’re even easier and quicker to make. The recipe makes four small loaves, all with an elastic crumb and chewy crust. The semolina helps them to keep well for a couple of days after baking, or you can freeze them for a later date.

Because I’ve used cold water and a relatively small amount of yeast in this recipe, the proving time is longer than for regular yeasted loaves. It will vary a little depending on ambient kitchen temperatures, and is fairly forgiving – just make sure the dough is puffy before you turn it out to cut, as there won’t be a second rise.
I always use scales to measure my ingredients, but I’ve included approximate cup measures as well. If you have a smaller oven, please feel free to halve the recipe (use 4g dried yeast in that case).
Fig Jam and Lime Cordial Pane de Casa
- 500g (3½ cups) bakers/bread flour
- 500g (3½ cups) fine semolina (durum wheat) flour (we use an imported Italian flour)
- 7g (1¾ teaspoons) dried/instant yeast (or one sachet)
- 18g (2¾ teaspoons) fine sea salt
- 750g (3 cups) fridge cold water
- rye flour, for dusting
Note: don’t be tempted to use fine or coarse semolina instead of semolina (durum wheat) flour – the former is too coarse and won’t absorb enough water, and you’ll end up with a soggy mess. If you can’t find semolina flour, substitute more bread flour in its place and reduce the water by about 5%.
1. In a large mixing bowl, whisk together the flours, yeast and salt.

2. Add the cold water, and mix the ingredients together to form a sticky dough. It’s easiest if you do this with one hand, so you can hold the bowl (or answer the phone!) with the other. Really squelch the mix through your fingers until evenly combined. Scrape off your hand and cover the bowl with a tea towel. Allow to rest for 15 minutes.


3. Give the dough a quick knead in the mixing bowl – after the short rest time it will have relaxed a little. Just fold it over itself a dozen or so times, and then scrape your hand off again and cover the bowl with clingfilm or a shower cap. Allow to prove until well risen – this might take up to three hours depending on your kitchen conditions.


4. Once the dough is nearly risen, preheat the oven to 250C (480F) with fan. If you’re using pizza stones, place them on the racks to heat up, and tear off four sheets of parchment paper. If you don’t have pizza stones, line a couple of baking trays with parchment.
The dough is ready when it’s puffed up and airy – the photo below was taken after three hours rising time in our Sydney winter kitchen.

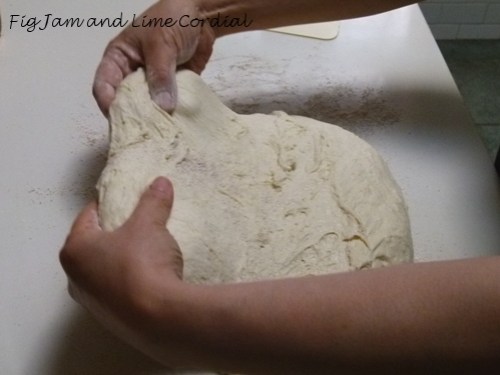
5. Heavily dust the bench and your hands with rye flour or fine semolina, then scrape the dough out gently – be careful not to knock all the air out of it.

6. Fold the top of the dough into the middle, and then fold the bottom over to enclose it, forming a long rectangle. It’s hard to explain, but the photos below should make it clearer. Keep your hands well dusted with flour, and use your scraper if necessary to help you manoeuvre the dough. It takes just a little practice to get this bit right.


7. Dust the top of the dough with more rye flour or fine semolina, then using your scraper, cut the dough into four roughly equal pieces.


8. Dust your hands again with flour. Pick each piece of dough up by the ends, give it a little stretch, and then place it on a sheet of parchment to go onto the pizza stones, or onto the lined baking tray.


9. Spritz the top of each loaf with a little water.

10. Turn the oven down to 220C (425F) with fan, and put the loaves in to bake for 20 minutes. Then rotate the loaves (if you’re baking on stones, remove the parchment now) or the oven tray, and lower the heat to 175C (350F) with fan. Bake for a further 20 minutes, or until the loaves are crusty and hollow-sounding when tapped. Note: please check your parchment paper instructions to ensure that it can cope with these oven temperatures.

11. Allow the loaves to cool on a wire rack before cutting.

Whew! Sorry to be so longwinded, but I wanted to make this tutorial as clear as possible. I hope you’ll give this a go – it’s a lovely Saturday morning bake – and quite forgiving once you get the knack of handling the wet dough. Every loaf looks a little rustic, but they all taste delicious!
Click here for a printable version of this recipe


