
. . . . .
The sun is shining and my boys are on holidays,
so I’m going to take a little breather to spend time with them.
Take care, have fun, and I’ll see you all in a couple of weeks or so!
. . . . .
Posted in Musings on September 27, 2011| 30 Comments »
. . . . .
The sun is shining and my boys are on holidays,
so I’m going to take a little breather to spend time with them.
Take care, have fun, and I’ll see you all in a couple of weeks or so!
. . . . .
Posted in Frugal Living, tagged burdock seeds, celeriac seeds, Hamburg turnip rooted parsley, New Gippsland Seeds, powdery mildew resistant peas, snake beans on September 26, 2011| 62 Comments »

I recently placed my first order with New Gippsland Seeds, and was really pleased with the parcel that arrived!
This seed company has been in business for nearly ninety years, and their catalogue was full of plants that we’ve been trying to track down for ages. I don’t know if any of these will grow in our backyard, but it’s nice to be able to experiment.
The photos below are taken from Wikipedia and other sources (all credited), as we obviously haven’t grown these plants yet, but I wanted to show you what we’re hoping for. I’ve included pics of the seed packets too, so you can see the details of each plant.
. . . . .
Hamburg Turnip Rooted Parsley
These seeds are actually for our neighbour June, who has been on a long search for the parsley grown as a root vegetable that she grew up eating in Hungary. I’ve never seen anything like it – apparently it’s quite different from the overgrown continental parsley roots that we occasionally pull out of the garden beds.

. . . . .
Burdock
 (photo credit: newasiancuisine.com)
Another vegetable that I’ve never tried, and this time the seeds are for my mum and Maude, both of whom love this stick like root. It’s quite commonly used in Asian soup recipes (there’s more information here). Pete’s not sure where we can grow these in the backyard (as they need quite a while to grow, and that doesn’t fit into the chook rotation schedule), so I might be passing the seeds on to Maude.

. . . . .
Celeriac

Ever since I bought a magnificently fresh example of this root vegetable at Eveleigh Markets, I’ve been pestering Pete to add it to our garden. It was absolutely delicious mashed with potato!

. . . . .
Mini White Cauliflower
I’m the only one in the house who will eat cauliflower, so it made sense to try this mini variety. I love the notion that each head would be enough for a single meal, but this was quite expensive seed, as there were only 15 seeds in the packet (as opposed to 100 to 200 for standard cauliflower)…

. . . . .
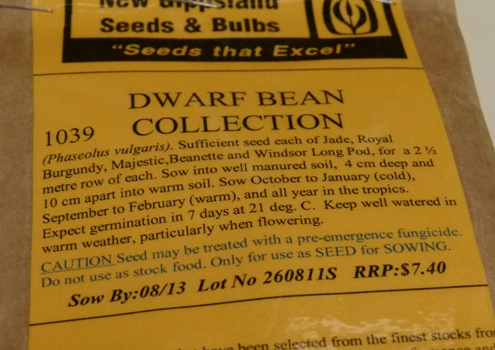
Snake Beans
My all-time favourite bean! I adore them fried simply with garlic and oyster sauce. We’ve never tried growing them before…

We also bought a packet of mixed dwarf beans to try…
. . . . .
Super Gem and Somerwood Peas

Super Gem was the variety I was trying to buy last year, when the lovely Lynn sent me Willow peas to plant instead. It’s surprisingly difficult to buy powdery mildew resistant pea seed, but both the Super Gem and Somerwood packaging clearly state that’s what they are. Pete was astonished at the quantity of seed we received – there were 350 peas in each $3.50 packet!
I would love garden beds filled with peas, perennial leeks and self-sown broccoli – we could happily fill our daily vegetable quota on just those three varieties alone! We’ll have to wait though, as it’s too late in the season now to plant peas…


. . . . .
I’m pretty excited to have new things to plant in the garden – hopefully they’ll all grow well!
If you’re a fan of seed catalogues (as we’ve become in recent years), you might enjoy reading this extensive one from New Gippsland Seeds. If you’re printing it out though, make sure you have your reading glasses, as the font is pretty small!
Posted in Recipes, tagged Patricia Wells Bistro Cooking, tarte tatin on September 23, 2011| 74 Comments »

Everyone has their own recipe for Tarte Tatin – this one is ours.
For the longest time, I avoided making this dish because I didn’t have a cast iron Tarte Tatin dish which could go straight from the hob into the oven. It wasn’t until I read Patricia Wells’ Bistro Cooking that I realised I was being daft. We now do as she suggests and cook the apples (her recipe is for pears) in a large non-stick frypan until golden, and then tip them into a pyrex pie plate, which lets us check on the apples as they bake.
It’s worth mentioning that the first stage of this recipe, which involves caramelising the apples, requires a measure of patience. I have none, and I’m a bit of a nervous Nelly about things burning, so I never manage to get the fruit really golden and brown before baking. Pete, on the other hand, is both brave and patient, so he always handles this part of the process.
A traditional Tarte Tatin uses a Pâte Brisée or flaky pastry, but we like it best with June’s sweet shortcrust pastry. Partly because there’s always some in the freezer!
Tarte Tatin
(an original Fig Jam and Lime Cordial recipe)
1. Preheat oven to 220C (425F) of 200C (400F) with fan.
2. In a large and heavy, preferably non-stick pan, heat the butter over medium heat until melted. Stir in the sugar. Now add the apple chunks, and stir occasionally to stop them from sticking. Continue to cook, stirring gently and moving the pieces around often to ensure they don’t burn. The fruit will get very brown and quite soft – this can take half an hour or more.
3. Tip the well caramelised apple pieces and any remaining syrup into a pyrex pie dish or other suitable container. The pyrex doesn’t need to be greased first, although I’m not sure about other dishes.
4. Between two sheets of parchment, roll out the pastry dough until it is slightly larger than the top of the pie dish. Peel off the top sheet, and invert the dough onto the top of the apples, then remove the bottom parchment. Now carefully tuck the edges of the pastry in around the apples.
5. Bake the tart until the apples are bubbling and the pastry is a dark golden brown, between 30 – 40 minutes. The actual baking time takes a bit of judgment – I was sure the tart was burnt, but Pete was insistent that it was ok – and it was!
6. When the tart is ready, remove it from the oven and immediately (and carefully) invert it onto a heatproof serving plate. Any stuck apple pieces should fall slowly onto the tart – a gentle tap on the outside of the dish can help.
Posted in Frugal Living on September 21, 2011| 62 Comments »

Spring has sprung!
In our front yard, some vigorous weeding has uncovered a cluster of bluebells, magnificent in their delicate purpley-ness. We’ve also removed a huge old rambling rose which was smothering the white azaleas…

Our blueberries have been transplanted into a permanent spot – they survived their first year in a pot and are covered in fruit. I hope we get to the ripe berries before anything else does…


We only managed to grow small garlic heads last year, but this year we kept the cloves in the fridge for a month before planting them out to see if that will make a difference…

We grow two types of mint in our backyard, both in contained spaces. This large pot is a variety of peppermint…

…and truckloads of spearmint are growing in a tiny bit of soil – just a single brickwidth’s worth around the base of the pots and the laundry tub…

Our broccoli seems to have flowered overnight! Pete is always keen to let it go to seed, and all the broccoli we’ve been eating recently has come from self-sown plants. Makes life easier for everyone, especially the bees!
What’s happening in your gardens at the moment?

Posted in Food & Friends, Recipes, tagged Aylesbury duck, confit duck, duck rillettes, Haverick Meats, Maggie Beer on September 19, 2011| 64 Comments »
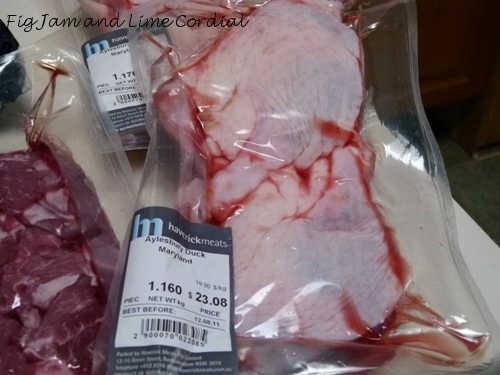
Since discovering that we could buy fresh Aylesbury marylands (drumstick and thigh portion) at Haverick Meats, duck has become a staple food in our house. It’s surprisingly good value – the meat is so rich that just a couple of pieces are enough to feed my entire family!
Edit: Good news! I’ve just been told by the handsome Pave at Haverick’s that the duck marylands are coming from Thirlmere Poultry (whose ducks are all free-range).
I confitted ten marylands using this recipe by Maggie Beer…
1. In a small food processor or blender, blitz the salt, herbs and bay leaves together. Rub this all over the duck pieces and refrigerate for 4 – 6 hours – the original recipe suggests overnight, but I find that makes the duck too salty for our liking. I prepped my duck at lunchtime, and then put them into the oven after dinner.
2. Rinse the duck pieces well and dry them with a paper towel. Preheat oven to 90C (not fan forced). Pack the duck pieces as closely together as possible in a baking dish or casserole – Maggie says you can layer them up to two deep.

3. Heat the duck fat very gently in a saucepan until just melted, and pour over the duck pieces until they’re completely covered. If you like, tuck a couple more bay leaves and sprigs of rosemary into the oil. I used a ceramic roasting pan, but next time I’ll use my large casserole pot, as it was impossible to get the roaster out of the oven without sloshing duck fat everywhere!
4. Cover the dish – I used foil – and bake for 10 hours (overnight), after which time the meat will be extremely tender and falling off the bone. If you wanted to serve the pieces whole, you might wish to reduce the cooking time substantially (Raymond Blanc suggests 3 hours).
5. Carefully ladle out the clear duck fat, taking care to avoid any coloured stock settled at the bottom of the pan. To store the marylands, scatter a little salt at the bottom of a large casserole dish (to stop the juices going rancid), then pack the pieces in as tightly as possible. Completely cover with the clear duck fat and store in the fridge. As an aside, I asked my food chemist friend Lee about storing confit duck – here is his reply.
6. Carefully pour the remaining fat and juices into a bowl and pop it into the fridge. After a few hours, the fat will set at the top and can be scooped off and stored, and a jellied stock will be left at the bottom of the bowl. This is gold. Unlike regular stocks which are made with water, these are the concentrated juices of the cooked duck. I store mine in small containers in the freezer (you’ll only need a little bit to flavour a whole dish) .

Duck Rillettes
I stored six of the marylands whole and used the remaining four to make Maggie’s Duck Rilletes. The skin and bones were discarded, and the meat finely shredded. An extra tablespoon of chopped rosemary fried in a little duck fat was stirred through the meat, which was then packed tightly into tea cups and topped with a bay leaf.

A thin layer of melted duck fat was poured over the top of each serve to seal it. The Rillettes were stored in the fridge, and the fat scraped off before serving. They were delicious served with a crusty sourdough and bread and butter pickles.

My friend and neighbour Maude created an amazing pasta dish using the Rillette that I gave her – she fried chopped Tuscan Kale and garlic in olive oil, then combined it with the shredded duck meat and stirred it through hot pasta.
I made a variation of this for dinner last night using chopped spinach from the garden and a couple of skinned and shredded marylands, as we’d eaten all the Rillettes. I also added a spoonful of the jellied duck stock, which intensified all the flavours. As we already had confit duck in the fridge, we were able to turn out a delicious meal in the time it took the pasta to boil!

© All text and photos are copyright 2009 - 2024 Fig Jam and Lime Cordial. All rights reserved. Please ask first.
 (photo credit: Wikipedia)
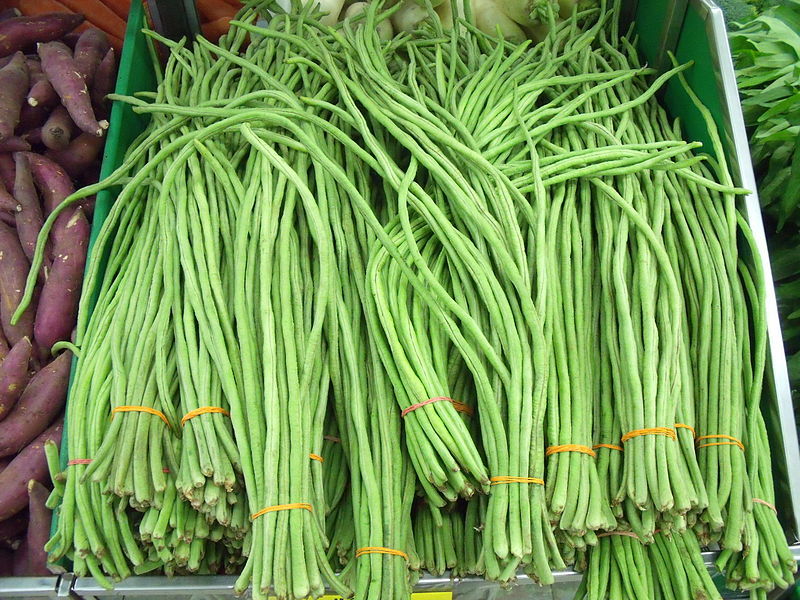 (photo credit: Wikipedia)