
2019 Update:
This tutorial was written more than nine years ago and I now make my sourdough in a very different way. Please refer to the 2018 Sourdough Cooking Class: Step By Step Instructions for our latest instructions, it will help you to produce a much better first loaf. I will leave this post up for archive purposes.
. . . . .
This sourdough tutorial produces a tender, closed crumb bread rather than a crusty, holey loaf. I’ve written it to provide bakers who are new to sourdough with an easy first loaf – the lower hydration dough is easier to handle than the much wetter ones needed to produce more “traditional” crusty loaves.
The aim is to provide a “proof of concept” first loaf – once you know your sourdough starter will actually produce decent bread, you can then experiment to your heart’s content!
. . . . .
Inspired by Rachel’s sourdough diary post, I thought I’d try writing a beginner’s sourdough tutorial in a similar format. I’ve ended up with a very long and detailed post, so please don’t feel you need to read it all if breadmaking isn’t your thing!
Some basic information:
Firstly, sourdough bread refers (generally) to loaves which are baked using wild yeasts rather than commercial bakers’ yeast. These wild yeast organisms are kept alive in the form of a “starter” (also known as a “leaven”), and are fed regularly with flour and water.
Secondly, baking sourdough bread involves a time commitment. Unlike regular yeast breads which can be turned around in a couple of hours, sourdough baking from start to finish can take up to two days (with some artisan bakers taking even longer than that). Generally speaking, the longer the dough takes to rise, the more sour the finished loaf will be.
Thirdly, if at all possible, use scales to weigh out your dough ingredients. I say that even though I feed my starter in cup measures (as that was how I started years ago, and it was too hard to rework my recipes). But for actually making the dough, I always use scales.
Finally, apart from patience, the other important ingredient is bakers’ flour (also known as bread flour). This flour has a significantly higher protein content than plain (AP) flour, and is required to achieve rise in the finished loaf. When I refer to “flour” in the text below, I always means “bakers’ flour”.
Edit: try to feed your starter with filtered water, especially if your tap water is a bit dodgy. I’ve had a few friends who’ve had difficulty with their doughs as a result of heavily chlorinated tap water, so I’ve amended the instructions below accordingly.
. . . . .
Day 1
To begin with, you need a sourdough starter. Lots of people make their own, but I bought mine from the US.
I actually bought two starters and at some point they merged into Priscilla, who lives in a covered container in the fridge.
After a period of time in the fridge, a liquid (“hooch”) might form on the top of the starter. This might be quite dark in colour. Don’t panic! Either tip it out or stir it in, whichever you prefer.
This is what Priscilla looks like after having been ignored for a week…

Before I can bake with her, she needs to be woken up and given a few feeds for optimum potency.
As I was planning to bake on Saturday, at 1.00pm on Friday, I took the container out of the fridge, gave it a stir, and then scooped ½ cup of starter into a large bowl.
Into the bowl, I stirred in ¼ cup each of bakers flour and filtered water. It was then covered with clingfilm and left on the bench.
Into the container, I stirred in ¼ cup each of bakers flour and filtered water. It was then covered and returned to the fridge for next time. Always remember to feed your fridge starter every week or so to keep it alive.

At 5.00pm, I gave the starter on the bench another ¼ cup bakers flour / filtered water feed.
At 10.00pm, I gave her a final feed of ½ cup each of bakers flour and filtered water (the little extra just to get her through the night)…

. . . . .
Day 2
At 6.00 am the following morning, the starter was fluffy and bubbly and frothy.
Please trust me on this: don’t bother trying to bake bread if your starter is sluggish – you’ll just end up with a flat loaf. It should look like this before you begin…
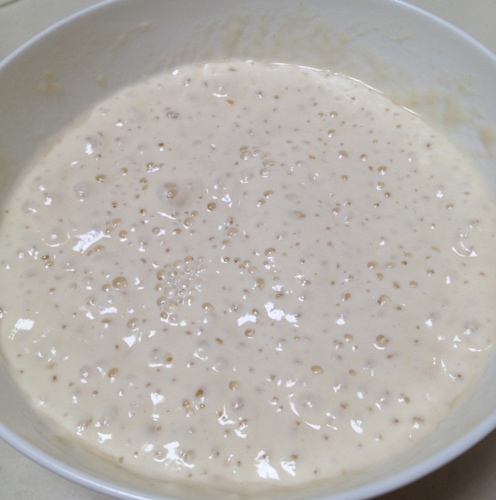
If your starter is still looking a bit flat at this stage, give it another small ¼ cup feed and leave it for a few more hours to get bubbly before making the dough.
Priscilla can be a bit of a diva – sometimes she needs more pampering than others.
7.00 am
In a large mixing bowl, I combined:
- 150g bouncy, ripe starter
- 250g water (filtered, if necessary)
- 25g olive oil
- 500g bakers’ flour
- 10g fine sea salt

The ingredients were squelched together – the aim is to squish them all between your fingers until no dry bits remain (that’s as technical as I can get!)…

After scraping off my fingers, the dough looked like a shaggy mess. It was left to rest, covered, for half an hour – this brief pause makes the kneading process much easier…

7.30am:
I uncovered the dough, and gave it a quick knead in the bowl – I timed myself and kneaded for exactly one minute, which was all it took to work the dough into a reasonably smooth condition.
At this stage, the dough was covered and left to bulk prove for several hours.

1.00pm:
As it was Saturday, Pete and I spent the morning running Small Man to sport and then shopping. We didn’t get back until 1pm, by which time the dough was well and truly risen. It’s very warm here in Sydney at the moment – at different times of the year, the proving time will vary from four to ten hours.
The aim is to allow the dough to double in size (watch the dough, not the time!), but mine went beyond that. It’s a testament to the vitality of Priscilla that she always seems to bounce back, regardless of how long I leave her doughs (other starters might vary)…

I scraped the dough onto a lightly oiled bench…it deflated in the process…

…and then I shaped it into a round ball, by folding the edges into the middle as follows:
I lined a baking tray with parchment paper, and gently positioned the ball of dough onto it. A sheet of clingfilm was sprayed with a little oil, and laid snugly over the dough to stop it forming a skin.
It was left to prove until puffed up, but not quite doubled in size. If it gets too large on this second proving, it might not rise as well in the oven.
(A note: please check the recommended baking temperature for your parchment paper – the brand I use is safe up to 230C. If you’re at all concerned, place the dough directly onto a greased tray.)

1.45pm:
The oven was preheated to maximum.
2.10pm:
Once the dough had risen, I removed the clingfilm…

…and slashed the top with a serrated knife.
As my friend Teck Poh used to say, “Slash with panache!” The dough was quite firm, and coped well with quick, assertive cuts…

2.15pm:
After spritzing the top of the dough with a little water, I popped the tray into the oven, dropping the temperature to 220C with fan at the same time. The dough was baked at this temperature for 20 minutes.
The hot oven causes the yeasts to burst and give the dough one last lift before dying off, in a process known as “oven spring”.
3.05pm:
Here’s a photo of the loaf at the 20 minute mark – as you can see, it had risen considerably by that time. Opening the oven door to take a photo was not a particularly smart thing to do, as it let all the heat out, but I wanted to show you what it looked like at this stage. It was quite brown already…

3.05pm:
I turned the oven down to 175C with fan, and baked the loaf for a further 20 – 30 minutes.
Bake until the crust is hard and quite brown, and the base sounds hollow when tapped (take the loaf out with oven gloves and turn it over in your hand, then knock on the bottom with a knuckle – it should sound drum-like).
In breadmaking, an extra ten minutes won’t do much harm (my loaf needed the full 30 minutes at 175C), and if there is any doubt about whether or not the loaf is ready, it’s usually better to bake it for a bit longer.

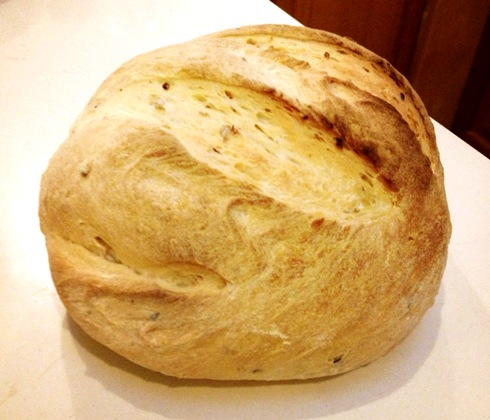
The loaf was left to cool completely before slicing (cutting a hot loaf causes it to go stale faster, and can also result in a gummy crumb)…

This method produces a tender crumbed white sourdough loaf with a mild flavour. It isn’t the chewy ciabatta bread that we normally eat at home, but it’s a great first loaf to bake, as the lower hydration makes the dough quite easy to handle.
There will be leftover starter in the bowl, which can be stashed in the fridge for later use, or turned into sourdough pancakes.
If you have any questions, please feel free to leave them below, and if I can’t answer them, I’m sure one of my many sourdough baking buddies will be able to help!
. . . . .
PS: My neighbour Michelle, whom I taught to bake bread a couple of weeks ago, tested this recipe for me. She added soaked grains to her dough. This was her first sourdough loaf ever, and look at what a wonderful job she did!

Thank you, thank you, thank you Celia – this is JUST what I needed.
See Sally, waking up to your comment made the hours that it took to write this post all so very worthwhile! :) Thank you darling xx
What a wonderful tutorial, Celia…thank you for taking the time to do such a thorough post.
Thanks for taking the time to wade through it, Karen! And thank you again for the recommendation of the pumpkin seed oil, we used it in a grilled vegetable salad yesterday, and it was sublime! x
Celia, this was such an amazing post! It was really helpful for me!
I’m glad you mentioned that dough can take anywhere from 4-10 hours to rise. We’re having a very cold winter, and my dough takes forever to double in size! After I bake it, I notice that my loaves are sort of dense. Do you think this is because it did not rise properly, or does it have to do with my kneading? I weigh all of my ingredients, use baker’s flour, and knead by hand. THANKS!!! :)
Emilie, you’re most welcome! :)
All starters are different, but here are my suggestions. Firstly, I doubt it’s related to kneading, as I barely knead at all anymore. I think it’s more likely to be:
– your starter isn’t quite active enough – it might be worth investing some flour and giving it twice or thrice daily feeds and keeping it in a warm spot to try and perk it up
– you might need to let your bulk dough rise a little longer, particularly if it’s really cold. I sometimes put the dough in the microwave to prove, with just the light on.
– you might need to let your shaped dough (second prove) rise a little less – I’ve found that if I let the dough overprove the second time, it will have less oven spring
– finally, you might want to try a higher hydration dough – if you’re looking for the large holes that you see in artisan sourdough, they usually come about because they’re using very wet doughs. They can be fiddly to handle though! :)
If it’s not one of these things, maybe my more experienced bread baker friends can suggest something? xx
Hi Celia! This is great info, thank you so much! Based on your suggestions, I think that I need to let my bulk dough rise a little longer. I definitely jump the gun on this one. Your microwave tip sounds perfect! I’m also going to check out some higher hydrations recipes.Thanks again :) xx
Good luck, Em! Can’t wait to see how you go! :)
Great tutorial, Celia! I am going to keep this one in mind, as I get emails of people asking me for links…
great job!
BTW, I also had two sourdoughs, one I made myself (Dan), the other I bought from King Arthur – but I let that one go, it was just too hard to keep two going. Dan (my starter) is turning 4 years old next month!
Thanks Sally! Did you name your starter after Dan Lepard? I’m sure he’d be very chuffed by that! :)
Fabulous step by step tutorial Celia! I have been feeding my starter regularly but have neglected baking with it. I will have to have another go soon, your bread looks fabulous as always. I’m going to share this post with my brother too…. He’s just starting to think about sourdough. Thank you for a lovely post in your lovely style – chatty yet detailed and informative!
I’m not sure my starter ever looks that bubbly and active though, although I guess being rye it will behave differently. I’m slightly envious of your warmth…. I sometimes wrap my sourdough in an old towel or duvet with a warm hot water bottle for company!!!
Caroline, thanks so much for saying that – the post kept getting longer and longer, and I was sure it was too much by the end! Rye starters really are different – I’ve never had one, but Maude across the road converted part of her Priscilla clone into a rye starter and loves it.
I find that if I leave starter or dough in the microwave with the door just slightly ajar and the light on, there’s quite a bit of gentle warmth in there. Might work for you? Although I’m really not sure how cold it is over there at the moment!
AWESOME tutorial, thank you so much Celia.
:-) Mandy xo
Mandy, thank you for working your way through it! xx
This is fantastic and inspiring Celia!! I’m going to have to search out a starter here in the city, I’m sure there’s one somewhere! I can’t wait to name my own sourdough starter.. xx Smidge
Smidge, order one from Teresa at Northwest Sourdough. The international shipping was only $5 to Aus, so I’m sure it wouldn’t be more than that to Canada! Having now baked with her starter for six years, I can highly recommend it – both the Northwest and the San Francisco were great (I think Priscilla was mainly NW, but I honestly can’t remember now!).
http://www.northwestsourdough.com
Thank you for this, Celia! I’ve not had my sourdough going for some time and it’s time I started up another one. Once it’s going, I’ll be sure to return here to follow your tutorial. There’s really nothing like a freshly baked sourdough, be it in a loaf or rolls. Time to get to work! :)
Thanks John! You’re good to make your own – I tried, but all I ever successfully grew was purple mould! :)
What a great post. I don’t have time to read it all now, but I am saving it for later. I MUST make a starter and try this! So lazy :D
Nick, not so lazy! You’re at uni, I’m so impressed you have time to do all the cooking you do as is! I never managed to make a starter, but the one I bought six years ago is still going strong! :)
I’ve not been at uni for over a year now, Celia! Keep up! :D
Look, are you 25 yet? No. Ergo, in my brain, you are still a uni student. :D
Haha – a mere 22, I’m afraid!
Wonderful, Celia, thanks so much. Bookmarked this for a time when I can focus fully on making a starter and baking bread regularly. Great post. Well done.
Lizzy, thank you, if you ever want me to send you some starter, just say the word! xx
Thank you so much! I’ve been so keen to create a sourdough start and then bake and all these recent posts are definitely pushing me in the right direction!
Clare, you’re most welcome – once you start on the sourdough path, you’ll never look back! :)
Great tutorial, Celia. I love the video especially with the sirens in the background! I really should start baking my own bread especially when you have provided such a good step-by-step process. How could I fail! xx
Hehehe…the video was taken years ago for my first bread tutorial – I didn’t remember the sirens until I was writing this post again. Proof that we really do live in suburbia! You know you only have to call, and I’d be giving you sourdough lessons! Nice excuse to spend a day together! :) xx
I thank you, too, Celia! This is very well done- and I hope to share it with others who want to learn. I haven’t ever named my starter. Thinking about it now, though.
Thank you, Heidi! Priscilla was named after the movie, “Priscilla, Queen of the Desert”, about three drag queens performing in the outback. Priscilla was actually the name of their bus! :)
http://en.wikipedia.org/wiki/The_Adventures_of_Priscilla,_Queen_of_the_Desert
My starter’s full name is actually “Priscilla, Queen of the Refrigerator”. :)
Thanks for taking the time to put this together Celia. The photos in particular are useful for those who lack confidence (nothing like being able to compare with a picture). I was really impressed with Michelle’s effort, lets hope that door has been dispatched pronto! xxx
Ali, isn’t Michelle a star? She brought that over at 7pm while it was still hot to show us! I’m glad you found the tutorial useful – I think the most important thing is always that the starter is awake and bubbly, so I wanted to make sure I showed some decent photos of that.. xx
What a great tutorial – I didn’t know that was how you got that clean shiny look to your loaves, I must try that covering the dough direct in oiled clingfilm method – it looks beautiful xx :)
Thank you! I know that’s not the usual way either of us would prove bread, but it’s a much easier starting method than bannetons or floured cloths and baking stones! :) And bannetons really are a commitment! xxx
Fabulous post Celia. You demystify the art of sourdough and make the whole process so accessible – just wonderful!
Amanda, thank you! I hope it’s not too longwinded! It was fun to write! :)
Dear Celia – I have just stumbled upon the many gifts you so generously share here – blessed are we to have such knowledge shared by a Lady of so much candor, grace and seemingly endless wisdom!
Thank you for doing, giving and sharing all you have and no doubt; will continue to do! I had hoped to please encroach upon you for a favor? In an older post you kindly shared the lovely images of the tin of plum mousse from Germany – I have a very dear friend here in Sydney who is feeling insanely homesick – would you be so kind as to share with me where you were able to find it?
I know it is certainly one of her favorites and would no doubt make her day… pushing your kindness and wealth of knowledge a little [OK – WELL A LOT FURTHER] – I would love to bring her some: “as close to the taste of home” rye sourdough to enjoy with that. Until my skills are honed; is there somewhere in particular you might recommend I could acquire a very traditional German loaf?
Any and all help you might be in a position to lend would be so very deeply appreciated.
I am in sheer awe of the scope of your home here on the net – I feel very honored to have happened upon your remarkable blog! THANK YOU!
Kind regards and my every sincere gratitude – Ms Phoenix
Ms Phoenix, thank you for taking the time to leave such a lovely comment!
Is this the plum mousse you mean?
If so, I found it years ago at Zanetti IGA in Haberfield – I’m not sure if they’d still have it though, as they tend to have one-off items in their store. I have to head over to Haby to go to the cheese shop this week, so I’ll have a look for you and see if Zanettis still have it in stock.
Regarding the German sourdough – I haven’t tried it, but I saw this SBS programme about the Bavarian Bakehouse in Gordon:
http://www.sbs.com.au/food/foodart/133/bavarian_sourdough_bread
Here’s the Sydney Morning review: http://www.smh.com.au/news/Eat-Up/Sourdough-suite/2005/06/13/1118514964372.html
Good luck with your quest! :)
Bad news, I just checked with Angelo at Zanettis and he said the item has been discontinued, which probably means it isn’t being brought into the country anymore. You could try the continental delis and see if any of them have old stock?
Great post Celia. Thanks. I was given a sourdough starter a couple of months ago and it’s languishing in the fridge. Will pull it out and give this a go as you make it sound so easy!
Thanks Mel! If your starter has been in the fridge for a while, it will probably need a few good feeds to get it ready to baking (maybe even over a couple of days)!
Excellent tutorial, Celia. I won’t need to bake again until the end of the week/weekend, so i’ll start feeding up Priscilla again nearer that time. But tell me about the grains – which grains did your neighbour use, how long were they soaked for, and when were they added to the dough? Until next time …
Rachel, we buy packets of grain mix from Harkola – they’re very cheap – and soak the grains overnight in water before adding to the mix. It’s very ad hoc – Michelle just added a couple of large spoonfuls of drained soaked grains to the wet ingredients before mixing in the dry. She was making a double batch of the dough, so probably a single large spoonful would have been enough for a single loaf.
Soaking the grains makes them much softer to the tooth, and I think makes the bread much more palatable! I’ve soaked them before in riesling.. :)
I am speechless! And so grateful! Since I’ll be looking in my postbox during the days to come for my little parcel from Northwest Sourdough, this ever-so-clear and fun tutorial could not have come at a better time. Don’t think I have ever had a recipe with clear advised times of the day before and so many [appetizing] pictures. This surely was not on my agenda, but will it ever be [useful] fun :D !
Eha, I’m so glad it’s of use to you! Hope it works out well! :)
After doing a “normal” bread making class a few weeks ago there is no way I would attempt sourdough as I found the normal bread WAY out of my skill level. I really admire people who make sourdough at home – that’ll be me in my next life I hope.
Mel, don’t give up! It just takes a bit of thinking to get your head around the process, but it’s not really hard…
[…] been reading a sourdough tutorial by Celia at Fig Jam and Lime Cordial (she introduced me to this baking game in the first place), and […]
Celia this just may have been my push. That’s one reason I was a bit scared to experiment with sourdough again. All the info out there was just too daunting. This is just perfect!
Claire, this is just my method, there really are so many different ways to work the dough, as you say. But I think if you find one way that works, then you’ll have the confidence to experiment with other techniques later!
Thanks for these instructions, I’m trying to work up my courage to bake bread and after living in San Francisco for 10+ years, sourdough is my favourite!
This leads to a tasty but quite simple white sourdough loaf. The chewy SF sourdough would probably use a different technique and much longer proving times, but I was trying to keep things as simple as possible to start with! :)
This is great Celia. At times I have considered doing a sourdough blog post but have always dismissed it as being too complex and detailed. You have captured the steps perfectly and made it easy to follow. One thing I have learnt with bread making it that I never stop learning!
I need some guidance on grain bread…I might email you one of these days if that is OK?
Jane love, I know exactly what you mean, which is why it’s taken me nearly four years to figure out how to blog about it! I’m not very good with grain breads, but I have found all the techniques in Dan’s THL really great for soaking and precooking grains before adding them to the bread. I remember an old miller saying to me that in the past, grains were always soaked before adding them to a loaf, but that step is now omitted in order to speed up the process.
You are a good teacher, Celia – a very nice post. And you got beautiful oven spring on your loaf!
Doc, you are very kind, thank you! I was trying to keep it simple and not put people off, and ended up with a massive post nonetheless! :)
Wonderful step by step Celia! Thanks for de-mystifying the whole process xox
Thanks darling! I’m sure there’s very little I could teach YOU about breadbaking! :)
Brilliantly timed post as my friend Jane-Anne was asking about this yesterday. I didn’t know you could keep the starter in the fridge. If I can get our house sitter to look after it while we travel I might start one soon :)
Tandy, I can’t really keep a starter alive on the bench without daily feeding, and I just don’t bake that often! Priscilla goes one to two weeks in the fridge between feeds, and she’s been fine for six years! :)
Good tutorial Celia. We should get a few more sour dough makers from this one. We will soon be able to take over the world.
Ha! I always knew you had plans for world domination, Glenda! :D
Oh! I make bread all the time but never a sour dough!! I will have to have a try, although I don’t know where I would get a starter from?
I bought mine from Northwest Sourdough in the US – both the San Francisco and Northwest ones are excellent!
http://www.northwestsourdough.com
I love this tutorial, Celia.
I think it’s concise, rather than long as you say.
I’ve got my tutorial in emails, but it would be better as a single blog post. And it’s interesting to see your feeding method. Different to mine, as I feed up my mother starter only, and have 2 or a max 3 days of baking with it, using 120g of it usually for each bake.
You take out a portion and feed that for each loaf you bake.
Perhaps everyone should make a sourdough tutorial so we can see how they approach the process.
Nice one.
Gill, isn’t it interesting how different everyone’s approach is! I’ve often toyed with a mother starter, but never had the fridge room or brain space to take one on. I must try it one day to see what difference it makes to the finished loaf!
Thanks again to the teacher/master extraordinaire!
You are SUCH a quick learner, Michelle! :)
What a good post Celia. I feed my whole starter before baking, take out what I need and put 100g aside to start again but your way looks better (mainly because I wouldn’t have to feed the starter so much between feeds). How big is your mother starter?
Anne, my starter is kept very wet, so it’s not really a stiff “mother” like some others. Having said that, all my fridge reserve tank is what you see in the photo above – it’s probably about two cups worth.
I remember when I first started SD baking, and I wanted to make sure my starter never disappeared and I kept all these little containers in the fridge. I wonder if everyone does that at the beginning.. :)
Thanks Celia. My starter’s wet too so I’m going to give your way a try. I have a little bag of starter in my freezer just in case I kill my starter or decide to take a long break from SD baking.
That is a great tutorial. I’ve been baking bread for, literally, decades and have never gone down the SD route – it’s always been a basic rather than an interesting thing to do.
I will certainly give it a go. Thank you.
Pat, I find SD baking far more interesting than yeasted breads, mainly because the results can occasionally be unpredictable! :)
You are the sourdough queen of the year. Thank you Celia, this is ‘food for thought’.
Thanks Rose! xx
Isn’t it interesting to see how many people are keen on sourdough bread making ? I have been making it for a couple of years now, sometimes it is very good, other times not so good, but always enjoyable. I don’t make mine in exactly the same way as you do, it is always interesting to see the various ways people go about making their dough, at first I thought I must be doing mine the wrong way but after reading bread blogs it seems there as many ways as there are breads! I found your tutorial very interesting and informative, bless you for taking the time to do this for other would be bakers.
Jeannette, thank you! I think the interesting thing about sourdough is that we all start one way and then find our own path – I’ve taught heaps of people to make sourdough in the past, and none of them do it my way anymore! :)
Wonderful tutorial, easy to follow and comprehend. Will save for when I can get into the groove.
Thanks Norma! It does take a bit of time – and maybe not the easiest thing in the cold weather you’re having at the moment!
Thanks for posting this. Sourdough is about the only bread we eat here at home but I often encounter an issue that you may be able to help with. I have trouble making free form loaves like the one above. As my dough rises it spreads resulting in a flat loaf. I live in QLD so am not sure if this is because of the temp or if I need to make a drier dough. Or could it be the shaping of the final dough? If you have any thoughts let me know.
Hi Fiona, not knowing what your dough formula or starter are like, I can only guess…
– you could try a lower hydration dough. If I want my doughs to really keep their shape and slashes, I go for about 60 – 65% hydration. The trade off is that the higher hydration doughs produce the really holey crumbs that we like.
– the other suggestion is that it might be that your oven isn’t hot enough to give them a really good oven spring? We usually bake our doughs on a stone, which helps with oven spring as well.
It could be a shaping issue – my friend Heidi is the queen of making doughs behave, so I’ll ask her if she has any suggestions for you.
Hi Fiona- Celia asked me to add a few ideas on shaping . I make a lot of free form breads that hold their shape through baking by creating what is called a gluten cloak as I shape the bread. You fold and smooth the dough to a very tight tension, pinching it together and then smooth again, holding that tension carefully, because it can tear. You can feel the tightness of the cloak on the surface of your dough- and make sure the seams are tight and placed on the bottom of your piece. You can do this on a large loaf by folding and keeping the tension tight whilst pinching- I have a tutorial on shaping smaller pieces, here, http://www.heidiannie.com/a-bread-shaping-tutorialbread-bears-for-celia-and-all-my-bread-friends/
I hope this helps.
Heidi, thank you! xx
Great post! I love sourdough pancakes! They are the delicious by-product when making sourdough bread!
Manuela, they’re a regular weekend breakfast here! :) x
Thank you so much for the tutorial! I got your email but then thought “Oh crap, can I do it without killing it?” and then I read this and I think I can! :D
I’ll get some starter to you next time I see you! :) x
That’s a gorgeous looking loaf of bread and a wonderful tutorial. I have been using tins thus far but I’m going to give a round loaf a go this weekend to have with Claire’s macadamia dukka.
Jo, I hope it works well for you! Claire’s dukka does sound wonderful.. x
Celia, happy year of the Snake to you. Loved the tutorial and all I need now is the starter! How easy is it to make one? Being across the ditch so to speak. Will have to go on a hunt.
Annie! Happy New Year darling! I’ve just emailed you! :)
I’m new to SD baking and have been following a long, convoluted SD recipe that takes forever – 2 days of feeding the starter 3 times a day, one day getting the bread ready to bake and the final day baking. If I have an active starter, can I just pull it out of the fridge, give it a feed and get on with actual bread making process? Feeding for 2 days prior seems to waste an awful lot of flour and means I have to be around (and remember!) to feed it at specific time.
Thanks for a great tutorial, Bronwyn.
Bronwyn, as I told a friend recently, SD baking should fit into your life, if you life has to fit into it, then it becomes a chore. :)
I find if I pull Priscilla out of the fridge, she always needs a couple of feeds to get her going. Often I’ll just feed her twice – once at lunch time and once at dinner, but when I was writing this, I wanted to make it as foolproof as possible, hence the suggested three feeds. I’m sure the method you’re following produces an awesome loaf, but it just wouldn’t fit into my life.
My big tip is this though: never try to bake with an inactive starter. It needs to be bubbly and lively, or you’ll end up with a flat loaf. It’s possible that days of feeding will produce a better flavour, as might the long prove, but it really is more time than I have to invest.
An excellent post Celia. I had to do more than one SD class before it all finally ‘clicked’ in my brain and I felt I could do it alone. Your tutorial sets it out quite clearly and makes it seem accessible.
I think people find bread baking so confronting because most methods read “You must do it like this or risk failure” when in reality there are so many ways to make a successful loaf. My method is completely different to yours as I use a rye starter and I also follow a dough retardation method developed by a lady here in Perth which is great in hot weather. But I still get a decent loaf.
Well done for spreading the SD love.
Thanks Tania! Yes, we all bake differently! I was trying to find as simple a method as I could for a beginner’s tutorial, but as you say, there really is no “right” way! :)
Thanks – I am going to give it a try :)
[…] a look at Celia’s brand new tutorial if you want to see how it is done superbly in the hotter climate of Sydney, Australia. Or if you […]
Having created a reasonably successful focaccia for Saturday lunch (burned fingertips excluded) I’ve been looking through your bread recipes for further inspiration…can you tell me please what “grains” you soak and add to your bread mixture?
Gill
Gill, I don’t usually add grains, but I have just made a grain loaf which worked really well. There’s a post coming in a few days time, but basically I bought grain mix from the shop, soaked a handful of it in water overnight, drained it really well, and then added it to the mix.
The grain mix I bought had: kibbled wheat, kibbled corn, kibbled rye, malted wheat and linseed.
Fabulous tutorial , love the pictures and the video , you are amazing
Thanks darling xx
Thank you Celia so much I loved the refresher on how to do the starter Bless you so much
Thanks Linda! :)
Hi Celia,
Thank you for sharing the recipe of your SD, I almost gave up the starter after a few failure attempts. Just to clarify your starter measurement, you started up with 1/2 cup of mother starter (I weighted mind as 150g), then feeding through another 1 cup flour (250g) and 1 cup water (250g), therefore the total starter you have before the breadmaking process is 650g. Your recipe indicates 150g ripe boucy starter, is that mean the other 500g starter should not be in the SD mix?
No, that’s not quite right. :)
I started off with half a cup of cold starter, and fed it on a total of 1 cup of flour (150g) and 1 cup water (250g). If your starter was 150g to start with (which sounds heavy to me, but I’ve never weighed mine), then you’d end up with 550g starter. Of that, you could use 150g of the ripe starter to make the loaf, or 300g as I did to make a double batch, and then either put the remainder in the fridge or make pancakes with it, or feed it up for the next day.
In theory you could start with a smaller quantity and give it smaller feeds, but for some reason that never quite works for me – I always find the starter doesn’t have quite enough food and tends to burn out before I’m ready to bake. That could be specific to Priscilla though, so you might want to try smaller feeds for yours?
And yes, to clarify, the excess starter doesn’t go into the bread dough. :)
Thanks Celia for the clarification, I am still confusing, how can your cup of flour weighted as 150g? I weighted my standard cup (250ml) with plain flour as 250g. I normally use plain flour (not baker flour) to feed the starter.
Yvonne, two things:
1. I’m surprised and impressed that your starter and bread work with plain flour. I’ve always found it needs the higher protein bakers or bread flours to activate the wild yeasts and rise the dough.
2. A standard cup measure is almost always between 130g and 150g – if you google, you’ll see that’s the usual recommended amount. I’m not quite sure how you get 250g in weight for a cup of flour, that’s way more than anything I’ve ever read? Are you perhaps packing the flour in tightly?
[…] shared her recipe for a grain loaf and early the next morning i began following the steps in her basic sourdough tutorial: mixing the ingredients into a dough, letting it prove, shaping it, letting it prove […]
Hi Celia,
Thank you for your correction to my silly question, I had such steep learning curb on baking. I actually been given a 100% hydration starter (I only use plain flour for starter, but a strong bread flour when making the dough) which I converted to your 166% hydration, then trying out your SD recipe, I did add some grants and kneaded it in the bread machine with the first proof, then I left the dough over night for a second proof. It turned out really lovely spongy (not densed) texture. The only issue that I have is that my dough seems to be flat rather than raising to a round ball like yours, not sure if it’s too wet or it was over-proof.
Thank you so much for sharing your SD recipe, it’s so easy to make (with bread machine of course). I also had a great success with your Hot Cross Bun recipe but I used the bread machine for the knead and proof instead. I think I am on the same path as you are of home bread making.
Yvonne, that’s wonderful, thank you for letting me know! I hope you enjoy your sourdough journey! :)
[…] feeding Maggie up 3 times throughout the day she was finally ready to bake.I followed Celia’s basic sourdough tutorial to the letter until I misread 25g of oil for 250g, so I scooped out the oil and continued on my […]
Dear Celia, You and your blog have inspired me. I’ve never baked sour dough bread. I have bought starter from N.W. and started it last week. I am in a spot though…I am away from home now and I forgot to bring it with me. The starter was 5 days old and now have been left all by “himself” :( for 4 days. Will it be OK when I return. Also, should I be refridgerating my starter or does it live on the counter forever? Thank you!
Jane, how exciting! The starter will be fine if you’ve popped him in the fridge – I keep mine in the fridge and feed her once a week if I’m not baking. If you haven’t put the starter in the fridge, it might still be ok when you get home – it will look pretty flat, but try taking out a small portion and feeding it up again. Good luck!
Thank you! No, I’ve left him on out on the counter since wed. afternoon!….all alone! It is Sunday, I will be home later this evening. I will give it a go on trying to “feed it up” again. How will I know if it’s ok? I did buy 2 packs of starter, should I just start over? ALSO, I leave every week for a couple of days so the first week I brought ‘Jack’ with me. I had a different type of flour here than at home. Should I keep the same kind of flour throughout or is it ok to change around? I found your blog this winter looking for myer lemon delights… you are inspiring! and funny. Thanks so much, Teresa in Montana
Teresa, I find it best to keep to the same or similar sorts of flour. You’ll need to use bread or bakers flour, as the wild yeasts need the higher gluten/protein content to feed on. I would try feeding up your starter again and see how you go – if it recovers and bubbles up again after a few feeds, you should be right to go. If it’s gone a funny colour or smells like cheese, maybe you should toss it. :) It MAY have a blackish liquid on the surface when you get back to it, but that’s hooch and should be ok, just pour it off. Anything that looks obviously like mould is a bad thing.
My starter survives fine without a feed for up to a couple of weeks in the fridge. Thanks for reading our blog! :)
I have to remember to come back here, because I want to start making my own bread.
[…] downloaded this tutorial to take me step by step through the process and about halfway through I was thinking, why […]
[…] to heat up. Then at 20 minute intervals, I got up and changed the oven temperature according to Celia’s recipe, and after about an hour there were two freshly baked round sourdough loaves […]
It proved then when taken out to splat on oil it became as flat as a pancake. 5 lbs of flour and still no bread. We tried several,recipes thinking this was the one that was going to work.
I’m sorry to hear that. I’m not sure what you mean by splat on oil? Perhaps you could try with a different sourdough starter…
I mean when I placed it on an oiled bench. It is possible I let it rise too long? I did try another recipe and made two loaves. Yeah. Only 7 pounds of flour later. Hubby went to make some but didn’t feed it and killed it.
It was quite a stiff dough, so it shouldn’t really have gone splat. I guess you could try using less water? It’s possible it overproved, depends a bit on your starter. I’m glad you had success with the other recipe, sorry mine didn’t work for you.
Btw your loafs of bread make mine look sick but it tasted good. I think it rose too much because we went to bed and it look like it blew up when we woke. It wouldn’t rise the second time. And looks like a huge hamburger roll. I’m dehydrating it for bread crumbs. At least it’s not a waste.
Ah, that’s possible. I have a very resilient starter, so it bounces back after a long rise, but not all of them will do that. Glad you found another use for the bread! :)