
Last weekend, I taught a couple of friends how to bake sourdough from scratch.
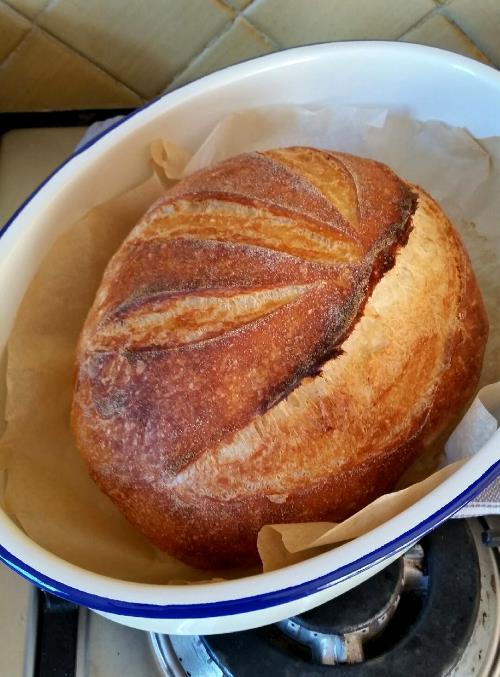
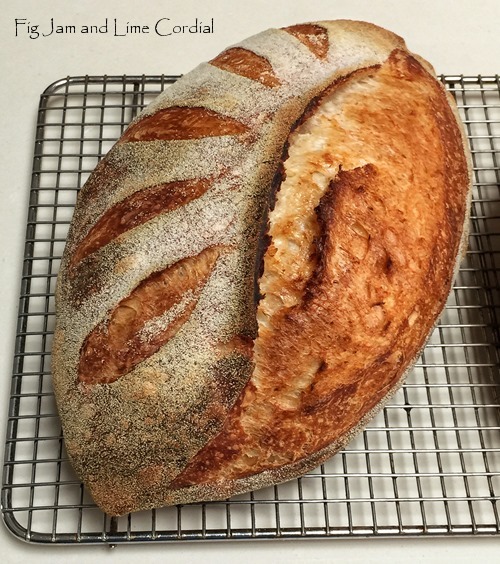
Over the course of the morning, I discovered that as a face to face teacher, I have limitations. I try to provide a lot of information, which can be difficult to take in fully during a few hours on a Saturday morning. Sometimes it works well – Helen sent this photo of her first solo loaf the following day, and it was perfect…
A couple of days later, I had a text from my other friend which began with…“Ok, so the Japanese tea towel caught fire..”
Hmm. I thought I’d better write notes.
I’ve written several sourdough tutorials over the years – our original Overnight Sourdough Tutorial, which I wrote in 2014, is still one of the most popular posts on our blog. Following that came our High Hydration Overnight Tutorial in 2016, which was almost as popular. But the way I make my dough is constantly evolving – the High Hydration tutorial adopted the newer trend of using a much smaller proportion of starter to flour, and I’ve reduced it even further after reading Emilie’s excellent book, Artisan Sourdough Made Simple.
So this blog post is a rundown on how I’m teaching my friends to make sourdough in 2018. I’ve cheated a bit and used notes and photos from our previous tutorials – the method has been tweaked, but it’s still basically the same. There are also a couple of new videos showing the current shaping and slashing techniques I’m using.
. . . . .
An integral part of the process is the baking of the dough in an enamel roaster. This makes a world of difference to the finished loaf. If you haven’t already invested in one, they’re very affordable, especially compared to enameled cast iron. You can buy the Wiltshire brand at David Jones, or the Falcon brand at Peters of Kensington. If you’re in the US, there are heaps available on Amazon at very reasonable prices…

. . . . .
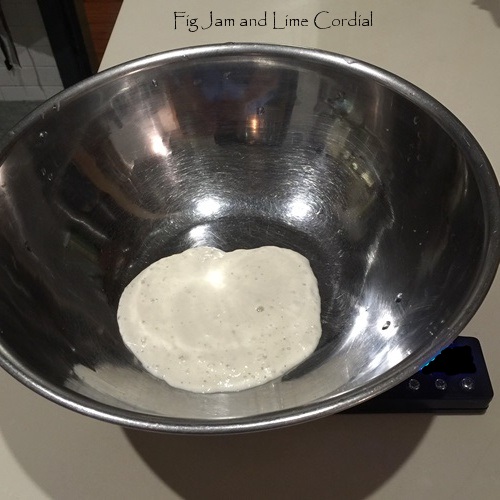
Begin with your starter bubbly and active. Start feeding it up about eight hours before you need it. Don’t even contemplate making dough if it doesn’t look like this. Test it by putting a small spoonful into a glass of water – if it’s ready, it will float.
Please, please, please read this post on how to feed and care for your starter…

Start at least an hour before you’re ready to go to bed and measure out 100g of bubbly starter into a large mixing bowl…
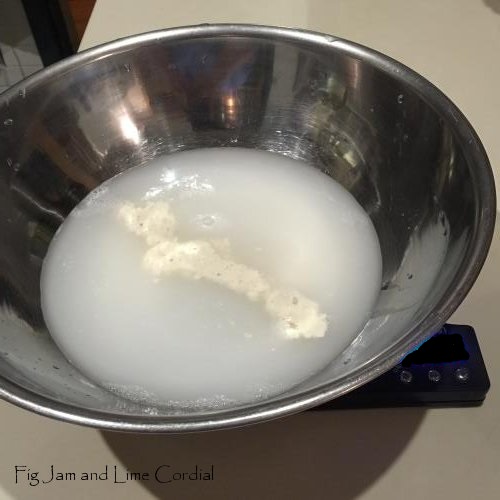
Add 700g of cool or room temperature water…
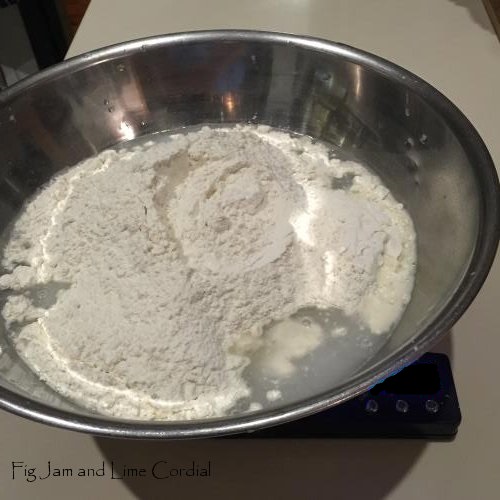
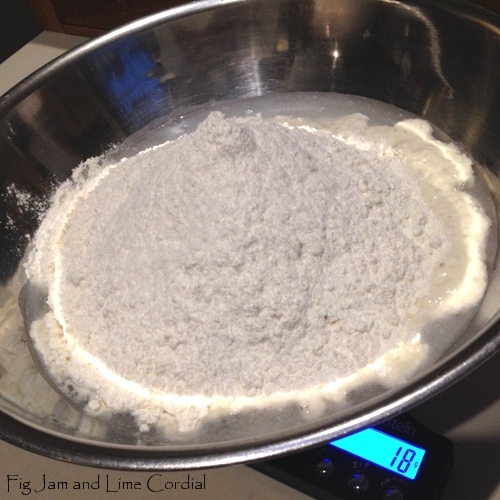
Add 1kg bakers or bread flour…
Add 18g fine sea salt…
With a clean hand, squelch everything together, then scrape off your hand and cover the dough with a shower cap or tea towel. Let it sit on the bench for half an hour or so…
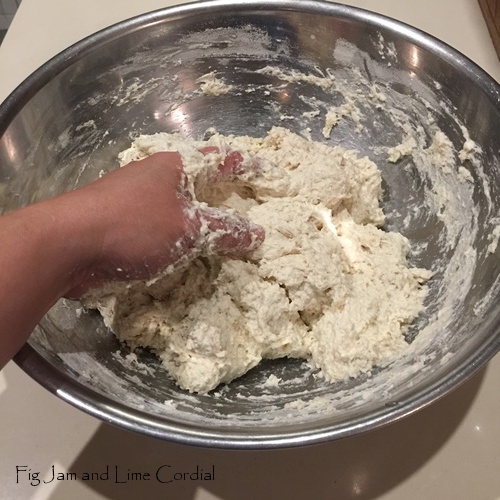
After the dough has rested, uncover it and give it a quick knead (for about a minute or so)…

Cover the dough with a shower cap, beeswax wrap or wok lid and leave it on the bench overnight.
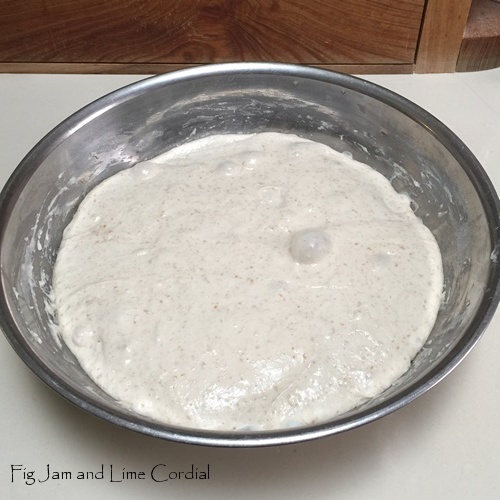
The following morning, it will look like this (but without the speckly bits as I no longer add wholemeal – sorry, it’s a recycled photo)…
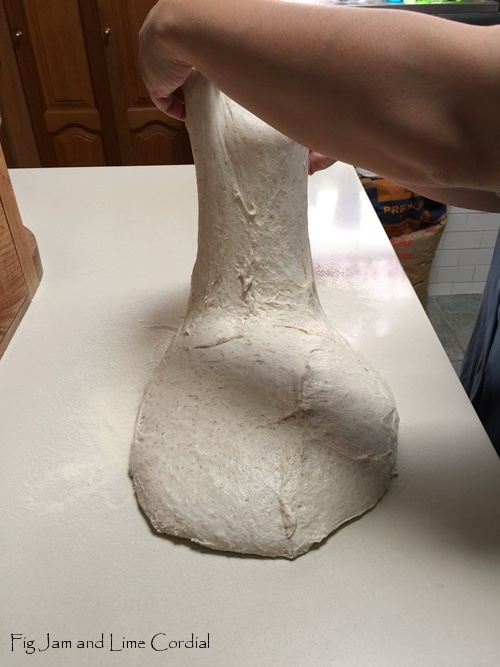
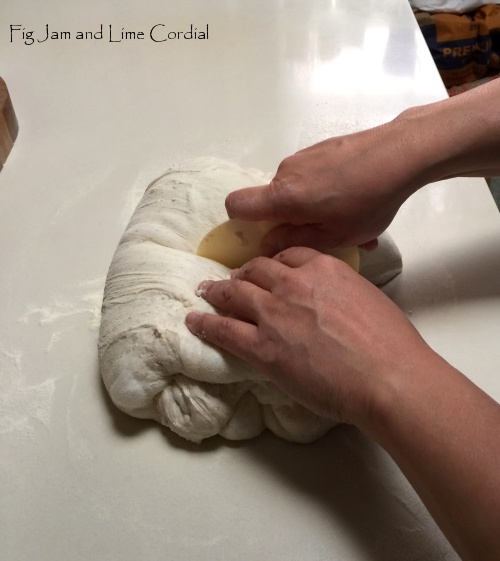
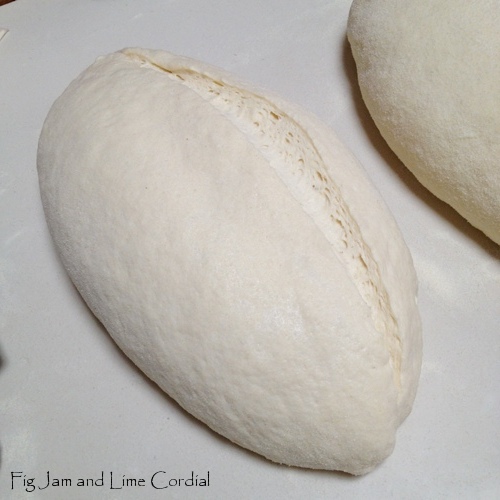
Dust the bench really well with fine semolina (rye flour, rice flour or just bakers flour will also work). Scrape out the dough…
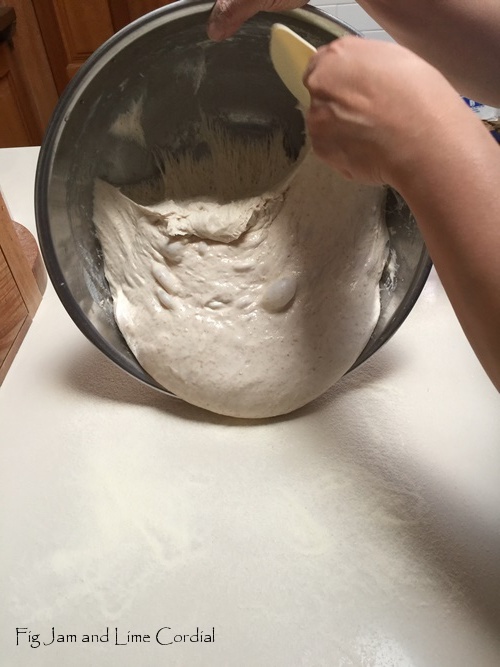
It will be soft and puffy, and a bit sticky…

Now here’s the trick…using your spatula, scrape under the dough on one side and stretch it up…
Fold it over the top of the dough…

Repeat with the other side…
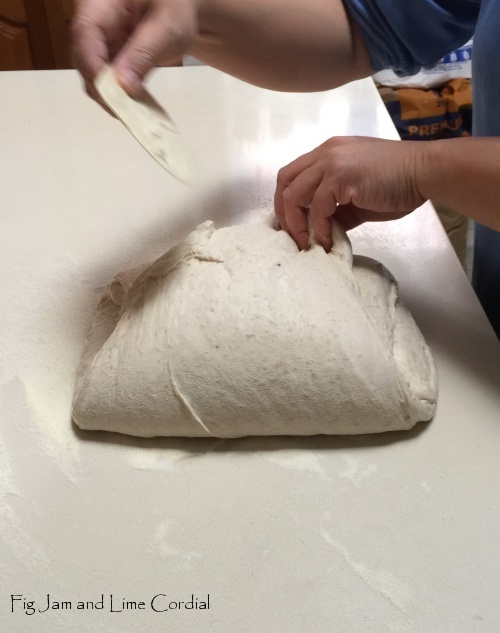
Do the same thing with the bottom part of the dough…
And again with the top section…
These four folds enclose all the sticky bits of the dough inside, leaving a completely semolina dusted (and therefore much easier) exterior to work with…

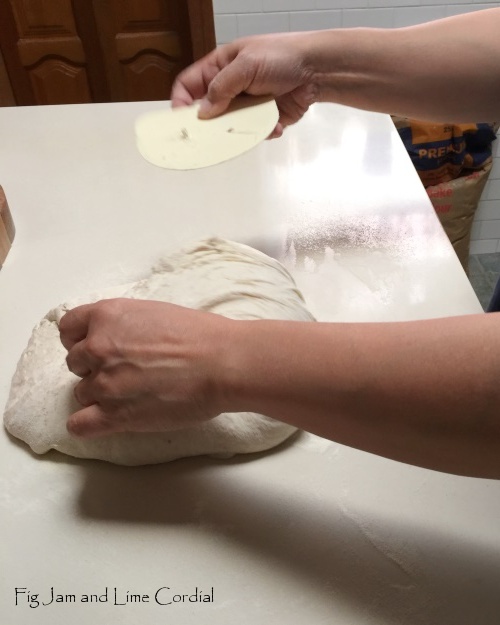
Using your spatula, divide the dough in half.
A note at this point: I have a large oven and several enamel roasters, so I always bake at least two loaves at the same time (usually three). If your oven can only fit one loaf at a time, you can either make a half batch, or divide the dough in two and return one half to the covered mixing bowl. Begin preshaping the second loaf when you place the first loaf into the oven…
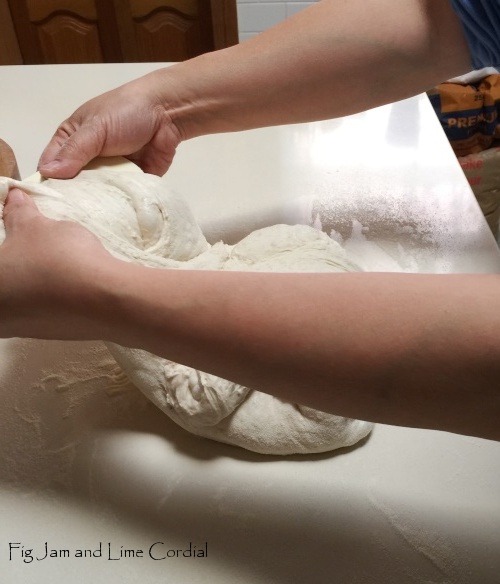
Shape each half into a rough ball by folding the edges into the middle…
. . . . .
. . . . .
Leaving the dough balls seam side up, dust the tops with semolina…
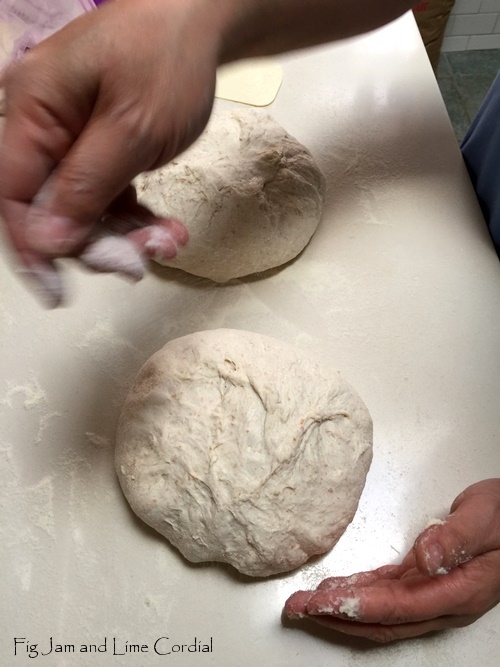
Cover with a clean tea towel and allow the dough to rest for about 15 minutes. This preshaping process makes the dough much easier to handle…
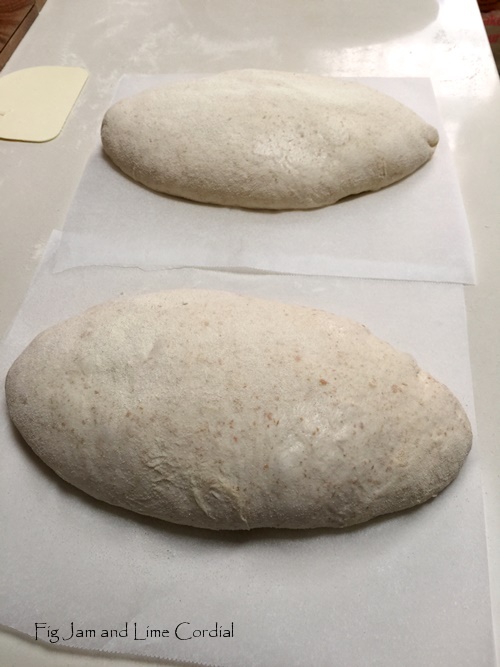
Uncover the dough and flatten each ball, then shape them into oval loaves. I do this by folding the edges in at the top and bottom, then folding the dough in half. Here’s a new video of my current shaping technique…
. . . . .
. . . . .
Place each shaped loaf onto a sheet of parchment paper, seam side down, then cover them with the tea towel again and allow them to prove for a further 30 – 60 minutes…
Alternatively, you could put them into tea towel lined bannetons – roll the shaped loaves gently in fine semolina first if you’re planning to do that, and put them gently into the baskets seam-side up (you’ll invert them out onto the parchment paper later). Let the dough rise for a further 30 – 60 minutes, depending on the ambient temperature in your kitchen.
At this point, turn your oven on and preheat it to 230C with fan.

Once the loaves have puffed up a bit, it’s time to slash. If the dough is in bannetons, turn it out carefully onto parchment paper.
The easiest thing to do is to make just one long slash down the side, and it’s a technique that works well. You can use a serrated knife, a lame or a razor blade…
If you’d like to try something fancier, you might like our “half starburst” slash. Use a sharp razor if you’re going to attempt it – the single slash will be fine if made with a serrated knife, but the fancier patterns need a thinner blade. Remember to slash with panache!
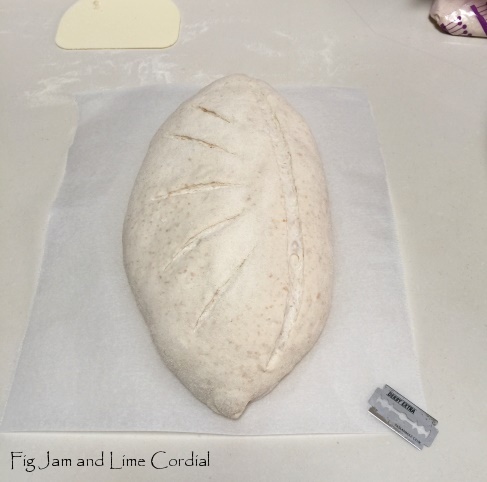
Here’s a new video of my slashing patterns – I gave up on using a lame ages ago and now just wield my razor commando style. I end up with a lot of tiny cuts on my fingers, but I like the control…
. . . . .
. . . . .
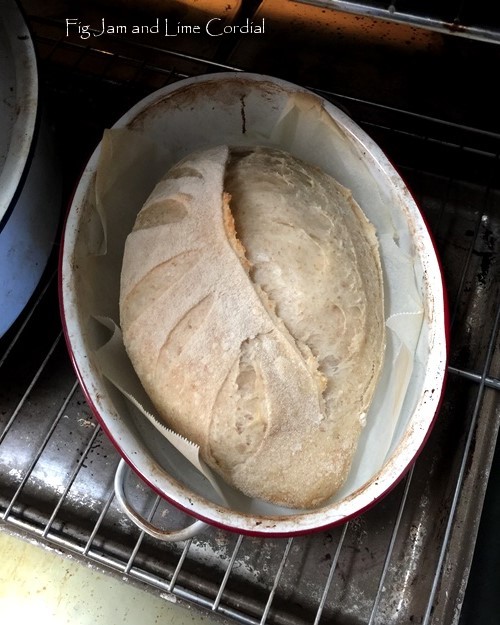
Lifting by the sides of the parchment paper, lower each loaf into an enamel roaster. Spritz the top of each loaf with a little water, if you like (it’s not essential). Cover with the lids, then put them into the oven, reducing the heat to 220C with fan. Note that the pots are cold – I don’t think it’s necessary to preheat them.
Set the timer for 20 – 25 minutes (you’ll figure out how your oven bakes after the first couple of tries. I now bake for 23 minutes with the lid on!)…

At the 20 (to 25) minute mark, uncover the pots to release any remaining steam – the loaves should be well risen and just starting to brown. Leaving the lids off, rotate the pots, then close the oven again and set the timer for a further 15 -20 minutes (again, you’ll figure it after your first bakes – I now do 15 – 16 minutes lid off, depending on how Bobby is behaving that day).
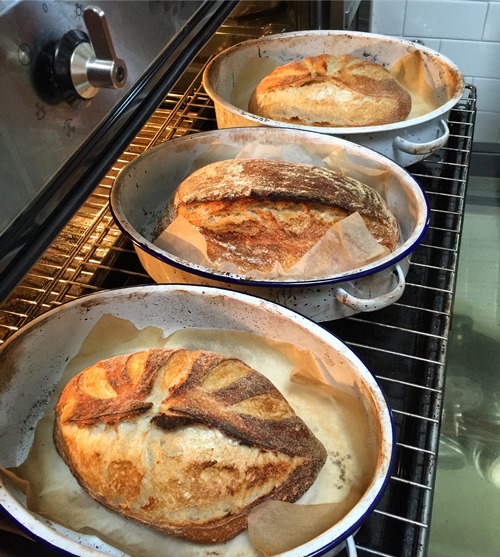
One other thing to note – I usually bake three loaves at a time, if you’re baking a single, you might need less time. Experiment and find the timing that best suits your oven.
After the second 15 – 20 minutes, the crust will be dark brown and crisp. At this point, I pull the loaves out of the oven and let them cool on a wire rack. If you’d like the loaves darker, take them out of the pot and place them directly on the rack for a further 5 – 10 minutes.
Here’s a photo taken from our cooking class…
The finished loaf should feel light and crusty. It will sound like a hollow drum when tapped on the bottom. Allow to cool completely on a wire rack before slicing…
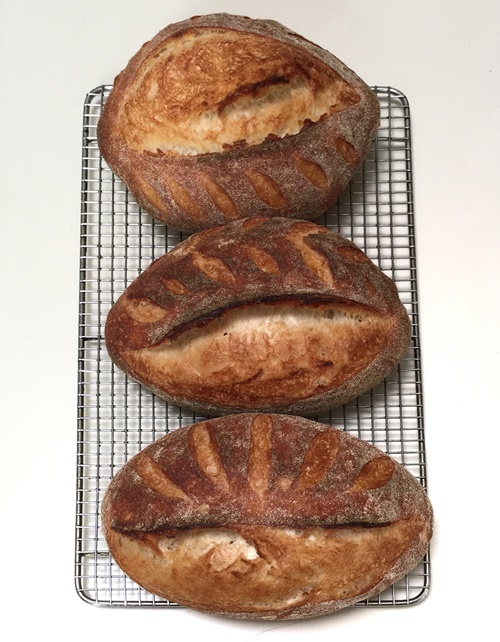
Here are the loaves I slashed in the video above…
I’ve found that the loaves keep well for a couple of days in a beeswax wrap (make sure they’re cool first)..

If you’re new to sourdough, I hope you’ll give this method a go. I don’t have any starter to share at the moment, but lovely Emilie’s book has clear instructions on how to grow your own, and I believe she’s also selling her starter Dillon via mailorder. Have fun! ♥

I’m new to reading your blogs, my girlfriend put me on to it . Really loving the information. I live I Earlwood so buying flour in Rich Street, Marrickville was new to me and so worthwhile. We are just starting making our own bread so will try your tried and tested methods this weekend. Many thanks Sue Snowden
Southern Cross Supplies is awesome! Watch out for the occasional broken bag at bargain prices on a pallet outside the front door!
Hello again I was just showing my husband around your site and I came across one of your entries labelled “In my Kitchen” from 15/8/2011. Oh my goodness I just had to let you know I have a copy of that recipe book like Pete’s Mum. I bought it when I was just 17 way back in 1963 from a travelling salesman who visited us at our place of work at Elder Smith Goldsborough Mort in Currie Street Adelaide. I paid the huge sum of 6 pounds, 6 shillings (about $13) which was about 1/2 my weekly wage at the time. I still have that book and refer to it for guidance about all kinds of things. Of course I have a huge library of wonderful recipe books but just love that one I bought all those years ago as a young girl with stars in her eyes. I don’t know how to post pictures or I would include a photo of the book with this post.
Sandy, that’s wonderful! The book came to us after Pete’s mum died – I must admit I’ve never used it, but love having it on my shelf.
Great post Celia! I too have plenty of dried starter if anyone needs some, happy to share. I still laugh at the memory of me trying to fit the Falcon enamel roaster into my toy oven. Hope you don’t go commando, while you go commando!
You are wonderful, Maree! And yes, I’m still laughing at that memory too. I STILL can’t believe the amazing bread you turned out of that tiny oven!!
Celia, you are such a generous person. I love your posts and one day I will bake bread.
Miranda, thank you! I hope you do get a chance to bake bread one day, it’s a very rewarding process!
I think your method is perfect- thanks for sharing it once again.
Such a compliment given the magnificent loaves you turn out! xxx
Thank so much, Maree Tink sent me to have a look at your work as I’m a newbie baker.
My pleasure, I hope you find it useful!
Your tutorials are the most wonderful resource, Celia, thank you for the time you put into them. I never fail to be thrilled when i take a ‘home grown’ loaf out of the oven and then when we slice it i am again thrilled that it tastes good. I also had the immense pleasure of passing on some of my Princess Patsy to someone else who has taken to baking with huge delight. Home bakers are such a great bunch of people and i think i can almost count myself among them:)
Jan, you and Patsy have been at it for so long now! Do you remember when you sent me the photo of your first “kissing” loaves? I do. :)
Hello Celia great tips and I love using the Falcon Enamel from cold. One thing I was taught by Clive Mellum a wonderful Baker was to use Skilly wash which is scalded cornflour to brush over loaves to make seeds stick without burning.
That’s a great tip, thanks Helen!
Ah, yes. The joys of sourdough starters. Funny thing is, I don’t even LIKE sourdough bread that much, especially those hole-y artisanal loaves. I prefer yeast baked breads. It’s the challenge for me. :)
It’s not for everyone! Although I find it much gentler on my digestive system than yeasted breads.
Fabulous tutorial, as they all are! Between you and Emilie I am addicted to baking sourdough now, it’s a very rare day that I don’t bake. Family & friends are very happy :-) I’m not quite up to razor blades yet, I just slash (with panache) using a small sharp knife.
I haven’t ventured into drying starter yet, but if there’s anyone in Sydney that wants some fresh starter I’m happy to share my Miranda.
Cath, isn’t Emilie’s book the best? She’s such a superstar!
Emilie’s book really is the best. My beautiful 13 year old daughter really wanted to learn how to make sourdough so last night the lesson began and we currently have in the oven a loaf that is half olive and half jalapeño! It’s looking good. I’ll send you a photo of Ruby’s first loaf once it’s out.
LOL, tea towel on FIRE! sorry but it made me laugh and I needed/kneaded one!
Am making a sourdough/chocolate/tart cherry one at the moment. You give us all hope! Thank you.
I know, right? I really didn’t need to write another tutorial, but then I realised, I really DID. Hahahaha…
I am still making your overnight sourdough loaves – keeps my starter alive and us in some nice bread. I think the smaller amount of starter here would not suit me as I tend to need to use more of my starter. I use the amount of salt you suggest but note that a few people have said it seems a lot – but it works for me. Lastly I think I need to dig out my beeswax wrap and try wrapping the loaves – I tried it over the overnight rise but it did not work that well. But my mum uses the shower cap and I think I would like to this instead of clingwrap.
Thanks again for all your advice – I play around with my loaves a bit – rolled them with pesto and cheese on the weekend.
I’m glad you enjoy it! That’s funny about the salt – I cut it back a bit from conventional recipes, and sometimes folks complain that the bread isn’t salty enough! 😆
Hi Celia, Maree from Sourdough Baking Australia and NZ, posted about this new technique, I am sure a lot of us will be giving this a try. My first ever loaf, and that one turned out as if I had been making sourdough all my life. So I cant wait to give this a try! Where do you get your beeswax wraps from?
Rosemary, I made them! There’s a link in the post!
Hi Celia, I love seeing how everyone’s bread baking techniques change over time. I still fondly remember when I got some dried Priscilla, and started my bread baking journey. I turned out some *shockers* and I still can’t believe I thought learning a new hobby with a newborn would be a smart idea… and here I am *years* later and still baking regularly. I LOVE my loaves, they’re rustic and not at all fancy, but they’re edible and friends ask me to bring them when we have gatherings so I must be doing something right. I’m a big fan of making fruit and nut loaves, and I’m starting to play with savoury flavours more as well now.
I have you to thank for that dear Celia… literally, thanks for my daily bread and for being so generous with your knowledge. I’m going to have to get some wax to make some wraps; my fabric stash could do with a cull :-)
Lisa, that makes me so happy, knowing that the tiny sachet in a 70c envelope has given you years of bread! Hooray! xx
Wonderful and just in time as my loaves , although tasty are not rising much in the oven , yet in the big bowl after 12 hours it fills the bowl … I’ve been thinking how glorious it would be to go to a Celia Class and when I opened your blog , here it is !!
Very Professionally done as well and has reinforced a few things for me
I’ll definitely get the book by Emilie .. and anytime you decide to throw a Sour Dough class I’ll be happy to pay whatever you ask .. just need a bit of warning as I live in the Upper Hunter Valley and grovel my way through fortnights on a lousy Pension .. making my own Sour Dough has filled a huge void and saved me from the perils of Stodge and all its evil Sugars and Yeast .. The BEST thing that happened to me last year was finding YOU .. Thank you again xx🙏🏻😻🌹
Len, you’re so kind, thank you! Trust me when I tell you that this tutorial is better than a class with me, as I’ve realised I’m very muddled when trying to do a “and here’s one I prepared earlier” type class. I don’t know how the sourdough teachers all do it, actually! :D
Those enamel roasters are also at Victoria’s Basement very cheap!
Ooh thank you. I looked online and neither brand was available, do they have a different one?
I can’t remember the brand, sorry – bought it ages ago! But I remember it was very cheap!
Oh yes, they did have the Wiltshire ones ages ago. Long gone now, sadly.
I went to Victoria’s Basement today. You’re right, lots of enamel but no roasters :(
That’s ok, we have ours! :) They’re still available in other stores, but not at that price anymore!
I got my roaster on Amazon and I love it. I let the loaf do the final rise right in the pot on parchment paper with the lid on. (Keeps the flies off) Then Slash and pop in the oven. Works great.
Hahahahaha that’s a clever idea!
What a great post, Celia, so much useful detail for anyone that wants to bake sourdough 😊😊😊 you continue to be our Queen of Sourdough xx
Thanks Elaine!! It was fun to put together!
Hi Celia, thanks for all the info. Love how you make everything easy to do. I made my own starter and was following your sourdough tutorial. Yummy bread. We moved and then I was unwell with a constant migraine for 5 months so any baking became obsolete. My question is do you know if I can still use my starter which has been dormant or should I start again from scratch?
Cheers Lisa Lee
I’m sorry to hear that – a constant migraine must be awful! I hope you’re feeling better now. If you’ve kept your starter in the fridge, you *might* be able to revive it – just try a little bit with a few feeds of strong flour and filtered water and see how you go. Otherwise you might need to start again!
Celia, I meant to comment right away, life got in the way – loved this post SO MUCH, next time I blog about bread will include a link at the very beginning of my post!
OUTSTANDING!
Ahhh you’re so lovely. Thank you, dearheart. xxx
Found a smaller, stainless steel roaster for $15 at that weird warehouse for tools/garden/junk next to the Paddy’s market on Main North Road, Parafield Adelaide. Produces sl more elongated/narrow loaf and two will fit into a smallish oven. Actually Celia, what I clicked on for was to mention I was looking up one of the lovely Clothildes’ recipes from chocolateandzuchini and she said that you can substitute leftover sourdough starter for yoghurt when baking. Truly. https://cnz.to/recipes/cakes-tarts/quince-almond-cake-recipe/
Oh that’s great to know!! Thanks Diane!
Hi Everyone, I’m having trouble with first ever starter. I started the starter three times. It just never looks right after, no bubbles etc., Any advice would be so much appreciated. I’m so looking forward to making my own bread. Sue
I’m sorry Sue, but I’ve never made a starter from scratch. Emilie’s book has instructions though, as do several internet blogs, including this one by lovely Brydie. She might be able to give you more advice on growing a starter.
Good luck!
Thanks Celia. I do have Emilie’s book, perhaps i’m just too impatient !!! I’ll check out Brydie’s link also, thanks again, Sue
Hi Celia, Thank you for your letter last week. Priscilla’s newest offspring has behaved herself over the weekend. I’ve decided to name my starter “Ethel” :) I’m looking forward to making my first lot of bread. Your blog contributions and contributors have given me some confidence in making sourdough. A huge thanks again, Suzanne
Hooray, that’s great news! Go Ethel!!
Thank you so much for this and especially the little video tutorials. I read someone say they use a dinner plate to cover their dough while it’s rising and I did it last weekend. Worked great and I could just throw it in the dishwasher. Easier than washing a shower cap or wasting cling film. You place the plate on the bowl upright like you are about to eat off of it. Love it!
Love your sourdough blogs! I was having trouble before I came across your posts, and now I have success! Just one question, you have reduced the amount of starter you use in this blog (100g) from the amount in your 2014 post (300g). I have been following your 2014 recipe and method, so I’m interested in why you have changed.
When I first started sourdough baking, all the recipes advised using a larger quantity of starter. As I mentioned in the post above, the trend has changed in recent years. I tried using a smaller quantity of starter and found it worked better, so I made the change. :) glad to hear you’re finding the sourdough posts useful!
Thanks Celia, I’ll give it a try!
Just following your recipe and instructions. So far so good
Thankyou Celia! Looking forward to my first experience of making my own sourdough!
Hey Celia, fantastic website with clear and concise instructions..I was wondering why you dont bake with wholemeal flour in this recipe anymore? as you made reference to not having the speckles in the flour, old photo.. Just curious, as I do a blend of bakers, spelt and wholemeal..Enjoy your Christmas, Cheers, Jane
It’s easier with plain bakers flour and I’m lazy! 😂