
Our Overnight Sourdough Tutorial, which I wrote in 2014, has become one of the most popular posts on our blog.
It was designed to be a simple, basic formula which would work well with our Priscilla sourdough starter. Being a lower hydration dough, it was easy for even absolute beginners to produce a good everyday loaf on their first attempts.
If you’ve mastered the basic overnight sourdough and would like to try something a bit more challenging, then this tutorial is for you. This higher hydration dough results in a chewy, open crumb with great flavour and an artisan, burnished crust. It takes a bit of skill to handle the wet dough, but it’s not very difficult – we’ve taken as many photos and videos as we could to make it as easy as possible for you.
I’ll assume that if you’re going to attempt this, then you’ve already read our first tutorial and are comfortable with the feeding and care of your starter. This recipe uses a much smaller proportion of active starter, fed at a ratio of one part water to one part bakers flour by volume (166% hydration).
An integral part of the process is the baking of the dough in an enamel roaster. This makes a world of difference to the finished loaf. If you haven’t already invested in one, they’re very affordable, especially compared to enameled cast iron…

. . . . .
Ok…ready to go? Let’s get started.
Begin with your starter bubbly and active…

Start at least an hour before you’re ready to go to bed (I started at 7pm), and measure out 110g of active starter into a large mixing bowl…
Edit 18Nov2017: since reading Emilie’s book, I now use an even 100g of starter and the bread works out perfectly. Round numbers are nice!

Add 750g of cool or room temperature water…

Add 900g bakers flour…

…followed by 100g wholemeal spelt flour. If you can’t get spelt, use regular wholemeal (or wholewheat) flour. The recipe will also work with all bakers flour, but it might be a bit stickier to handle. Reduce the water to 700g if necessary…

Add 18g fine sea salt…

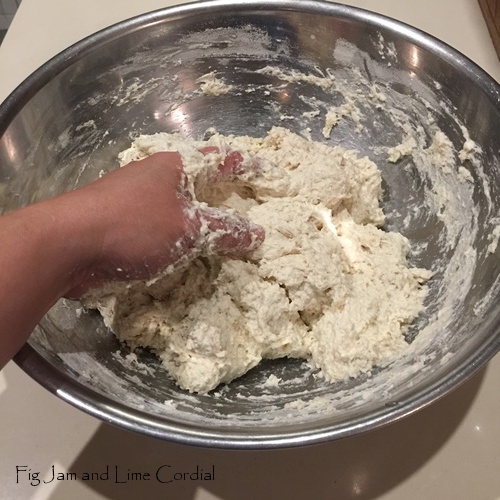
With a clean hand, squelch everything together, then scrape off your hand and cover the dough with a shower cap or cling film. Let it sit on the bench for an hour or so…
After the dough has rested, uncover it and give it a few stretchy folds. Using wet hands, grab one side of the dough and pull it up, then fold it over the top. Repeat this three more times, giving the bowl a quarter turn each time. Edit: I like to do this twice, making two complete rounds (ie. eight stretches and folds). The dough should start to tighten up by the end of the second round…

Here’s a video of the process…
. . . . .
. . . . .
Cover the dough with the shower cap again and leave it on the bench overnight. If you have time before going to bed, you can fold the dough again.
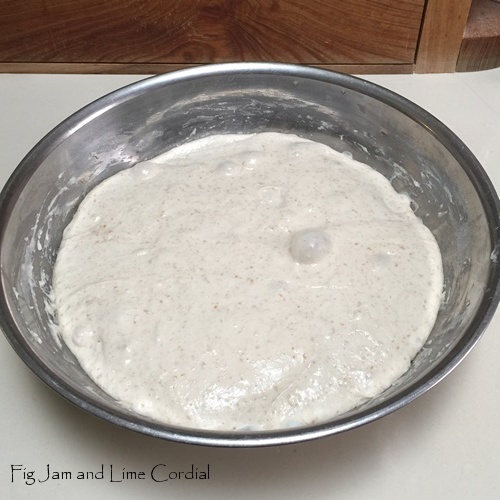
The following morning, it will look like this…
Preheat the oven to maximum. Dust the bench really well with fine semolina (rye flour, rice flour or just bakers flour will also work). Scrape out the dough…
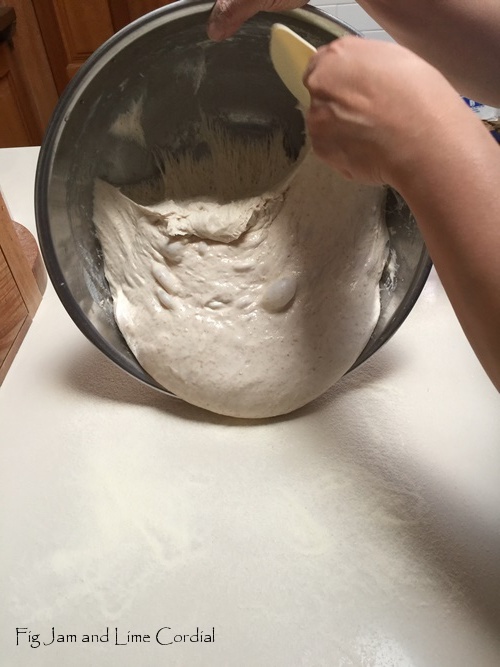
It will be quite soft and sticky…

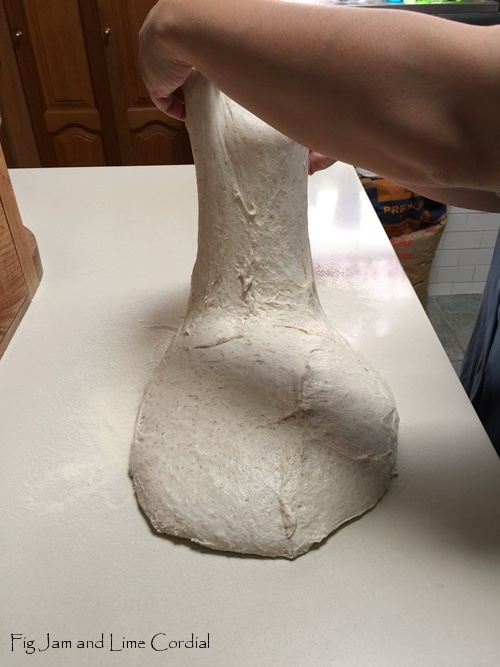
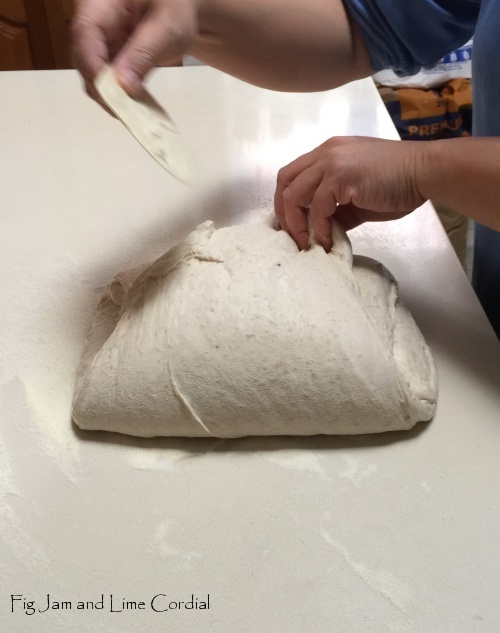
Now here’s the trick…using your spatula, scrape under the dough on one side and stretch it up…
Fold it over the top of the dough…

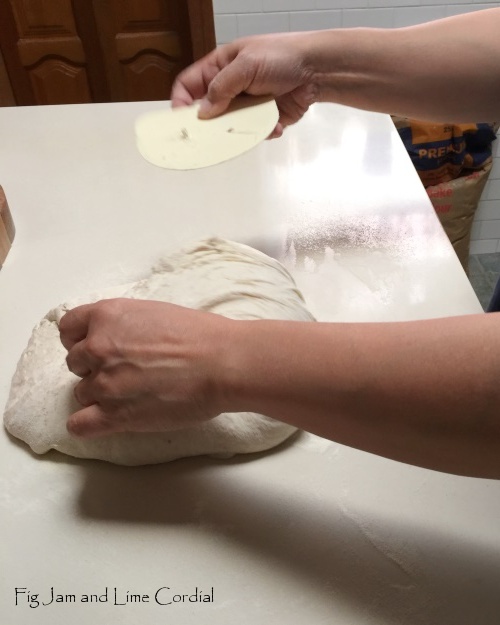
Repeat with the other side…
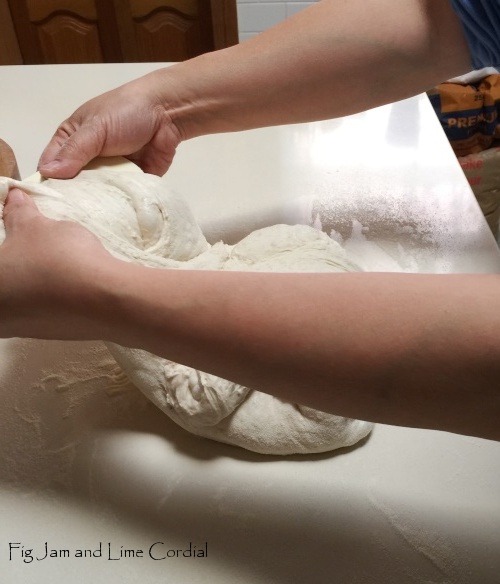
Do the same thing with the bottom part of the dough…
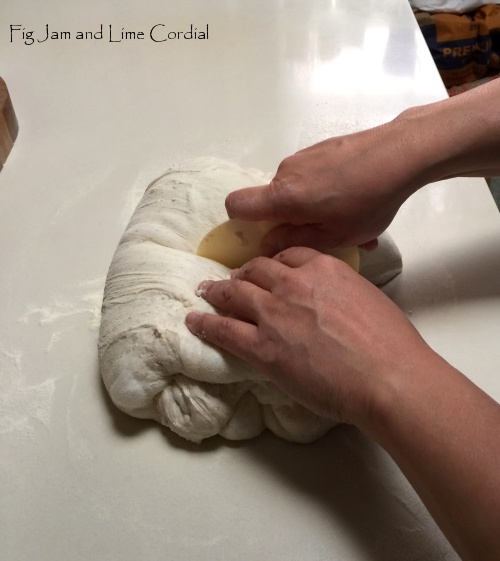
And again with the top section…
These four folds enclose all the sticky bits of the dough inside, leaving a completely semolina dusted (and therefore much easier) exterior to work with…

Using your spatula, divide the dough in half.
A note at this point: I have a large oven and two enamel roasters, so I always bake two loaves at the one time. If your oven can only fit one loaf at a time, divide the dough in two, then return one half to the covered mixing bowl. Begin preshaping the second loaf when you place the first loaf into the oven…
Shape each half into a rough ball by folding the edges into the middle (there’s a video of how to do this here)…

Leaving the dough balls seam side up, dust the tops with semolina…
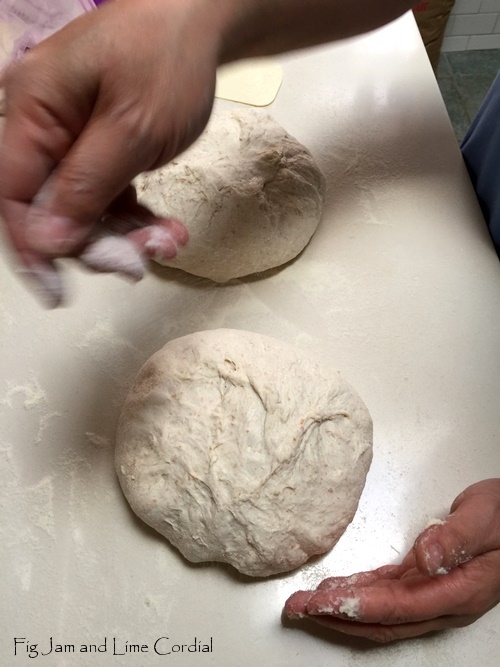
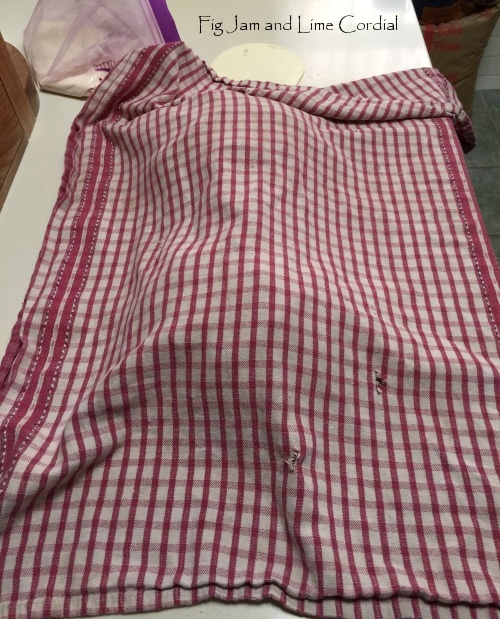
Cover with a clean tea towel and allow the dough to rest for about 20 minutes. This preshaping process makes the high hydration dough much easier to handle…
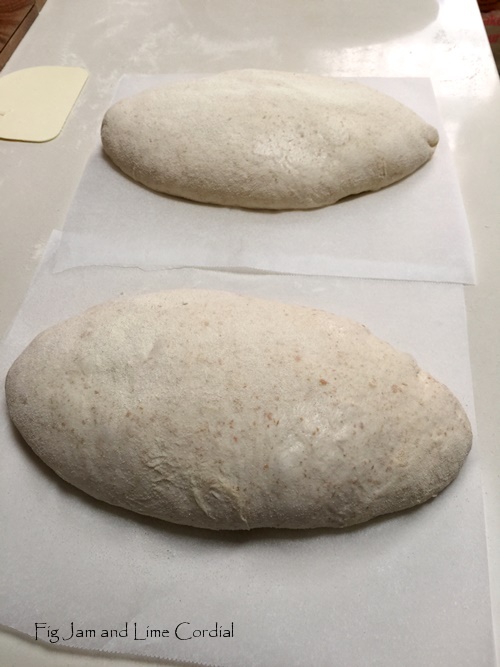
Uncover the dough and flatten each ball, then shape them into oval loaves. I do this by folding the edges in at the top and bottom, then folding the dough in half – it’s much easier to show you than explain, so we’ve taken a video (there are also some photos here). Use a gentle touch…
. . . . .
. . . . .
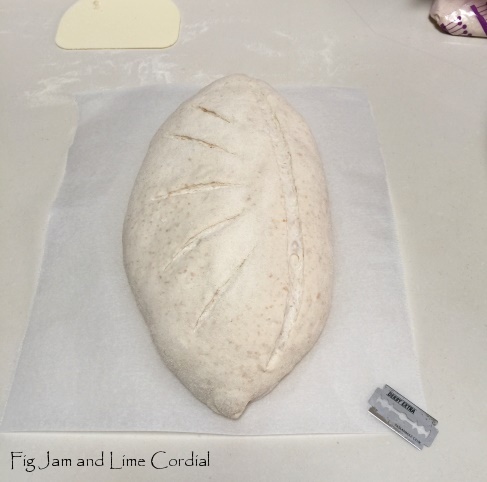
Place each shaped loaf onto a sheet of parchment paper, seam side down, then cover them with the tea towel again and allow them to prove for a further half an hour or so. You could put them into bannetons, but I find the higher hydration doughs tend to stick to the cane…
Once the loaves have puffed up a bit, it’s time to slash. I used to make just one long slash down the side, and it’s a technique that works well…
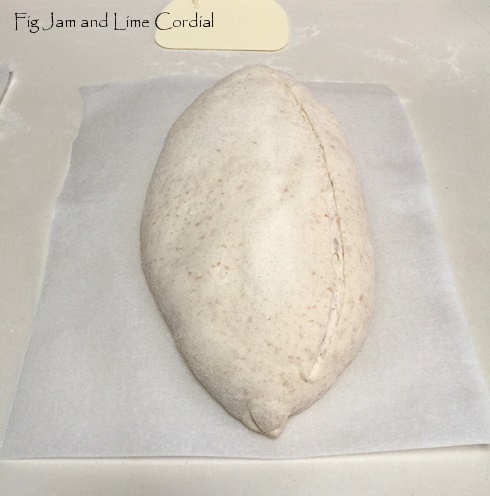
…but if you’d like to try something fancier, you might like our “half starburst” slash. Use a sharp razor if you’re going to attempt it – the single slash will be fine if made with a serrated knife, but the fancier patterns need a thinner blade. Remember to slash with panache!
Lifting by the sides of the parchment paper, lower each loaf into an enamel roaster. Cover with the lids, then put them into the oven, reducing the heat to 220C with fan. Note that the pots are cold – I don’t think it’s necessary to preheat them.
Set the timer for 20 minutes…

At the 20 minute mark, uncover the pots to release any remaining steam – the loaves should be well risen but pale. Close the oven and set the timer for a further 20 minutes…
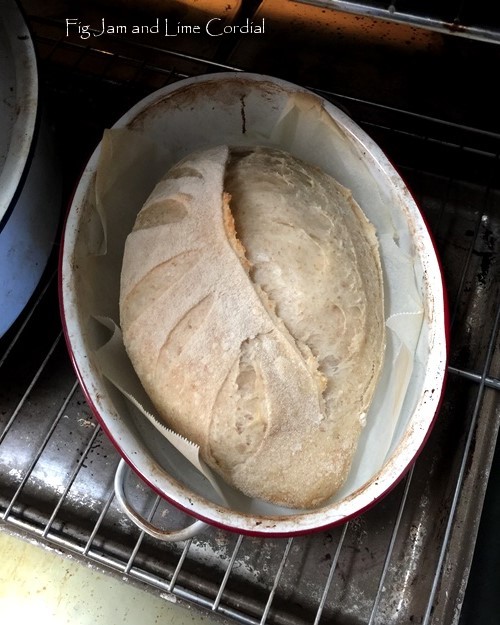
After the second 20 minutes, the crust will be dark brown and burnished. I like to take the loaves out of the pots, place them on the oven racks, and bake them for a further 5 – 10 minutes at 175C with fan.
By the way, the loaves will shrink back a bit after baking with the lid off, but not nearly as much as the photo below implies – I took the photo above of our small roaster and the one below of our big one.

The finished loaf should feel light and crusty. It will sound like a hollow drum when tapped on the bottom. Allow to cool completely on a wire rack before slicing…
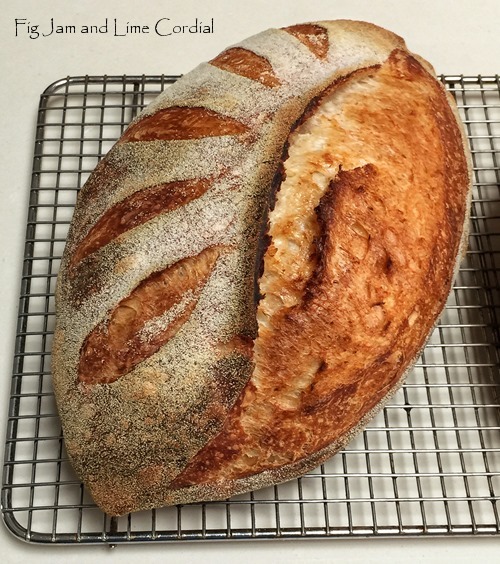
The crumb is gloriously holey and chewy. A little trivia for you – my friend Joe told me that his Italian baker father refers to the holes as “naski”. Naska, according to Joe, is the word for nasal passage, so if the bread has naski, it can breathe…

A note on timing – I usually make this dough at about 9pm and then shape it when I get up in the morning (usually about 6am).
For this tutorial, I made the dough at 7pm (to ensure there was enough light for the photos) and didn’t get to shape it until 9am the following morning (when Pete was around to help me take the videos). Because Priscilla is so resilient, she didn’t seem to mind the longer proving time!
I hope you’ll give this a go – it takes a little bit of practice, but once you’ve got the knack of it, you’ll find the stretchy dough great fun to work with! ♥
. . . . .

Thank you, this bread looks delicious and you have produced a great tutorial :)
Thank you! I hope you find it useful! :)
YOU are totally amazing … thank you so much Celia … I am definitely going to be trying this! xo
Hooray! Have fun with it! x
Great tutorial! The overnight sourdough is one of my favorite recipes; it fits perfectly into a busy schedule. I will have to give this a try too!
Manuela, I think you’ll love this. It’s a natural progression from the original overnight which you do so well! :)
Excellent tutorial, Celia! Love the videos. I do this method as well when it’s winter here. I find the the cooler temperatures are perfect for a long overnight rise on the bench (without spilling out of the bowl!). In the summer, I just let the dough rise all day and then retard the dough in the fridge for the final rise. Isn’t it so cool that with a little tweak here and there you can fit bread baking into your schedule?
I have two geeky questions for you: why are you using less starter than usual? What protein % is your flour?
Hugs! xo
Thanks lovely! I’ve noticed in recent years that some sourdough formulas are using less starter to begin with, so I thought I’d give it a go. It’s been working a treat! (They also use lower hydration starters but I’m too lazy to change mine now!) It seems to affect the finished crumb in a good way. The bulk prove rises much less, so you might find it works well for you on the bench even in summer. My bakers flour is around 12.5% protein, the wholemeal spelt around 14% I think. xxx
Is there a printable version of this available? I attempted this and my first 2 loaves weren’t quite as beautiful as yours but this a recipe I am going to definitely keep trying. My dough seemed to still have too much slack in the morning and my loaves didn’t hold shape well. I used King Arthur Bread flour and King Arthur whole wheat. What brand of flour do you use for your bakers flour? That is the same as bread flour correct? I am in the US. Also your oven temp was at 220 C, I am in the US so I went with 450 F. This was my first real attempt at higher hydration dough and your write up and pics helped tremendously!! Thank you!
Sorry, no printable version. The wet dough handling takes a bit of practice, but you could try reducing the water slightly if you’re finding it too difficult. My friend Dan in San Fran bakes with a Priscilla starter and all white King Arthur bread flour – she uses 700g water instead of 750g. Also, your starter is likely to be different to mine, so you might need to experiment a bit. The flours I use are all Australian and not readily available in the US. I haven’t had any luck at all with baking such wet dough on a stone – it does best in an enclosed pot. If you’re using heavy cast iron, you might want to try preheating it first, but I find such high temps hard on the expensive cast iron enamel. You can buy thin enamel pots like the one I use on Amazon quite cheaply – try searching “enamel roaster”. Good luck!
Thank you Celia! After reading more comments, I agree, I have to adjust the water a bit. My starter is different. Do you know the hydration of this recipe? Definitely will look for the roasters. Thanks for the tip. Great website you have. I hope I can make time to read all of it. So many great recipes. Thanks again for the fast reply. 😊
I will have to try this soon. Your loaves are so gorgeous!
Have fun Gretchen! This is nice dough to work with once you figure out how to contain it.. :) xx
Wonderful tutorial. The level of your bread baking is amazing, especially so since you bake in a home kitchen. The bread looks incredibly tasty!
Thank you! I find it very therapeutic to bake bread, so I try to do it at least a couple of times a week! :)
Celia, I’m following your ongoing sourdough tutorials with rapt attention. LOVED your terms: “a stretchy fold” and a “gentle touch.” You have to get your hands IN the dough (NO fear) to know what those feel like. Thanks, darling, xo.
Most welcome, dearheart, I hope you have fun with the tutorials and Prissy II. Hmmm. Have you picked a name yet? :) PS. Your grandma was right! xx
P.S. My Grandma used to tell me: “Never be afraid of a sticky dough.” :)
Brilliant Celia. We all need a little bread inspiration from time to time, and this has just given me the will to do another plainer loaf but wetter. Your videos and easy instructions are so helpful, Mt T is slowly coming on board with the bread prep at night – I am the early bird for that part- and so he can view it too. Thankyou dear friend.
I’m so glad you enjoyed it, lovely Fra! It would work well with your sleeping, I think – this batch was made at 7pm (which would allow for an 8.30pm bedtime) and shaped and baked the next morning! :) xx
Great tutorial, Celia! I make a big loaf of sourdough twice a week (Mr Delightful is addicted to it and won’t eat store-bought bread any more). It is such fun, really, and you do such a good job of conveying that as well!
Thanks Jean! :)
gloriously detailed. Your tutorials give me the confidence to attempt new techniques. I’m so glad I’ve discovered the fun of home made bread :-)
Lisa, I’m so glad you discovered it too, it’s been a joy to bake along with you! :) xx
Thank you Celia. I can’t wait to try this. Great tutorial.
Ardys, I used a scaled down version of this recipe with 100% wholemeal spelt and it worked really well too! x
Have just returned from the grocery with whole meal spelt in hand! :)
Very good… I’m farming out my Polly sourdough to babysitters while we travel, the G.O.’s cousin and 2 neighbours, so the timing of this is wonderful.
If you can, dry a little bit out before you go and tuck it into the fridge. Then you’ll have some back up if you need it! Have a fabulous time! xx
Thank you. I have a dehydrated batch in the fridge as does my sister, and a small in the freezer that I prepared before our last trip :)
Thank you Celia. Your tutorials have been a great help to me on my sourdough journey. My starter, Gertrude, has performed amazingly well :-)
How could any starter named Gertrude not perform well? :) Glad to hear you’re having fun!
Dear Celia, your ears must have all the time today, because I was thinking of you as I baked my first sourdough bread with your Priscilla starter. With sticky dough fingers I tried to click on your short videos. I was all a very exciting experience and guess what my bread turned out beautifully. Melted butter dripped from the first slice as I didn’t have the patience to let it completely cool off and my teeth sank into the warm first bite. OMG bread heaven! I have to say it looks just like your bread in one the above pictures, I wish I could send you one on this respond. Thank you ever Celia for all your support and Priscilla, she is great!
Cornelia, that’s wonderful!! Thanks so much for letting me know! :)
Thank you, thank you Celia. I am addicted to bread baking by now
Thank you Celia, I have mastered your previous tutorial and will definitely give this a try. My husband will eat no other bread now!
Helen, thank you for trying the original tutorial! I hope you enjoy this one just as much! :)
They look amazing!
Thank you! :)
This looks wonderful – I make the overnight sourdough regularly and wonder if my starter would have survived without it because it is so easy. I got one of the “harvey normal” roasters recently and wondering if I can fit two in the oven as they are so good. Thanks.
I have a couple of questions – when you say one part flour and one part water I gather you mean a cup of each rather than 100g of each. I have always done the grams and I think my starter is 100% hydration but it works fine with the overnight sourdough.
I notice in the comments that you said you had tried the bread with wholemeal spelt – have you also tried the regular overnight sourdough with spelt – I was asked about spelt bread recipes recently!
Hi Johanna, I think this recipe will work fine with the starter at 100% hydration like yours. I do it by volume simply because I always have and it’s easier, but the quantity of starter is lower here, so it doesn’t make much difference. I haven’t tried the regular overnight sourdough with spelt, but this version works well! x
I haven’t tried your higher hydration loaves yet – well not using your recipe – but I made overnight sourdough loaves today and had a mix up with the scales and they ended up having far more moisture than usual so I found it really useful to refer to this method to help me muddle through with a sticky dough. thanks! will have to try some spelt in it at some stage.
My starter is 100% hydration, maybe why my dough was still too slack in the morning. Should I decrease the water a bit?
Another inspirational post, Celia. Thanks for sending me the replacement starter, after I managed to murder mine. I haven’t reconstituted it yet, as I’ve been away to much and too busy when I’ve been home. (That neglect is probably the reason I killed the last lot.) I’m in Cambodia right now, but will be baking when I get home.
Cambodia! How fabulous! I hope you’re having a glorious time, A! xx
This is a brilliant tutorial!!
Thank you! :)
You make it look so simple. Do you have any tips for revitalising the starter? Mine seems particularly sluggish lately, possibly because it sits forgotten in the fridge for most of the time. I sometimes use a little honey and cider to perk it up, but wonder if you have a better way to keep it bubbly. Preferably that needs little effort.
My method for perking a sleepy starter is to throw most of it out and start feeding up again with lots of regular feeds. I’ve recently bought some super high protein flour (14.5%) and the starter has gone crazy! :)
Brilliant tutorial and fabulous looking loaves! I’m getting braver with my slashing using some Japanese knives Big Man bought me….one has a lovely thin blade. Have never made a loaf at such high hydration but will be trying it. We’re very into our bread using spelt right now 😊
I’ve had really mixed results with spelt, but I recently discovered a brand of wholemeal spelt that is baking really well for me! Those Japanese knives sound wonderful! Much love xxx
Ooh, thanks for that Celia, I will try this method. I’m getting the hang of the basic sourdough baking, time to branch out. Keep meaning to ask you what your go to books/websites are for baking sourdough.
PS my starter is going well, although I still haven’t come up with a name for it!
How fabulous to hear that your starter is going well! I don’t use a lot of books for sourdough, but I did always love The Handmade Loaf by Dan Lepard. I don’t make bread according to his recipes much anymore (as my starter is usually at a different hydration), but the book is a glorious read and the recipes are grand. Oh, and I also ADORE the Tartine Bread book – that’s probably the one I’ve been most inspired by in recent times! It reads well on the iPad in ebook format.
Thank you for the great tutorial. I have been baking sourdough bread for the past twelve years with the same starter but readily admit that my efforts are very hit and miss! Conversely, your bread appears to be successful each time. Love to know how you achieve this? Maybe Priscilla is your secret weapon!
Priscilla is magnificently robust! She is indeed my secret weapon!
Great tutorial, thank you :)
Hopefully this will help overcome the ‘spread’ that I’ve had with sloppier doughs x
And beautiful loaves!
Thank you! xx
I am SO looking forward to making this!!
You’re not allowed to yet! You have to stay in bed! ;-)
Gorgeous, simply gorgeous
Oh Celia this is wonderful! Thank you so much for all the photos and videos and so much guidance to help understand the process. I can’t wait to try this with Priscilla’s progeny.
Hooray! I hope Elliot is still behaving well for you! 😉 (did I remember your starter’s name correctly?)
Thanks Celia for another fantastic post! I’ve been reading your blog for years and you inspired me to start sourdough baking around three years ago. I haven’t looked back. I too have a very robust starter which I grew myself though it remains nameless. I made this yesterday/today and was informed by my partner that it was the best bread I had ever made. Usually I make your ciabatta as it’s so easy but this entails possibly even less work. I have shared my starter with a number of friends in Melbourne and always direct them to you as a starting point :)
Oh that’s wonderful news!! Thank you for testing out the tutorial for me – how fabulous that it worked so well for you! :)
Exactly the kind of bread I love to eat. That texture Celia it’s just perfect. I can see this being your second most popular post in no time.
Hooray! I hope Prudence likes it too! :)
So excited this post is very timely….I made my own starter last week (10 days in the making) and then made my first loaf which I was very happy with as my first loaf. I didn’t have a roasting pan so just made it on a tray and have been researching roasting pans and they were all $55 plus postage so didn’t buy one. I’ve just ordered the Harvey Norman roasting pan, unfortunately I couldn’t pick up from store to save the $10 postage but $25+$10 is still cheaper than I found on line (so thanks perfect timing). Can you tell me where to buy a reasonably priced big bowl and bread scrapper (I’m in Brisbane) but happy to order on line. I will be giving this recipe a go as I’m okay with sticky dough. I was certainly exhausted after making my first loaf that ended up in the oven at 11 pm at night (not suitable) so happy to see how this overnight process goes for me….now I just need my pan. I used rye flour on the outside of my loaf and that worked a treat…..any ideas on purchasing at bowl and scrapper. Regards Kathy A, Brisbane
Hi Kathy, I’ll send you a scraper – check your email! :)
[…] mentor and home village baker extraordinaire, puts out another bready post. Her recent addition, “A New Overnight Sourdough Tutorial – High Hydration Loaf” is a must read for those who need some revision, or inspiration, or a new approach. The […]
Also…once I have my starter made and it’s in the fridge I have to feed it every week….do I just add flour and water….I don’t have to tip half of it out like when I made the starter? Regards Kathy A, Brisbane
Hi Kathy, I’m not sure how you need to manage your starter (as they’re all different), but here’s how we manage Priscilla: https://figjamandlimecordial.com/2015/02/03/priscilla-sourdough-tips-and-suggestions/
Just checking on another detail Celia. Do the roaster enamelware pans get preheated in the oven or go in cod into the hot oven? Xx
They go in cold. I used to preheat them, but I’m clumsy in the mornings and kept burning myself. I honestly don’t think it makes much of a difference as the thin enamel heats up pretty quickly! :)
yes, I though they might heat up much more quickly. Morning is my best time! Clumsy happens later in the day. Then its time for more reading.
I’ve just added a note in the tutorial – thanks love x
Thanks Celia for another great post. I really enjoy reading your bread stories and excellent tips. My cousin is currently preparing her starter from some I gave her and she is very excited just like I was when I made my first loaf and all the subsequent ones too!
Andrea, that’s great news!
Oh Celia, you are such a bad influence. I bought two roasters from Harvey Norman yesterday :(
Don’t worry, you’ll love them. So much easier to use than those heavy cast iron pots! :)
Ode to Celia….
Better than a castle or an Italian villa
Is a hot fresh loaf made from Priscilla.
Boxes of diamonds tied up with a bow
Cannot compare with hot sourdough.
You may like powdered yeast for leaven
But sourdough starter, smells like heaven,
Just flour and water and a bit of lovin’
Crunchy chewy loaves, hot from the oven.
hugs, Maz. :-)
I LOVE it!! Thank you, lovely friend! xxx
hee hee hee, thank you! Half the loaves I made today are already consumed. :-)
Hi Celia, I have just stumbled onto your site from Francesca’s Almost Italian website referral and it’s completely destroyed 2 days’ worth of my productivity :) I don’t know where to start, other than to say it’s amazing and I am starting to work my way through it. One recipe at a time, ha ha. With 3 teen kids to feed my partner & I are finding the desire to cook is driven by both being economical while at the same time driving for more nutritious & delicious meals and snacks. My problem as with all newbies is my efforts have been a bit hit and miss. My wife on the other hand is brilliant. I love the site, it will give me many more opportunities to test myy cooking arm. Thank you for the effort you put in to make it what it is.
Paul
Paul, what a kind comment, thank you! If you ever decide to bake your own bread, let me know and I can send you some starter! :)
Hi Celia, I have tried bread making both with a traditional bread making machine (not really that hands on to be honest) and old school dough and tin. They always seemed to be too heavy & dense, almost like stuff in bullet proof jackets …,😅. I’d love some starter if that’s ok? From trading bits on the site and comments from others Priscilla the starter seems pretty hardy and able to handle the foibles of newbies. Thank you for being so thoughtful, cheers Paul
Your slashed sourdough breads are absolutely gorgeous! I still have your starter (dried) and will be bringing it back to life in the next few weeks when I have more time at the cottage. I’ll stick to the first tutorial though!
Fantastic post Celia. I have no time for baking and desperately need a new oven. Reading your post makes me hanker for retirement even more!
– Fra’s Bro
[…] Here is Celia’s latest adaptation of her overnight method, which incorporates some helpful videos and also adapts the recipe to a higher hydration and uses some spelt flour, but is mostly wheat. She does also have a 100% spelt recipe here, however it uses her normal wheat starter, I believe and mine uses a spelt starter. […]
Celia, what a great explanation and tutorial. Thank you. Thank you as well for the tip about the affordable enamel roaster. The loaves look beautiful.
You’ve done it again!!
Could I use a le cruseut pot instead, or are they too heavy to conduct the heat properly?
I believe Francesca at Almost Italian has made this with a le creuset pot, but I don’t own one, sorry. It would probably take a bit longer to heat up? If it’s a problem, you can try preheating it before using. Good luck!
Thank you for taking the time to respond Celia. As much as I love to have exactly the right gear, my little kitchen is quite tiny and I now have to make sure I absolutely need it before buying.
How about on a baking stone? I did mine in a enameled cast iron Dutch oven and for some reason I think this bread would have done better on my stone.
[…] we went to Adelaide, I was reading a post by Celia, from Fig Jam and Lime Cordial. She was, again, extolling the virtues of the Wiltshire […]
Hi Celia. I am well used to the overnight sourdough reciepe now. I am using one oval cast iron pot and one rectangular clay baker which both fit into my standard oven together. Will these do or would I definately need an enamel baker? Have only seen really expensive ones in Ireland.
I haven’t tried this recipe in anything other than the enamel roasters, but you could give it a go, Kay! If you’ve got it working for the regular overnight formula, it might be fine for this one too. Good luck!
Hi, just wondering if you have any tips for getting the dough to puff up after being shaped? Is my starter not strong enough?
I’ve been baking about about 2mths and this is one area I struggle with. I get a good rise overnight with lots of lovely bubbles throughout the dough but my loaves spread out after shaping instead of puffing up. It does rise during baking.
Love your blog and the this method, so easy and anyone who says they ‘don’t have time’ is kidding as although it takes a long time, there is not much effort involved.
Thanks
I’m afraid I can’t advise on your starter, as every starter is different. You could try less water, or have a look at my friend Heidi’s old post about forming a gluten coat. Good luck! http://www.heidiannie.com/?p=6462
I just made with cast iron pots (preheated) and it worked really well – freezing overnight temps notwithstanding! Thanks Celia :)
I tried this with Fred yesterday, and omg! We didn’t have any spelt, so I subbed in some barley flour – it was delicious and had phenomenal texture. Thanks again for an awesome recipe!!!!
[…] bread, the sourdough starter was revived and our breads are back on the table, using a variation of this recipe. I dehydrated my sourdough starter (Celia’s method can be found here) back in July, but then […]
[…] That’s four stretches in all. If you do two or three, the bread will not mind. I always have sticky hands and so have not been able to photograph this method. Where is Mr T when you need him? If you need a little visual version of this method, check Celia’s video here. […]
Thanks Celia for a really great recipe and method.
I am returning to sourdough after a thoroughly frustrating period 12 months ago when nothing would rise properly in baking when using the pizza stone method and steam.
The roaster is a revelation (we usually have a chicken in it!).
My first loaf looked a bit flat going in but it sprung up beautifully and was my best loaf of many bakes.
I’m looking forward to refining my technique and many more great loaves – my next attempt is proving at the moment…
Thank you for restoring my faith in sourdough!
Hooray! Thanks for letting me know; so glad it’s working well for you! How cool that you already had a roaster on hand! :)
This is fantastic!
I will try this soon, but I needed to write you about the lower hydration overnight sourdough bread. As the comments are closed there, I want to thank you very much for your recipe, clear and short explanations!
I was very skeptical about the final result, considering that I basically “worked” at this bread no more than 30 minutes. With other techniques I used to worry a lot about the proofing times after kneading (slap & fold) or stretching and fold numerous times. After all I used to spend my whole weekend for a couple of loaves.
This morning I found my dough exactly as you described and I preheated my pot. The result was perfect. Just a perfect bread for everyday consumption, with as little effort and worries as possible.
I will try this one Friday to Saturday though :)
That’s wonderful, thank you so much for letting me know! :)
Hi Celia, I’ve been using your recipe for the higher hydration dough using the 4th ingredient olive oil. . I noticed your updated tutorial does not hve any oil included so I was rather scared while I worked on the dough.. it was really very sticky n I had to use lots of semolina flour and wet hands. Do u think If I used olive oil on my hands instead of water and semolina flour to shape the loaves compromise the rising in any way ?
I think it should be fine. It’s a bit fiddly, so it takes a bit of practice. You could also add a little oil to the dough if you want to? Reduce the liquid accordingly. My friend Dan makes this with just 700g water and has great results.