I’ve been responding to quite a lot of emails from new Priscilla bakers, so I thought I’d write an FAQ post. For more tips on sourdough baking, please check out Emilie’s fabulous primer here.
. . . . .
1. Flour
I always feed Priscilla with bog standard white bread (bakers) flour. It needs to be bread (bakers) flour because the wild yeasts need the higher protein to feed on and that isn’t available in plain (AP) flour. I know many people who successfully feed their starters with rye flour, but I’m not a huge fan of the flavour, so I don’t do that.
I know that ideologically it would be lovely, but I’ve found that stoneground organic flours don’t work. They’re ok for actually making the dough with, particularly if you’re a fan of heavier loaves, but I’ve never known anyone to successfully activate or keep lively a Priscilla starter with them. That’s because stonegrinding produces a heavy, coarser particle, whereas steel rollermilling (which is how regular white bakers flour is made) results in a much finer, consistent flour.
I currently alternate between the Manildra and Ben Furney Flour Mills brands, both of which are excellent. Bakers in Victoria have had great success with the Wallaby brand as well.

. . . . .
2. Water
Water has proven to be a bugbear for a few sourdough bakers. In parts of Australia, our water can be heavily chlorinated which can kill the starter off. I always use filtered water to feed the starter, but I find I can get away with tap water to make the actual dough. If you’re still having trouble and you’re using filtered water, you might want to check that your filter cartridge doesn’t need replacing.
If you don’t have filtered water, both Jason and Maz have had great success with using water that has been boiled first then allowed to cool.
. . . . .
3. Storing the Starter
When I first started baking sourdough, I couldn’t bring myself to throw any excess starter away (I still have trouble with it now). As a result, I ended up with lots of jars of starter in the fridge, busily trying to keep them all alive.
I’ve since learnt that this is false economy. When the amount of starter in the fridge gets too large, the small weekly feeds aren’t enough to keep it going, and the starter can stagnate and start to die off. So these days I keep no more than 1 – 1½ cups of starter in the fridge at any given time. Here is a photo of my fridge starter, just after feeding and before going back into fridge…

My maintenance routine is this: whenever I bake, I take the starter out of the fridge (where it’s stored in a covered container), give it a stir and pour about ¼ – ½ cup into a large bowl.
Into the container, I stir in ¼ cup each of bakers flour and filtered water. It is then covered and immediately returned to the fridge for next time. If you’re not baking regularly, feed the starter like this once a week to keep it healthy. Make sure to discard a little bit each time.
Into the bowl, I stir in ¼ cup each of bakers flour and filtered water. It is then covered with a plastic shower cap and left on the bench. About 4 hours later, I stir in ¼ cup of flour and water. A few hours after that, the starter is usually raring to go (but if it’s not, I’ll feed it again and adjust my baking schedule). The starter should be super bubbly before it’s used to make dough…

Don’t panic if your starter looks like this when you take it out of the fridge after a week. Depending on the weather and how often it’s been fed, the starter can look pretty sorry at times. Occasionally it can build up liquid on the top known as “hooch”, which I believe is the alcoholic byproduct of fermentation. Just pour this off…

Edit: here’s a great tip from my friend Emilie. To test if your starter is ready for making dough, drop a spoonful into a tall glass of water. If it floats, it’s ready to go!

. . . . .
4. Sharing the Starter
One of the great joys of having a thriving sourdough starter is being able to share it around! If you’re passing it on to a friend in person, just take a bit of the starter, feed it up until it’s bubbling, then pop it into a takeaway container and hand it over.
If you’re planning to mail the starter, it’s best to dry it. Get the starter really bubbly, then spread a bit out thinly onto a silicone mat or plastic plate and leave it in a warm spot to dry for a few days. Once it’s dry, crumble it up (I use a mini food processor), then bag it up (airtight if possible) and store it in the fridge until ready to share. This is also worth doing so that you always have backup in the fridge should anything happen to your main starter. I wrote a bit more about the process here…

. . . . .
5. Timing
Every sourdough baker eventually figures out a routine and schedule that suits their lifestyle. It takes a bit of time to work this out – I start feeding a bowl of starter at lunch time, make the dough before bed, and bake the following morning (as per our overnight sourdough tutorial). For folks who work regular hours though, it might be easier to take the starter out when they get home on Friday night, feed it immediately, then give it a really large feed before going to bed, ready to bake the following morning.
The starter works to its own schedule – it can bubble up frantically at 2am in the morning and then be flat and subdued again by 6am. It takes a bit of trial and error to figure out how to get to it when it’s at its peak. If I’m planning to make dough in the morning, I’ll often give my bowl of starter a huge feed before going to bed (sometimes as much as a cup each of flour and water) to make sure it’s got enough food to see it through the night.
Once you’ve made the dough, the time it takes to prove will also vary. On a hot day, it might be ready within four or five hours, but in the middle of winter, it can sometimes take 12 hours to prove. Priscilla always seems to bounce back regardless of how much time she’s had (although I haven’t tested her with a bench prove longer than about 14 hours) – not all starters are as resilient.
. . . . .
6. Dough Hydration
The hydration of the dough refers to the percentage of total liquid to flour. So if a dough has 750g of liquid (water, oil, milk etc) to 1kg of flour, the hydration of the dough would be 75%. This is slightly more complicated with sourdough, as the amount of water and flour in the starter needs to be taken into account as well.
The numbers aren’t really a huge deal – here’s what’s important about hydration:
- a lower hydration (drier) dough will be easier to shape and slash. It will produce a loaf with a tender, more closed crumb and is great for sandwich bread and rolls.
- a higher hydration (wetter) dough will be soupier and trickier to manipulate, but the pay-off is a more “artisan” loaf, with large holes and a more elastic crumb.
Most bakers will start with a drier dough and work up to a wetter one as their skills improve. Experiment and see how you go! I’ve had great results from baking higher hydration loaves in a closed pot (more here).
. . . . .
7. Mixing it up!
One of the best ways to create interesting loaves is to experiment with different flours. I’ve found the easiest way to do this is to substitute half the bakers flour in a dough with an alternate flour – wholemeal, rye, spelt, kamut, remilled semolina. Some of these have a lower protein content than white bakers flour, so it can be tricky to make 100% loaves with them. Adjust the water accordingly, as some of these flours can be quite thirsty.
Another way to expand your sourdough portfolio is to add inclusions in your dough such as dried fruit or nuts. On our bread page there is a list of Bread #101 Sourdough tutorials with suggestions on how to vary your basic loaf (I’ve listed these at the bottom of this post as well).
. . . . .
8. Basic Shaping
To shape a round loaf, flatten the dough out and fold the outsides into the middle. Then turn the ball of dough over and cuddle it with the palms of your hands to round it up…
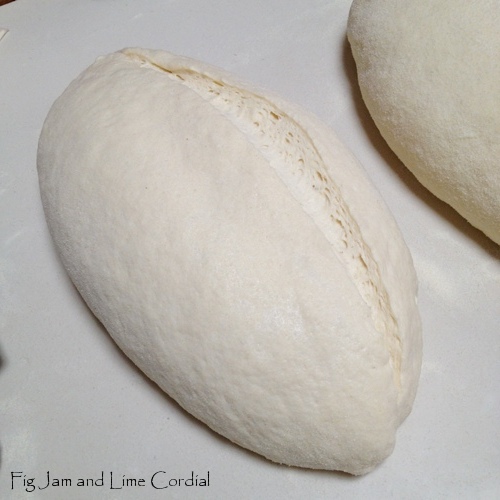
To shape an oval loaf, begin with a round loaf. Flip it over and flatten it out, then fold in the top and bottom…

Then fold the dough in half and squish the two sides together (either with your fingers or the heel of your palm)…

Flip the dough over and allow to prove, then slash. I like to make a single deep cut with a serrated bread knife…
The dough above was baked in a closed enamel roaster…

. . . . .
9. Baking the Loaf
Once the dough has had its second rise, there are a multitude of ways to bake it. My preference is to use a preheated oven, but that’s not necessary – a lot of people pop their dough into a cold oven and get fabulous loaves. I prefer the crust and crumb from a loaf baked in a hot oven though, so I always preheat.
A shaped dough can be baked uncovered on a tray or a preheated pizza stone, and for most of my bread baking life, that’s what I’ve done. In the past year though, I’ve learnt to bake in a covered pot (thanks Em!) and my loaves have gone from homemade to artisan in appearance.
Here’s why it works so well – when the dough is placed inside a closed container, the moisture in the dough which is released as it heats up is captured as steam inside the pot. The steam prevents the crust from hardening too quickly, which enables the dough to rise to its maximum capacity. When the lid is removed, the steam is released and the crust gets a chance to brown up and set. Trying to keep the outside of the dough moist and expanding for as long as possible is the reason bakers add ice cubes or mist their oven (they’re trying to create steam).
Most pot bakers use enameled cast iron pots, but I find them too heavy. I now use cheap, lightweight enamel roasters which are heat safe to 270C and work brilliantly. If you do use cast iron, remember to check that your pot can cope with the high temperatures. Some of them have plastic handles which melt at anything over 190C.
Edit 21/10/16: both the Wiltshire and Falcon enamel roasters work well – the one in the photo below is a 30cm Falcon. I’ve bought both brands online – here are the links:

Hot or Cold Pot?
I used to preheat my enamel roasters in the oven, then manoeuvre them out with welding gloves and plonk my shaped dough into the hot pot. I still think that gives me the best results – I like the crispiness of the crust that I get that way. That’s the technique I originally suggested in the Overnight Sourdough Tutorial.
However…these days I’m more likely to put the dough into a cold pot, simply because it’s easier. The results are still excellent, particularly with the enamel roasters which are lightweight and therefore heat up almost instantly in the oven. I line the base of the roaster with a sheet of parchment paper, as I’ve found that putting the dough into a cold pot makes it more likely to stick than when it goes into a hot one. Once the shaped dough is risen, I slash it, place it into the pot, cover it, and put the whole lot into a preheated oven. It works a treat!

. . . . .
10. Storing the Loaf and Using Up Excess Starter
Always allow your loaf to cool to at least lukewarm before slicing it – otherwise the crumb could go gummy. I store my loaves in sturdy plastic bags and we try to eat them over a couple of days. Surplus loaves are frozen or turned into bread rusks – the latter keep well in an airtight container for weeks. Never store bread in the fridge, as it tends to go stale faster that way.
Excess sourdough starter is perfect for pancakes. We make a batch most weekends and my boys absolutely love them. I also use excess starter in Cuban bread (although that just results in more bread in the house)…

. . . . .
11. Artisan Sourdough Made Simple, by Emilie Raffa

If you haven’t already purchased a copy of my darling friend’s book, then I’d strongly urge you to do so, not just because it’s brilliant, but also because it’s been specifically written for everyone who is baking with a Priscilla starter. I wrote two whole posts about it here and here.
. . . . .
Do you have any questions about your Priscilla sourdough starter that I haven’t answered here? If so, please let me know – I’ll keep adding to this post as I think of more tips to share!
. . . . .
- Bread #101 – Overnight Sourdough Tutorial
- Bread #101 – Basic Sourdough Tutorial
- Bread #101 – Rosemary Salt Sourdough Rolls
- Bread #101 – Sourdough Scissor-Cut Loaves
- Bread #101 – Sourdough Grain Loaf
- Bread #101 – Sourdough Epi Stars and Fruit Loaves
- Bread #101 – Sourdough White Sandwich Loaf
- Bread #101 – Sourdough Cookie Cutter Rolls
- Bread #101 – Sourdough Knotted Rolls
- Sourdough Cooking Class 2018 – Step by Step Instructions
- Holey Loaves

Great tips Celia and I do love your sourdough sharing – very grateful to have benefitted. Reassured by your pics too that my bubbling starter (now named Edna) looks similar. Will write about it soon.
‘Edna’ love it. Made me smile!
Andrea, hooray! Edna is a wonderful name! :)
Great post, Celia.
Cheers Glenda, thanks! :)
This is all so useful, thank you xx
Elaine, I’m not sure you need any help – your loaves are looking amazing! :)
Ah, thank you :) it’s all thanks to you and Selma, I’ve done copious reading of posts from you both! xx
This mornings bread is sensational. Though I was too hesitant with the cuts. Your description of timing was most useful in your post. . I came back this morning to double check the storing of the Starter. And I see where I have been going wrong.. Feed then immediately back into the fridge for storing. I tend to leave mine out too long.. so I will attend to that.. thank you for making that clear for my paddington bear brain.. love love.. c
Think of the starter as a pet – it needs food to keep it alive. If it’s fed and then left on the bench, by the time it’s bubbly, it’s consumed most of its food and is ready to make dough. But if it goes into the fridge like that, it doesn’t have anything left to keep it going while it’s in there. So it’s fine to leave the starter on the bench, but it will need a feed before it goes back into the fridge for storage! :)
That is an excellent way to describe it.. makes perfect sense
Very useful tips, Celia, can never have enough! My first two loaves with the starter you provided have been very well received by family and friends. Thank you so much for all your help.
Jeannette, your loaves looked astounding! :)
Oh C, what bread monsters Priscilla has started! I’m typing with floury fingers in floury pajamas. Two mutant stuffed loaves are rising in my kitchen, (Cheese cubes, artichoke hearts and green olives). I have a mason jar filled with cooling boiled water to feed my starter, Big Mama. Breadmania continues. I’ll post picts. Hugs, Maz
Maz, your loaves are looking stellar! Harness the Breadmania! :)
Great tutorial, Celia! I am getting set to bake again today. 74% hydration dough today. This time I will try one long slash. Have a great week!
Manuela, your rolls today were the bomb – I loved how you used the daisy cookie cutter! :)
A very thorough explanation! I find it easier not to divide the starter but to feed the whole starter when I want to bake and then just before I add the flour, salt and water I take out 1/4 to 1/2 cup, feed it and put it back in the fridge. Like you say, everyone develops their own routines to suit themselves and the trick is to find your own rythm.
Anne, I’m a doofus, when I’ve tried to do that, I end up using all the starter and forgetting to put any back in the fridge. Your starter is probably a bit healthier for the double feed each time! :)
You’re a STAR, Celia!
Thanks A! x
Celia, I’ve always meant to try a loaf in an unpreheated oven, but I can never bring myself to risk it! :D
Jean, it’s worth a try! I’ve done it on a few occasions, usually when I’m using a clay vessel, but I know folks who start with a cold oven all the time!
Thank you Celia, this is very timely as I will bake my first loaf this week.
Hooray! Enjoy Liz! :)
Thank you Celia for such a great post. I am going to play it safe and dry some of my starter…just incase… Can you please tell me how you rehydrate the dried starter.
Carol, it’s very easy! I just put two generous teaspoons’ worth in a bowl and feed it 1/4 cup bakers flour and filtered water. I repeat this a few hours later. Usually by the third feed, the starter has bounced back and is raring to go, but it depends a bit on how long it’s been dried. I dry some off as backup every few months so there’s always some reasonably fresh dried starter on hand. It’s easy to do, although the house does smell like starter for a couple of days! :)
Thanks Celia, this is very helpful. I’m now ready to dry some of my starter to give to friends.
Mary, I’ve found it’s always worth keeping a bit of dried starter as backup – just in case anything happens! :)
Perfect timing… and good morning, love! My first tweet today was going to be to you, asking if I could use pre boiled water that had cooled. Thanks for this fabulous and informative post. Love ya.
Enjoy Lizzy! I hope you have fun with Ludmilla!
Brilliant Celia. It’s always useful to read tips and reminders from someone as experienced as you. That has now convinced me to buy an enamel roaster.
Jan, don’t tell Peter I’m making you buy more cookware! :) Although the enamel pot really is fabulous – for roasting poultry as well!
Once I get mine going, I’m going to call her ‘Ludmilla’.
I love all this discussion ….. I must get going again soon.
It can be very addictive once you start! :)
Celia, you are a master bread maker:)
Thank you! :)
I took Esmerelda Pissemeyer out of the fridge this morning and gave her a feed and now I see these wonderful tips. I’m going to make a pot bread with a higher hydration tonight and bake it off in the morning and see how it goes. Fingers crossed! Thanks again from the bottom of my heart for a bite of Priscilla!
Do you ever call her Ezzie? I think I’d be tempted.. :) Hope the pot loaf went well! x
Celia – how long after I’ve shaped the dough can I bake it? I’ve been leaving it 30 minutes or so but I’m wondering if it should be longer? Rich had vegemite on toast for brekkie this morning – he’s probably getting tired of me asking how the bread is!
Nancy, I find that the longer I leave it to prove the first time, the shorter the second (shaped) prove needs to be. I usually just let the dough puff up a bit after it’s shaped and then bake it – I like the big oven spring from having it just slightly less than fully proved. You could prove longer if you want, but be careful not to leave it too long, as overblown dough won’t spring up as much in the oven and you’ll end up with a flatter loaf. Rich should answer enthusiastically each time if he wants to keep eating fresh bread! :)
I’m determined this will be the year but like Celi, the drawback is if I make it I will eat it!
It IS hard to resist! :)
Fabbulous post, Celia! Such useful tips, as many of these challenges were my own experience (chlorine in the water making my starter sluggish, Aldi pot with handle that started to “melt” as I hadn’t heeded the max 190C warning on the box!) Thank you so much for your patient guidance like an expert midwife as I eventually birthed Princess Sandy….I feel so excited and proud to be part of the Priscilla Dynasty!
:-) :-) :-)
Jaqi, your first loaves were spectacular!!
Brilliant post Celia! I’m just about to mail out some more starter to about 5 blog readers this week and sent 4 lots out a few weeks ago. I need to have a go at this pot baking. I missed that!
Claire, thank you for sharing the love! Make sure to keep some dried starter for yourself as KJ backup! :)
thank you Celia…with all the info you feed us with you’d think we could make sourdough now with our eyes closed! My 10 yr old is studying Food Tech this year (we homeschool) and guess what he wanted to make first and foremost?? Yep, sourdough bread!!
Hahaha…good for him! Bet he’ll make a master baker! :)
Wow. I’ve learned so much from reading this post. I love how leftover started can be used to make pancakes – always a great way to start the weekend xx
Charlie, as you know, any time you’d like some starter… :)
So jealous Celia, gluten free never looks this good :( xo xo
Sorry hon. If you ever want starter to bake bread for the troops, just let me know! x
You are such an inspiration, Celia!!
That’s very kind, thank you! :)
Booking marking this post for future use and thank your for all the tips :)
I SO hope your starter gets there soon, Moya!
Celia this post is gold! Thank you so much for the time and trouble you have taken to write it. I’ve bookmarked and printed it.
Rose, how’s Elliot going? Thank you for taking the time to read this longwinded post! :)
This is so comprehensive. Thank you for the detail. Off to buy some falconware.. You’ve answered so many questions!
Hooray! Glad it was helpful, thank you for your lovely comment! :)
Love reading all your tips and wisdom. Makes me think I should experiment more with sourdough but so often I just want to throw it in the bowl and get on with something. I am just chomping on some overnight sourdough which is my favourite bread of late – made it with starter straight from the fridge because I was disorganised and it worked. I probably should dry some starter as back up – really good idea. I don’t have enamel roasters and just use cheap ceramic casserole dishes to bake my bread which works ok at 240 C in my oven.
Johanna, I’m so impressed, I’ve never managed to make dough using a cold starter! I’m glad it worked for you!
You definitely wrote this post for me. You are a super star. Celia, thank you so much. Soon (hopefully) I will be able to produce and share with you a beautiful loaf of bread!
Have a wonderful and happy day.
:-) Mandy xo
Starter is on its way to you, Mandy! :)
What a fantastic informative post. I can’t wait to try this all out!
Gretchen, I hope your starter has made it! If not, let me know and I’ll resend!
Awesome tips Ms Celia. It’s been pretty cold here lately and we have just started TAFE so am waiting a bit to start Godscilla when all of the kerfuffle settles down. Haven’t had to physically attend TAFE for a long time now so this is most definitely a spoke in my usual wheels! I am saving this tutorial (along with all of the other ones mentioned) in a word doc so that I can easily find them when I need them. Thank you SO much for your amazing shares with both starter and recipes and now hints and tips :)
Keep the dried starter in the fridge until you need it, Fran! TAFE – goodness, it’s been a long time since I did any formal study, not sure how I’d cope now! :)
“I” am not sure how I will cope but at least it is interesting and “creative” which means that the lecturers are a lot more free and easy about things like “rules” etc. so the odd social faux pas shouldn’t alarm anyone too much ;)
Brilliant post – I was curious about drying the starter to share…now I know!
It’s very easy to do! And it’s always nice to have backup in the fridge!
What an excellent and thorough tutorial. Thank you Celia. I now have a good place to steer others. Thank you!
Praise from the master! Thank you lovely man. Please let me know if you think I need to add anything! x
Great tips Celia. Lovely to have it all in one place. Must start drying out my excess starter.
Fra, it’s a great way to share it around – much easier than trying to hand over live starter. That way folks can revive it when they’re ready, rather than trying to keep one alive from the get-go! :)
Great tutorial, learned a great deal about sourdough starter and bread making, thanks.
Norma, thank you! Do let me know if you ever want any starter to play with! :)
Thanks for the offer, Celia. I will.
I have been putting my loaves straight onto a hot baking tray, after pre-heating the oven, as I don’t have any pots. The other thing I have been doing is pouring cold water into a tray in the oven just below the bread, creating steam – I read that this helps create a crunchy crust.
Must be working – your last loaves looked fantastic! :)
[…] been playing with Celia’s sourdough starter that she gave me that I’ve renamed Esmerelda Pissemeyer. This is the liveliest, […]
Such a wonderful post Celia! As I’ve said, time and time again, you’re the queen!
Thanks lovely, you’re very kind! x
Thank you Celia, this really helps a new bread maker and is great reference for me. Although I’ve never made sourdough bread before, I’ve always made French bread & baked with a pan of water underneath. Mostly I thought it was to catch the drips as I basted the loaves with water while cooking but now that I see what you’ve written about the moisture that explains the pan WITH water in in underneath. Always something new to learn every single day.
Glad it was helpful, Di! Helps a lot to understand why they do things, doesn’t it! :)
Fantastic Celia, thanks so much for your guidance! Next question, and possibly a stupid one… can I simply add to the leftover starter on a daily basis if I want to bake again next week? Or do I need to make a new starter? Thanks love xo
Darls, see post above. Feed the leftover starter now and pop it into the fridge. When you want to bake next week, take some of the starter out, feed it up until you have enough, then make dough. At the same time, give the starter left in the container a feed and pop it straight back into the fridge – that is then your reserve tank for future baking! :)
Aha, got it… thank you!
OMG! I cannot believe I have struggled to truly ‘get’ hydration forever, then you write a few simple words and it is like ‘duh, of course that is what it is!’ Thank you.
Ha! Sometimes the books do make it very confusing, don’t they? Glad it helped, T! :)
I am behind in my reading!!! This is wonderful, Celia. As always, very thorough and informative. I’ve actually been in the process of photographing my starter(s) on different days to compare. Quite interesting! Thanks for the mention too, love! xo
Thanks darling! xxx
[…] faithfully followed the instructions given by Selma and also on Celia’s blog to feed Priscilla regularly a couple of times until bubbly and alive, and at this point began thinking of names for […]
[…] other day I was reading Celia’s post on Fig Jam and Lime Cordial where she talked about putting the bread in a pot without pre-heating it. I knew I had to try […]
[…] sent to you from Australia by Celia, a regular font of sourdough knowledge (see her latest in Sourdough Tips). Her starter, which goes by the name of Priscilla, is very prolific. In fact, I believe Priscilla […]
Peter’s of Kensington has just received an order from me ! – I’ve been using a Pyrex lidded pot for my little no-knead; but round loaves are wasteful. I would never have found this, Celia ! – you’re an absolute gem !!!
[…] several times a week. I enjoy the process and now that I’m using my starter Hercules, Son of Priscilla (thanks Celia!), my loaves are going from strength to strength. I confess that most of the time I […]
Hi Celia, I’m new to wordpress and just chanced upon your blog.
Love these tips on Sourdough baking.
Kevin, thanks for stopping by! Good luck with your new blog! :)
[…] well and are great used as picnic rolls. Now, to work out how to incorporate Hercules, Son of Priscilla, my sourdough starter into the next […]
I love this article thank you Celia. I’ve had to re-start Riley, my sourdough starter, as she’s been in the fridge for the past couple of months not being used :( I hope you don’t mind if I share this on my FB, Google+ & Twitter to get everyone excited about baking bread again – pingback straight to you. Thank you for making bread baking simple, easy & fun! I’m going to try wholemeal breads – if you have any pointers would love to hear them. Thanks again Celia x
Nic, I’m so glad you’ve found it useful! Thanks for letting me know! I don’t make wholemeal – no-one will eat it here, but it’s usually quite high in protein, so should work well! x
Thank you for letting me know about the wholemeal flour. I’ll hopefully let you know how it goes once I’ve mastered it ;) x
Hi Celia, I’m a coeliac and need to make gluten free bread. Currently I’m using a mix of rice and soy flours, potato and tapioca starches with dried milk powder and a variety of seeds with plain dried yeast, but I’d love to try sourdough. Do you know if there’s there any way of creating my own sourdough starter using these flours? I can’t use your lovely Priscilla because it’s made with gluten containing flours and will make me pretty sick.
Kate, I’m really sorry, I wish I did! I have several friends with coeliacs who would really enjoy it!
Not to worry, I’ve had the same answer everywhere, but as you’re the sourdough guru, I thought you might have an idea…
Kate, I just came across this link on a friend’s blog, it might be what you’re looking for? I haven’t tried it though…
http://glutenfreegourmand.blogspot.com.au/2014/03/gf-24-hour-sourdough-bread-recipe.html
Thank you so much! I clicked through to the post about making the starter, and I think I’ll combine what she recommends for building the starter with how you maintain yours. I really want to try sourdough because it lasts so much better than commercial yeasted GF breads, which dry out on day 2 and are concrete by day 3. I think if I’m successful, I’ll call her Audrey II, from Little Shop of Horrors, because she was always asking to be fed!
Hello,
How long can the starter stay dried in the fridge? Mine has been in there 11 months. I’ll be testing to see if it comes to life tomorrow.
Priscilla lasts a very long time in the fridge, but I’m sure it varies enormously from starter to starter. Good luck with yours!