Feeds:
Posts
Comments

Archive for the ‘Recipes’ Category

hbk1
I don’t buy many bread books anymore, but this one was a happy exception.

Hot Bread Kitchen is a non-profit social enterprise based in New York City which aims to bring about social change by empowering low-income, minority and immigrant individuals (largely women). The organisation has grown to include business training and incubation, but it began with and continues to be based around a bakery – one which enables its employees to create, sell and preserve the bread recipes of their homelands. This is their first cookbook and it’s glorious, full of traditional techniques as well as recipes for the dishes that usually accompanied the breads.

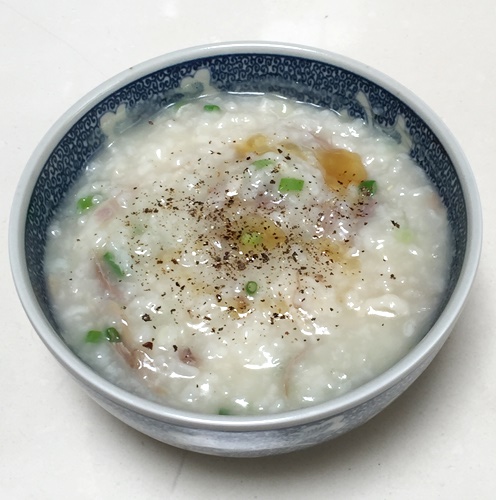
I made their Moroccan M’smen recipe just hours after I’d downloaded my Kindle copy of the book. It’s surprisingly similar to Malaysian Roti Chanai, so much so that we ate it that night with a chicken curry.

With permission from HBK, here’s the recipe:

  • 500g plain (AP) flour
  • 100g fine semolina
  • 1½ teaspoons (6g) kosher salt (I used Malden Salt Flakes instead)
  • 400g water
  • 95g canola oil, plus more for shaping
  • 85g salted butter, melted

Step 1: Put the flour, semolina and salt into a heavy duty stand mixer fitted with a dough hook. Add the water and 10g of the oil, then mix slowly until combined. Increase the speed to medium and mix for about six minutes, until the dough is smooth and elastic.

Step 2: Coat a rimmed baking tray with oil. Coat the benchtop with oil, then transfer the dough to the oiled surface. Divide it into 12 roughly equal balls (the traditional method given in the book is to form your thumb and index finger into a ring and squeeze the pieces off). Roll each ball in the oil and place them on the baking sheet, keeping them separate from one another. Now cover the entire tray with cling film and allow it to rest at room temp for 30 minutes, or up to eight hours (I made mine in the morning and let them rest until lunch time). The longer resting time allows the gluten to relax, making the shaping easier.

Step 3: Put the 85g oil in a small bowl and mix with the melted butter.

Step 4: Re-oil the benchtop. Take one piece of dough and flatten it out with your hands to form a circle about 25cm across. You want to get it as thin as possible. Using your hands, smear over a tablespoon of the butter mixture, then sprinkle over a teaspoon or so of semolina…

hbk6

Step 5: Using a spatula, lightly mark a line in the middle of the circle as a guide. Fold the top over to about 1.5cm below the line. Then repeat for the remaining three sides to form the dough into a small square…

hbk7

Step 6: Transfer the folded dough back to the baking sheet, seam side down, and let rest for another 15 minutes. Repeat with the other balls of dough, warming up the butter mixture if it begins to solidify.

hbk8

Step 7: Starting with the first folded piece, lightly oil a sheet of parchment, then place the square of oily dough on top and spread it out with the palms of your hand to form an 18cm square. Repeat with the remaining dough. It helps to have two sets of hands at this point, so one can cook while the other one shapes. Don’t stack the sheets on top of each other or they’ll stick.

hbk9

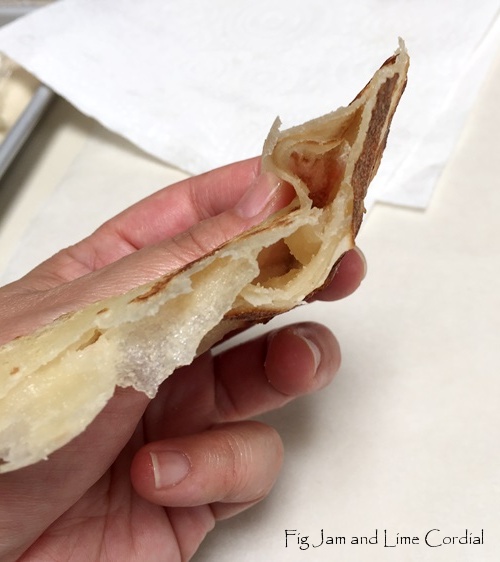
Step 8: Heat a large griddle (I used a stainless steel frypan) over medium high heat until a drop of water sizzles almost immediately. Flip the m’smen paper side up onto the hot surface and peel the paper off once the dough starts to cook and firm up…

hbk9a

The dough will turn translucent first…

hbk9c

…then brown up in spots. The total cooking time will be approximately two to three minutes on each side…

hbk9d

These are incredibly delicious eaten warm, either Moroccan style with honey and sweet fresh mint tea, or Malaysian style, torn and dunked into a spicy chicken curry. They’ll keep in the fridge for five days in an airtight container (good luck with that, ours were eaten within hours of cooking) and can be reheated in a dry pan for a minute each side before serving…

hbk9b

hbk9e

. . . . .

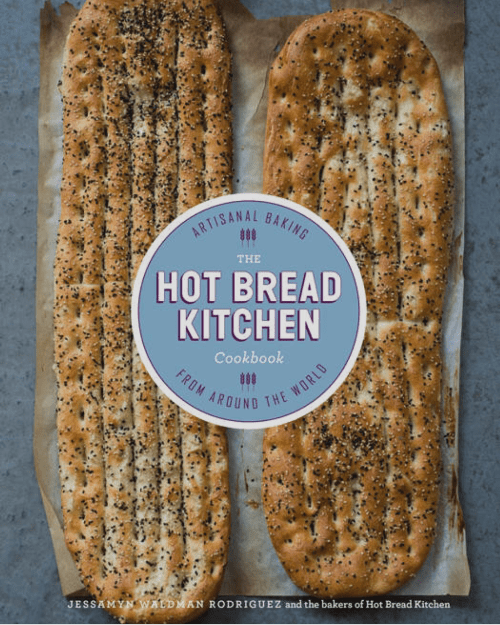
The next recipe I tried was HBK’s signature Nan-e Barbari (as pictured on the cover of their book). If you’re making this, there’s a slight hiccup in the ingredients list – the water quantity should be 350g instead of 450g. They advised me on twitter that it will be corrected in the next edition.

Nan-e Barbari is an intriguing recipe, as the proved dough is coated in roomal (a flour and water paste), which adds moisture to the bread as it bakes. The end result is a crust which reminds me of the one on traditionally kettled bagels.

hbk3

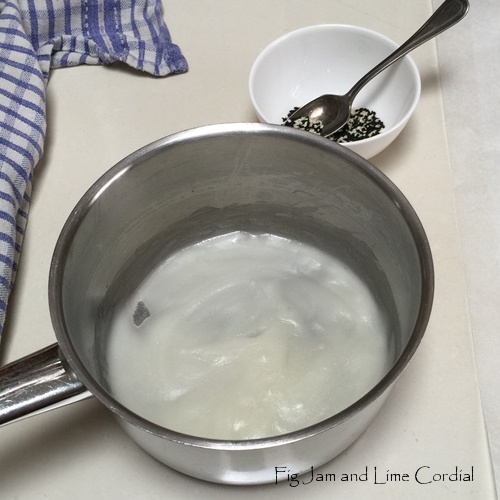
The finished loaves are wickedly good, with a wonderful aroma from the nigella seeds…

hbk2

. . . . .

If you’re after a new (non-sourdough) bread book, this one is well worth a look. Best of all, the proceeds from your purchase will be going to a good cause!

Read Full Post »

23x

A tutorial for Millie, Emmeline, Gabby and Rachel!

. . . . .

Twenty-three, I’ve decided, is the new twenty-one.

I know a surprising number of 23 year olds (including our own Big Boy) and they all seem to have found their groove – they’re confident, mature and comfortable in their own skins. Any early 20s angst has subsided, their opinions are considered and sophisticated, and they’re a joy to spend time with. This is their world now.

Last weekend, I took my filled focaccia to a neighbourhood get-together, and was describing the recipe to lovely Emmeline (23), who was keen to try a vegetarian version.

On Monday, Millie (23) came to help us with the garden, and I made a slab for lunch. She too was interested in the recipe, so I sent her home with a bag of bread flour and some yeast. The brilliant girl made a vegan version that evening, filled with olives, sundried tomatoes, artichokes, figs, apricots and nutritional yeast (a parmesan cheese substitute)…

23a

It then occurred to me that this was the perfect first bread recipe to teach Big Boy (23). He certainly loves eating it, and the ingredients are always on hand!

Let him show you how easy it is…

Step 1: scoop 500g bakers (bread) flour into a large mixing bowl. That’s about 3½ cups, but it’s much more accurate if you use a set of scales. Add 10g (or one sachet) of dried yeast…

23b

Step 2: add 7g (1 level teaspoon) of fine sea salt…

23c

Step 3: Stir all the ingredients together…

23d

Step 4: chop or tear up filling ingredients. Big Boy chose to use 150g ham offcuts…

23f

…four dried figs, stems removed, cut up…

23g

…and 100g Dorset cheddar…

23h

Step 5: Add the filling ingredients to the flour. Then add in 320g (or 320ml, or 1 and 1/3 cups, but weighing is more accurate) of cool tap water…

23i

…and 50ml (10 teaspoons) of olive oil (or 50g, whichever is easier)..

23j

Step 6: mix all the ingredients together, either with a spatula or a clean hand. Mix until all the dry flour is incorporated…

23k

Step 7: cover the bowl with a shower cap or cling film and let it rest for 30 minutes.

23l

Step 8: uncover the bowl, and using a clean hand, knead the dough very briefly, for less than a minute. It will be sticky at this stage. Then cover the bowl again with the shower cap and let it rest until puffy and doubled in size, about an hour.

23m

This is what the risen dough will look like after an hour or so proving time…

23n

Step 9: Preheat the oven to 230C with fan. Line a baking tray with parchment paper (Glad Bake or similar). Scrape the dough into the middle of the tray…

23o

Step 10: pour a little oil onto your hands and gently work the dough into a flat rectangular shape. It doesn’t have to be perfect. Try not to squish too much air out of the dough – you want it to be about 3cm thick when you’re finished.

23p

23q

Step 11: pour a good drizzle of olive oil over the top and sprinkle with a bit more salt…

23r

Step 12: rub the oil over the top of the dough and then stick your fingertips in to make dimples. Push right through to the bottom of the tray (don’t worry, the dough will expand and fill up the holes as it bakes)…

23s

I think Big Boy did a very good job on his first attempt!

23t

Step 13: allow the dough to rest for another 10 minutes or so (it will puff up a tiny bit more). Once the oven is hot, pop the dough in and turn the heat down to 220C with fan. Set the timer for 15 minutes. When the timer goes off, carefully rotate the tray in the oven, then bake for a further 5 – 10 minutes until golden (in our big oven, it only needs 20 minutes in total).

23u

Step 14: tah-dah! Take many, many photos for Instagram! Allow the focaccia to cool on a wire rack for half an hour or so before scoffing (if you can).

23w

This simple recipe can be made plain, filled, vegetarian, vegan or meat-packed. It’s perfect for lunches, snacks and parties, and it’s a great way to use up leftover antipasti in the fridge. Ok all you 23 year olds, it’s time to get baking!

Read Full Post »

Pressure Cooker Chinese Congee

This is the comfort food of my childhood – almost.

The English word for this rice soup is congee, but there are a couple of different forms it can take. Teochews and Hokkiens (my family) make moy – where the rice grains are cooked until they’re split but not disintegrating. The Cantonese version is called jook, and it usually involves long, slow cooking with just a little rice to a large quantity of water. The end result is a starchy soup where the rice grains have broken up completely.

I grew up eating moy, but as an adult, I crave jook.

I don’t, however, have hours to watch a pot on the stove. Nor do I have a clever rice cooker with a congee setting. So I was delighted when Maude gave me her pressure cooker recipe – it works really well and can produce jook in under an hour.

The ratio she uses is one part short (or medium) grain rice to six parts liquid. I was using risotto rice (because that’s what I had in the pantry), so I increased the liquid to seven parts, as I knew the rice would absorb a bit more. I use this ratio with sushi rice as well. In my large pressure cooker, I use a cup of rice, which produces enough jook to feed three to four people.

Cooking with water will result in a plain, unflavoured congee which works well as an accompaniment to other dishes. Using stock and leftover meat will produce a stand alone meal, commonly eaten at breakfast or lunch.

Into the pressure cooker, put the well rinsed rice, liquid and any additions. Cover and bring to pressure and hold it there for 30 minutes (I reduce the heat to minimum once my pot is fully pressurised and keep an eye on it for the cooking time). Allow the pressure to release naturally. If you’re in a rush, take the cooker to the sink and gently run cold water over the lid – it will depressurise very quickly that way.

For the jook in the photo above, I used chicken stock and leftover poached chicken (shredded) as well as a knob of ginger and a few black peppercorns. The batch in the photo below was made with leftover shredded (cooked) lap ap, combined with ginger and defrosted duck stock. Both were topped with spring onions and a drizzle of sesame oil.

Congee isn’t the most photogenic dish, but it’s incredibly soothing. It’s commonly eaten for breakfast, but it’s also the chicken soup of the Chinese world, served up whenever anyone is feeling unwell or in need of a gentle meal. Best of all, it’s a perfect way to use up leftovers!

Read Full Post »

Chocolate Decaf Coffee Beans

I have a problem with coffee.

You see, I love the stuff. But it makes me quite sick.

A couple of espressos a day will give me heart palpitations, raise my blood pressure, cause my hands to tremble, and interrupt my sleep. Even just one full strength coffee a day will make my joints ache. Apparently it’s an uncommon but not unheard of reaction to caffeine.

So for the past year or so, I’ve been on a quest to find a really good decaf coffee. EcoCaffe’s Decaffeinato Supreme is excellent and works well in our Nespresso machine. The completely biodegradable pod is easy on my conscience as well…

Chris at Single Rosetta in Haberfield makes a very nice brew using Campos beans…

But hands down the best decaf I’ve found in Sydney is crafted by Coffee Alchemy in Marrickville. These guys take coffee very seriously – owner Hazel has a finely honed palate, and her blends are all interesting and diverse (Big Boy loves the Golden Galileo). I’ve written about them a couple of times before

A couple of weeks ago, I thought it might be fun to try making chocolate coated coffee beans. I used to love these, but have avoided them for the past decade or so.

The combination needed to be quite dark, so I paired Hazel’s whole decaf beans with Amedei 9 – an exquisite 75% blend of cacao from nine different plantations which I buy from my mate Tania at Lario International

I chopped up 500g of the chocolate and tempered it (there’s a loooong tutorial on how to do this here), then stirred in 100g of the beans and ladled the mix into flat bar moulds, flattening it out as much as possible. I’d toyed with the idea of dipping each one individually, but soon realised how difficult this would be – in commercial situations, a tumbling machine is used to coat beans (or nuts) evenly in chocolate.

The bars were a huge hit – crunchy, dark and very grown-up. I subsequently made a ginger and coffee bean version which was also very popular…

So…if, like me, you have problems with caffeine, don’t give up. There are some excellent decaf options out there!

Read Full Post »

Potato and Onion Pakoras

A couple of weeks ago, I was standing at the counter at Harkola, waiting to pay, when a young Indian man walked in.

He held out a small takeaway container to Ray behind the counter and said, quite shyly, “these are for you and the other lady”. When I asked what they were, he said, “pakoras…please try one!” His face was beaming – he was clearly very proud of what he’d made.

It would have been rude to refuse (although I usually do, as I’ve been scarred by hidden banana offerings in the past), so I picked one up and took a bite. It was delicious – quite spicy, still warm from frying, and very flavoursome. Then this lovely young man said to Ray..”I’ll be back tomorrow to get my container”.

I was oddly touched by this – he was frugal enough to come back for a plastic takeaway box that most of us would have discarded, yet he hadn’t hesitated for a second in offering his food to a random bystander. As I pulled out of the carpark, I saw him walking down the street – he was still smiling as I drove past.

. . . . .

On my way home, I rang the Spice Girl, my darling friend and go-to authority for all things Indian. After getting a few tips from her, I googled pakoras and came up with this fabulous YouTube clip by Hari Ghotra

. . . . .

. . . . .

My first attempt used besan (chickpea) flour, potatoes and half a large zucchini…

The batter was a little too sloppy with the zucchini…

They looked pretty, but the flavour wasn’t quite right…

. . . . .

So I rang the Spice Girl back for more advice.

In the end, this is the recipe I ended up with:

  • one large onion, thinly sliced (I used a mandolin)
  • three potatoes, peeled
  • 100g besan flour (chickpea flour, also known as gram flour)
  • 1 teaspoon fine sea salt (or more to taste)
  • 1 teaspoon ground turmeric
  • 1 generous teaspoon chilli powder (or more to taste)
  • ½ teaspoon ground cumin
  • water
  • oil for deepfrying

1. Preheat the oil to 180C (I used a large, old wok). As the oil is heating – grate the potatoes into a large wide bowl. Add the onion, then the salt and spices. Sift in the besan flour. Mix the whole lot together with one clean hand – you want to try and coat every bit of potato and onion in the dry flour and spices.

2. Add a tiny bit of water and keep mixing. You want to add just enough to hold the batter together – if it gets too sloppy, it’s hard to fry. Don’t leave the batter to sit, or the onions will release their juice. It’s best to deepfry it straight away.

3. Form a little batter into a patty and gently lower it into the oil. Allow it to fry until quite brown, then lift it out with a slotted metal spoon. Let it cool then taste it for seasoning – adjust the rest of your batter as required (I added a little more salt and chilli to mine).

4. Once you’re happy with the flavour, form more patties and carefully lower them into the oil, a few at a time. Don’t overcrowd the pan. Turn the patties if needed to ensure even browning.

The Spice Girl told me that the traditional way of making these is to fry them twice – once to a light golden brown…

…and then a second time until dark brown and crisp. This allowed the hostess to prepare the pakoras before guests arrived, and then to re-fry them briefly before serving…

I accompanied them with a raita made by mixing our homemade Greek yoghurt with diced cucumber. Big Boy tried to eat them all on his own…

Thank you for the inspiration, generous young man. And for all your advice, Spice Girl. I’ll be making these regularly from now on!

Read Full Post »

« Newer Posts - Older Posts »