Feeds:
Posts
Comments

Archive for the ‘Recipes’ Category

Frijoles Negros Refritos

When I placed my last order with Fireworks Foods, I’d intended to order refried black beans (frijoles negros refritos), but I ended up with whole black beans (frijoles negros enteros) by mistake…

I thought it was a great opportunity to try making my own frijoles refritos from scratch. A word of warning to my vegetarian friends – did you know that tinned refried beans have sometimes been cooked in pork lard? I only noticed this recently on the ingredients list.

Here’s my easy take on homemade refried beans. It’s loosely adapted from a recipe in Thomasina Miers’ fabulous cookbook

  • 2 x 400g tins of whole black beans (preferably Mexican)
  • 50g lard (or butter or olive oil)
  • 1 onion, finely chopped
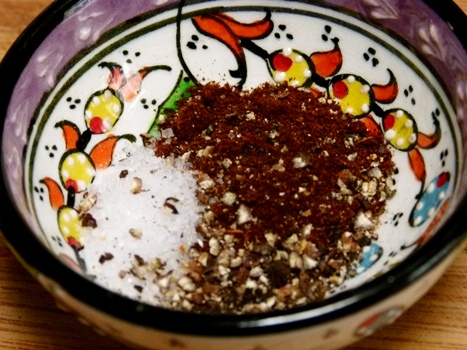
  • fine sea salt and freshly ground black pepper, to taste
  • 2 cloves of garlic, finely chopped
  • 1 teaspoon ancho chilli powder (optional)
  • ½ teaspoon ground coriander

1. Empty the tins of beans into the jug of a stick blender (you’ll probably need to do one tin at a time). Make sure to include both the beans and the liquid. Blitz with the stick blender until smooth…

2. In a heavy based pan (I used my baby Emile Henry risotto pot), heat up the lard until melted, then add the onions. Season with salt and pepper and fry until softened. Add the garlic, chilli powder and coriander, and continue cooking for a few minutes more…

3. Add the purêed beans and cook for another 15 – 20 minutes over a low heat, stirring frequently. The mixture will bubble like molten lava and gradually thicken – keep cooking until it reaches a consistency you’re happy with.

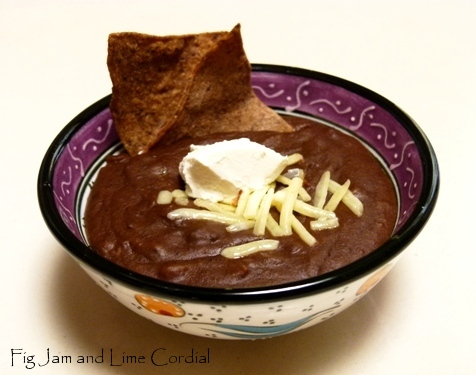
Serve as a side dish, a taco filling, or with corn chips. Note that the mixture starts to form a skin almost immediately, so if you’re not planning to eat it straight away, press a piece of parchment paper to the surface before storing in the fridge.

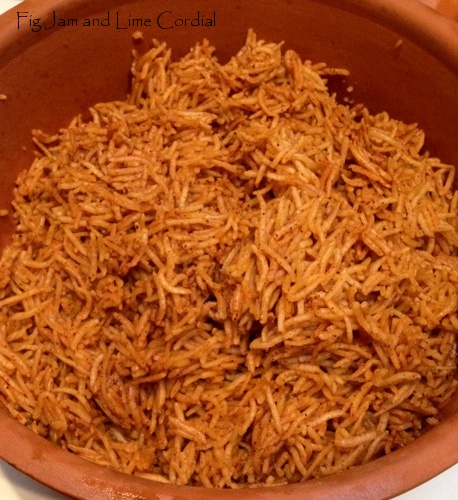
We served our frijoles negros refritos with these fantastic blue corn chips, also from Fireworks Foods. They’re locally made and arrive as triangular pieces of blue corn tortillas (with a shelf life of about three weeks in the fridge)…

They’re easy to fry up in vegetable oil to crisp and delicious, and as they’re unsalted, you can actually taste the blue corn flavour. Surprisingly, they absorbed very little oil during the cooking process…

We adore refried beans, so the entire batch was devoured with gusto at Saturday lunch. I caught Big Boy standing at the stove, scraping the clay pot clean with the last of the corn chips!

Read Full Post »

I haven’t made these little cakes in three years, and I’d forgotten how good they are. The last time I blogged about them there was a flurry of communal internet baking, with my friends Joanna and Heidi both trying out the recipe with great success.

I’d also forgotten how quick and easy they are to make – I had fifteen minutes yesterday to get something into the oven, and a quick peruse of our Cakes and Cookies archive turned these up.

This time I made them with luxurious Amedei ‘9’ chocolate – a blend sourced from nine different plantations – clocking in at a dark 75% cacao. The end results were moist, moreish and very grown up, with a soft, tender crumb…

Here’s the recipe again:

Little Chocolate Cakes
(originally by Jill Dupleix)

  • 200g (7 oz) dark chocolate, chopped or in callet form (I used Amedei ‘9’, a 75% cacao blend)
  • 100g (3½ oz) caster sugar (superfine sugar)
  • 120g (½ cup) unsalted butter, chopped
  • 100g (3½ oz) blanched almond meal (ground almonds)
  • 4 large (59g) free range eggs, separated
  • icing sugar, for dusting (confectioner’s sugar)

1. Line 12 muffin pan holes with paper liners.  Preheat the oven to 180C/360F or 160C/320F with fan.

2. Place the butter, chocolate and caster sugar in a large pyrex mixing bowl and melt them together in the microwave, using short bursts on high and stirring frequently (alternatively, use a double boiler on the stove). Be careful not to scorch the chocolate.  The mixture should be smooth and glossy.  Allow to cool slightly.

3. Stir the almond meal into the chocolate mixture, then beat the egg yolks in one at a time.

4. In a separate mixing bowl, whisk the egg whites until stiff peaks form.  Stir a large spoonful of the beaten egg whites into the chocolate mixture to loosen it, and then gently fold in the remainder.

5. Divide the mixture evenly between the 12 muffin liners, and bake for 25 – 30 minutes.  The cakes will rise a little as they bake, but flatten as they cool.  Be careful not to overcook them. Allow the cakes to rest in the muffin pans for 10 minutes before transferring them to a wire rack to cool completely.  Dust with icing sugar before serving.

These little cakes are easy to make, gluten-free, and the perfect accompaniment to a cup of tea or coffee. Because there are so few other ingredients, the flavour of the chocolate really shines – it’s a great recipe for showcasing a special blend. I hope you enjoy them as much as we did!

Read Full Post »

Pete read this post over my shoulder as I was drafting it and said, “More Römertopf evangelism?”  Sorry folks, I’m on a roll.. x

. . . . .

All my friends have gone Römertopf pulled pork crazy.

PeteV has made the dish twice. Carol baked a large pork neck, and the entire two kilo cut was demolished by her family in one sitting. Dredgey managed to get a pork shoulder into his Romy (I still haven’t figured out how) and ended up with meat so tender that he couldn’t lift it out of the pot.

The Spice Girl told me today that she’d made this (with a dozen extra spices added) and her son had requested it for lunch and dinner three days in a row. Our friend and neighbour Will squished a small pork neck into his baby pot, baked it until it was falling apart, then ate it like a caveman.

My friend Lisa, a Römertopf novice, no longer hates me for posting photos that made her son nag her into buying one. On the first night, she made the pulled pork, and on the second, a chicken stew which her family devoured. The ease of cooking in the clay baker surprised both Lisa and Carol – once it’s in the oven, all the hard work is basically done, and after the meal is finished, the pot goes straight into the dishwasher.

Caught up in this wave of enthusiasm, I’ve been trying all sorts of dishes in my well seasoned Römertopf. The latest were these pork ribs, a riff on one of our earlier recipes.

I began by rubbing two large racks of what we call American spare ribs (I think these are known as baby back ribs in the US) with two tablespoons of brown sugar and a tablespoon each of paprika and sea salt…

Following a similar method to the pulled pork recipe, the ribs were layered into the presoaked baker and placed in a cold oven. I turned the temperature to 200C with fan and set the timer for 30 minutes. After that time, I added two cups of hot water and turned the oven down to 150C with fan for a further 1½ hours baking time. The cooked ribs were tender and moist…

I removed the ribs from the pot and spooned over our barbeque sauce marinade:

  • ½ cup tomato passata
  • ¼ cup runny honey
  • 1 tablespoon (4 teaspoons) light soy
  • 1 tablespoon (4 teaspoons) Worcestershire sauce
  • 1 tablespoon (4 teaspoons) white wine vinegar

They were then placed on a lined oven tray and put back into the oven under the top element to colour up. The end result was delicious – not quite as tender as I’d hoped (I think I overcooked them a bit in the final browning stage), but packed with flavour. My hungry wolves devoured the entire platter’s worth…

I poured all the liquid from the clay baker into a large bowl and put it in the fridge overnight to set. The following day, I scraped off the flavoured fat (which went into a batch of Pan Cubano the day after that) and stashed the two containers of rich jellied stock in the freezer…

A week later, I defrosted some of the stock and used it (plus a little annatto paste), to season a batch of Basmati rice. The end result was this incredibly flavoursome pilaf…

…which we topped with frijoles negros refritos, (defrosted) pulled pork, tomatillo salsa and corn chips…

That’s it for now, folks – I’ll try to give the Römertopf posts a rest for a while!

PS. I buy all my Mexican ingredients online from Sydney-based Fireworks Foods. They have a huge range, great prices and quick delivery!

Read Full Post »

I love making sculpted bread rolls, but I know that not everyone has access to the fancy bread stamps that I buy from Chefs’ Warehouse.

I thought it was worth experimenting to see if something similar could be made with cookie cutters. I tried using fluted round cutters (plain ones should be fine as well) and was really pleased with how the rolls turned out. The best results came from using two cutters in tandem – a single small one produced triffid-like protrusions from the middle of the rolls.

  • 300g ripe, active sourdough starter (fed at a ratio of one cup water to one cup flour – for more information on how I feed my starter Priscilla, please see our tutorial here)
  • 580g cold water
  • 500g bakers/bread flour
  • 500g remilled semolina flour (Semola Rimacinata di Grano Duro – if you can’t find it, substitute 00 flour or more bakers flour, and reduce the water to 550g)
  • 18g fine sea salt
  • fine semolina for dusting the bench and dough

1. In a large mixing bowl, use a clean hand to mix the starter, water, bakers flour, remilled semolina flour and salt together to form a shaggy dough. Scrape your fingers off and cover the bowl with clingfilm. Allow the dough to rest for half an hour.

2. After the rest time, give the dough a quick knead in the bowl – literally just a minute or so. Cover it again and allow to rest until it has doubled in size – depending on your starter and the temperature in your kitchen, that could take anywhere from 4 to 10 hours.

3. Dust the bench with fine semolina, and turn out the proved dough.  Give it a few folds, then cut the dough into 125g pieces (you’ll end up with about 15 rolls).  Shape each piece of dough into a tight ball and place it seamside down on a lined baking tray.

4. Dust the top of the rolls with more fine semolina, then place a small and a medium round cookie cutter on the top of each ball. With the palm of your hand, press firmly on both cutters are the same time. Push right through the dough to the tray. Carefully remove the cutters and repeat with the remaining rolls (make sure to dust well with the fine semolina to prevent sticking). Cover the rolls with a tea towel and allow them to prove a second time.

5. Preheat the oven to 240C with fan. Once the rolls have had their second rise, spritz the top of each roll with a little water, then pop the tray into the oven, reducing the oven temperature to 220C with fan at the same time. (As you can see from the photo below, I was also experimenting with other cookie cutter shapes – they didn’t work out as well.)

6. Bake the rolls for 20 minutes, then rotate the tray(s) and turn the oven down to 175C with fan. Allow a further 15 – 20 minutes baking time until the rolls are brown and crunchy.

The rolls aren’t quite as neat and tidy as the ones made with bread stamps, but they were great fun to make, and delicious to eat!

Read Full Post »

A Bowl of Soup

You know, I love to cook.

I understand completely that it’s not everyone’s thing, and that many people view it as a chore, but I find it soothing and relaxing. I think that sometimes (not always), I like to cook more than I like to eat. I often find the process of preparing food – sitting at a table folding dumplings, or piping meringues, or shaping bread – more enjoyable than consuming the finished dish.

Sometimes, life gets big, and tiring, and complicated. When that happens, I find solace in a little comfort cooking. It helps me to focus my attention on the minutiae, and  allows me to create, to feed, and to nurture. I find it incredibly satisfying on a soul-deep level.

Last week, I tried making char siu. It was very good, but the flavour wasn’t quite right (so I won’t be posting a recipe yet)…

Later that day, I needed a late lunch. I took a container of treasured Burrawong Gaian chicken stock and a handful of homemade wontons out of the freezer. The stock was defrosted in a small pan, while the wontons were boiled for ten minutes in a separate saucepan of water. Once cooked, the dumplings were added to the stock along with the sliced char siu, and lunch was ready.

As I sat down to my bowl of soup – made with stock that I’d meticulously saved months ago, dumplings which I’d folded the previous weekend, and pork that I’d made that morning – I felt instantly restored. With the exception of the chilli sauce, everything in the bowl was the product of my efforts. It was satisfying in a way that restaurant dishes never quite seem to achieve.

My bowl of homemade soup was small, soothing and comforting. It reminded me that, even though it can occasionally get big, tiring and complicated, life is always good!

Read Full Post »

« Newer Posts - Older Posts »