Feeds:
Posts
Comments

You might recall that just over a month ago, I made my first dumplings.

Well, since that time, my sons have gone mad for them. I walked into the kitchen last Sunday and found that they’d raided the freezer and were boiling some for lunch. And when I say some, I mean sixty dumplings.

Potstickers are delicious, but at the moment, boiled dumplings are all the rage at our house. I mentioned this to a friend, who commented that we were “harnessing our inner Asian” – steamed and fried were nice, she said, but silky boiled ones were the real deal.

As you know, I can’t leave things well enough alone, so I’ve been tweaking my dumpling filling with every batch and have finally come up with a recipe that I’m completely happy with. My sons approve – Small Man said, “the dumplings get better every time you make them, Mum”. Bless him.

  • 500g free range pork mince
  • 1 small bunch of baby bok choy, finely diced
  • small handful of garlic chives, finely chopped
  • walnut sized knob of young ginger, peeled and finely diced
  • 1 small leek, finely chopped (I use two baby perennial leeks)
  • 2 teaspoons Shao Hsing rice wine
  • 2 teaspoons light soy sauce
  • 2 teaspoons oyster sauce
  • ½ teaspoon white sugar
  • ½ teaspoon fine sea salt
  • 1 teaspoon sesame oil
  • 1 teaspoon cornflour (cornstarch)
  • ½ teaspoon bicarbonate of soda (baking soda)
  • good pinch of white pepper
  • ¼ – ½ cup water

Note: we use bok choy, garlic chives and perennial leeks simply because they’re growing in our backyard. Substitute freely!

Mix all the ingredients together excluding the water and allow the filling to rest covered in the fridge until needed. Before using, stir in the water – start with ¼ cup and gradually add more as needed. The filling will absorb the water – it shouldn’t be wet or sloppy, but it should be slightly loose and easily scoopable.

A suggestion: before I start folding dumplings, I bring a small saucepan of water to the boil. I fill and pleat a single dumpling, then boil it for about 4 minutes until cooked. Then I taste it, and adjust seasonings as needed.

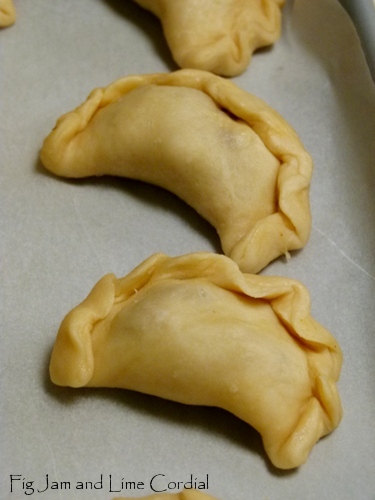
Use whatever wrappers take your fancy – for this batch, I used locally made square wonton wrappers made from egg dough. Moisten the edges of the wrappers with a little water mixed with cornflour to seal. This quantity of filling is sufficient for about 70 dumplings. Pop any uneaten ones into plastic containers and stash them in the freezer – they boil up perfectly from frozen.

Bring a large quantity of water to the boil, then add the wontons gently and boil for 6 – 8 minutes until cooked through and hot in the middle. (Frozen ones take longer to cook – about 10 – 12 minutes. Don’t bother defrosting them first.) Take one out and cut it open to check it’s cooked through. If it is, scoop the rest out with a slotted spoon and serve immediately.

Small Man likes dipping his in light soy, Pete adds Lingham’s chilli sauce to his, and Big Boy prefers the soy and ginger dressing that follows.

This sauce was inspired by one from Kylie Kwong’s Simple Chinese Cooking. The original recipe (which can be found here) included coriander and used malt vinegar and spring onions, but I didn’t have any on hand.

  • 2 tablespoons light soy sauce
  • 1 tablespoons kecap manis
  • 1 tablespoons black rice (Chin Kiang) vinegar
  • ½ teaspoon chilli oil
  • 2 tablespoons finely diced ginger
  • 2 tablespoons finely chopped baby leeks (or spring onion)
  • dash of sesame oil

As my sons are eating dumplings at a rapid clip, I seem to spend a lot of time sitting at the dining room table folding them these days (fortunately I find it very enjoyable). It’s definitely worth the effort though, as they can grab a few boxes out of the freezer and feed themselves in less than twenty minutes flat!

Edit: Indu asked me how I folded my wonton dumplings, so I took some photos for her when I made another batch today.

Put a teaspoonful of filling in the centre of a square dumpling wrapper…

Moisten two edges with cornflour slurry, then seal to form a triangle. Press the wrapper together around the filling to exclude the air from the dumpling (or it might burst when boiled)…

Fold the top down a little…

Moisten one corner of the triangle, then grasp both corners…

…and fold them in, overlapping the points and sticking them together…

Check the edges are well sealed and move onto the next one!

Last December, I bought two packets of supermarket puff pastry.

The plan was to use the six sheets (it was butter puff, so there were only three sheets per packet) to make sausage rolls for the street Christmas party. It didn’t eventuate – I made pâte brisée instead – and the bought pastry continued to take up valuable freezer space.

Last weekend, I thought I’d turn it into curry puffs, a traditional Malaysian snack. Using a modified version of Amy Beh’s recipe, I made the filling, let it cool, then took the pastry out of the freezer and waited for it to defrost.

It was a complete disaster.

I’ve used sheets of puff pastry before, but on this particular day, I just couldn’t get them to work. By the time the pastry had defrosted enough to cut the circles of dough, it was too soft to handle and I ended up smooshing it around the filling as I tried to pleat the tops. I’d taken all three sheets out to defrost, and suddenly they were like goop, so I tried again with the second packet. Same thing happened again, even though I was being extra careful and trying to work quickly this time.

In a fit of pique, I threw the whole lot away.

I then rummaged through the fridge for leftover fat and butter, and made a pastry from scratch. It was simple, tasty and easy to work with – it’s really what I should have done in the first place.

Filling:

  • 400g free range chicken mince
  • 2 onions, diced
  • 400g potatoes, peeled and diced
  • 2 tablespoons curry powder, mixed with a little water to form a paste (I use the house blend hot curry powder from Fiji Market)
  • 2 stalks of curry leaves, leaves only
  • 2cm cinnamon stick
  • 1 star anise
  • 250ml (1 cup) water
  • 1 tablespoon dark soy
  • salt and sugar to taste

Heat a little oil in a wok, and fry the onions until soft. Add the cinnamon, star anise, curry paste and curry leaves and fry for a couple of minutes, then add the potatoes and continue to stir fry for a few minutes more.

Add the chicken mince and stir until combined, then add the water, dark soy and salt and sugar to taste. Stir well, then cover and allow the pan to simmer until the potatoes are cooked through and the water has evaporated.  Spoon the mixture onto a plate and allow to cool.

Note that this makes more filling than needed – freeze the excess for another day (or halve the quantities, as per the original recipe, or eat the leftovers on rice).

Pastry:

  • 400g plain flour
  • ½ teaspoon fine sea salt
  • 75g lard or drippings saved from the last roast or meat bake
  • 75g unsalted butter
  • 125-150ml cold water
  • 1 small free range egg, beaten with 1 tablespoon water (for egg wash)

Put the flour into a large mixing bowl and stir in the salt. Rub in the lard and butter, then add in the cold water and knead briefly to combine…

Preheat oven to 200C with fan.

On a floured bench, roll the dough out to 3mm thick, and cut out 9cm circles. I used a large (7½cm) cookie cutter, then rolled each piece out a bit thinner after cutting.

Put a generous teaspoonful of filling in the centre of each dough circle, fold it in half, then fold and pinch the edges to seal…

Lay the puffs out on a lined baking tray and brush with the egg wash. Bake for 20 – 30 minutes until golden brown, rotating the tray halfway through the baking time.

The finished puffs have a sturdy, flaky and slightly bread-like pastry. The original recipe suggests deep frying (in which case, the egg wash would be omitted), but we opted for the less decadent approach…

I served these with our Lingham’s chilli sauce, and Pete and the boys demolished them. I ended up with thirty small puffs in total, and I think Small Man ate ten on his own!

When I placed my last order with Fireworks Foods, I’d intended to order refried black beans (frijoles negros refritos), but I ended up with whole black beans (frijoles negros enteros) by mistake…

I thought it was a great opportunity to try making my own frijoles refritos from scratch. A word of warning to my vegetarian friends – did you know that tinned refried beans have sometimes been cooked in pork lard? I only noticed this recently on the ingredients list.

Here’s my easy take on homemade refried beans. It’s loosely adapted from a recipe in Thomasina Miers’ fabulous cookbook

  • 2 x 400g tins of whole black beans (preferably Mexican)
  • 50g lard (or butter or olive oil)
  • 1 onion, finely chopped
  • fine sea salt and freshly ground black pepper, to taste
  • 2 cloves of garlic, finely chopped
  • 1 teaspoon ancho chilli powder (optional)
  • ½ teaspoon ground coriander

1. Empty the tins of beans into the jug of a stick blender (you’ll probably need to do one tin at a time). Make sure to include both the beans and the liquid. Blitz with the stick blender until smooth…

2. In a heavy based pan (I used my baby Emile Henry risotto pot), heat up the lard until melted, then add the onions. Season with salt and pepper and fry until softened. Add the garlic, chilli powder and coriander, and continue cooking for a few minutes more…

3. Add the purêed beans and cook for another 15 – 20 minutes over a low heat, stirring frequently. The mixture will bubble like molten lava and gradually thicken – keep cooking until it reaches a consistency you’re happy with.

Serve as a side dish, a taco filling, or with corn chips. Note that the mixture starts to form a skin almost immediately, so if you’re not planning to eat it straight away, press a piece of parchment paper to the surface before storing in the fridge.

We served our frijoles negros refritos with these fantastic blue corn chips, also from Fireworks Foods. They’re locally made and arrive as triangular pieces of blue corn tortillas (with a shelf life of about three weeks in the fridge)…

They’re easy to fry up in vegetable oil to crisp and delicious, and as they’re unsalted, you can actually taste the blue corn flavour. Surprisingly, they absorbed very little oil during the cooking process…

We adore refried beans, so the entire batch was devoured with gusto at Saturday lunch. I caught Big Boy standing at the stove, scraping the clay pot clean with the last of the corn chips!

I had so much fun photographing our local birds recently that we went looking for more yesterday. We were amazed by what we found!

. . . . .

My friends Joanna and Brian live in Bristol, and are keen birdwatchers. Over the years, I’ve tried to take photos of our Australian birds to share with them, and in the process, Pete and I have developed quite a keen interest in the area as well.

Last week, Jo asked me if we had any wetlands nearby, as she loves waterbirds. So yesterday, Pete and I went to Bicentennial Park in nearby Sydney Olympic Park and strolled through the mangrove and coastal saltmarsh reserves.

The Badu Mangrove walk is swampy and muddy, and full of grey mangroves, all breathing through their snorkelly stick-like roots…

Growing alongside the path is beaded glasswort, a form of coastal succulent…

Past the mangroves are twenty hectares of remnant and regenerating coastal saltmarsh (described as “an ecological community found in the intertidal zones of estuaries and lagoons”).

We arrived at midday, and found the lake filled with birds…

There were oodles of Chestnut Teals, both males and females…

This little one was happily bathing…

An enormous Great Eastern Egret landed right by the water’s edge. He had black sooty legs and a kink in his neck which enabled him to concertina it up and down…

A small flock of Australian Pelicans were gathered in the middle of the lake. They’re quite distinctive with their black and white feathers…

A single Royal Spoonbill was fishing, by sweeping his large beak through the mud under the water…

To me, he’s an Alice in Wonderland bird…

Numerous Black-Winged Stilts were also feeding – their graceful orange legs and the rhythmic swishing of their beaks through the water had me (and my camera) entranced…

A group of Black-Fronted Dotterels, small waders with Zorro eyemasks and red and black beaks, were clustered on a rocky outcrop near the water’s edge…

The trees next to the saltmarsh were full of activity. In one small shrub, there was an entire family of Superb Fairy-Wrens. We only knew this because we spotted the bright blue male, but didn’t manage to get a photo of him…

They’re so small (13-14cm/5″) that we just pointed the camera in the right direction and hoped for the best…

In a neighbouring tree, a territorial war was being waged between a group of tiny (10cm/4″) Silvereyes (I took this photo by pointing the camera straight up above my head)…

…and the much larger Willy Wagtails. They were all moving so quickly that I couldn’t get a better photo of either of them…

Bicentennial Park is part of the Sydney Olympic Park. It adjoins the Newington Armory which we visited a couple of years ago, and it’s definitely worth popping in if you’re interested in our local flora and fauna. There have been over 180 native bird species recorded at the site (more information here), and it was a glorious way to spend a few hours on a Sunday afternoon!

PS. The Australian Birds in Backyards website is absolutely brilliant. We didn’t recognise the Dotterels, so we went to their bird finder page and selected “medium shorebird” and “face distinctively marked” and it identified the species for us.

I haven’t made these little cakes in three years, and I’d forgotten how good they are. The last time I blogged about them there was a flurry of communal internet baking, with my friends Joanna and Heidi both trying out the recipe with great success.

I’d also forgotten how quick and easy they are to make – I had fifteen minutes yesterday to get something into the oven, and a quick peruse of our Cakes and Cookies archive turned these up.

This time I made them with luxurious Amedei ‘9’ chocolate – a blend sourced from nine different plantations – clocking in at a dark 75% cacao. The end results were moist, moreish and very grown up, with a soft, tender crumb…

Here’s the recipe again:

Little Chocolate Cakes
(originally by Jill Dupleix)

  • 200g (7 oz) dark chocolate, chopped or in callet form (I used Amedei ‘9’, a 75% cacao blend)
  • 100g (3½ oz) caster sugar (superfine sugar)
  • 120g (½ cup) unsalted butter, chopped
  • 100g (3½ oz) blanched almond meal (ground almonds)
  • 4 large (59g) free range eggs, separated
  • icing sugar, for dusting (confectioner’s sugar)

1. Line 12 muffin pan holes with paper liners.  Preheat the oven to 180C/360F or 160C/320F with fan.

2. Place the butter, chocolate and caster sugar in a large pyrex mixing bowl and melt them together in the microwave, using short bursts on high and stirring frequently (alternatively, use a double boiler on the stove). Be careful not to scorch the chocolate.  The mixture should be smooth and glossy.  Allow to cool slightly.

3. Stir the almond meal into the chocolate mixture, then beat the egg yolks in one at a time.

4. In a separate mixing bowl, whisk the egg whites until stiff peaks form.  Stir a large spoonful of the beaten egg whites into the chocolate mixture to loosen it, and then gently fold in the remainder.

5. Divide the mixture evenly between the 12 muffin liners, and bake for 25 – 30 minutes.  The cakes will rise a little as they bake, but flatten as they cool.  Be careful not to overcook them. Allow the cakes to rest in the muffin pans for 10 minutes before transferring them to a wire rack to cool completely.  Dust with icing sugar before serving.

These little cakes are easy to make, gluten-free, and the perfect accompaniment to a cup of tea or coffee. Because there are so few other ingredients, the flavour of the chocolate really shines – it’s a great recipe for showcasing a special blend. I hope you enjoy them as much as we did!