Feeds:
Posts
Comments

Sydney’s inner west suburb of Haberfield is known around these parts as Little Italy.

I’m at the Haberfield shops at least once a week, visiting Johnny’s cheese shop, drinking chai lattes at Manny’s cafe, or buying pasta from my friend Joe at Peppe’s Pasta.  Lorraine at NQN did a great walking tour of the suburb – grab a cup of tea and check it out here.

At the heart of Little Italy is Lamonica’s IGA – a supermarket quite unlike any other in Sydney.  As well as standard groceries, they also stock a wide range of imported Italian goods, including interesting pastas, deli items, cake ingredients, olive oils, vinegars and more.

When I was there last week, they had Italian flour on sale, including 5kg bags of Granoro 00 for $8.99, and Granoro durum semolina flour for just $2/kg.

Semola Rimacinata di Grano Duro is re-milled durum wheat semolina – a superfine flour with 12% protein content (more information here).  It’s great for making egg pasta, but I also find it the perfect flour for my ciabatta loaves.  This one nearly attained the desired “slipper” shape…

A disclaimer: this isn’t how ciabattas are traditionally made, nor is the end result an authentic representation of anything other than what I call a ciabatta. My apologies to any purists out there who are miffed by this.

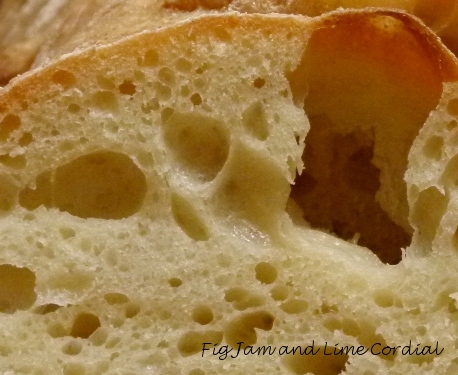
Having said that, the loaves have a chewy, elastic texture which we find highly addictive, and my family will eat all four loaves within a couple of days.  This is not light fluffy white bread, and the crumb has an intriguing, almost plasticky shine in the holes…

This is also the bread I make when my hands are sore, because it requires very little actual kneading or shaping.   Unfortunately as I get older, these things all have to be taken into consideration!

A note to my fellow sourdough bakers – the hydration of the dough is approximately 77%, which is quite high, but the durum wheat flour seems to absorb more moisture than regular bakers’ flour. Don’t be tempted to use fine or coarse semolina instead of semolina (durum wheat) flour – the former is too coarse and won’t absorb enough water, and you’ll end up with a soggy mess.  If you can’t find semolina flour, substitute more bread flour in its place and reduce the water by about 5%.

Ciabatta con Semola Rimacinata di Grano Duro
(an original Fig Jam and Lime Cordial recipe)

  • 300g active sourdough starter (fed at a ratio of one cup water to one cup flour)
  • 675g iced water (must be at least fridge cold – this is important)
  • 500g bakers/bread flour
  • 500g Semola Rimacinata di Grano Duro (fine durum wheat semolina flour)
  • 18g fine sea salt

1. Measure all the ingredients into a large mixing bowl.

2. Squelch and scrape everything together to form a sticky dough.  Scrape your fingers off and cover the bowl with clingfilm.

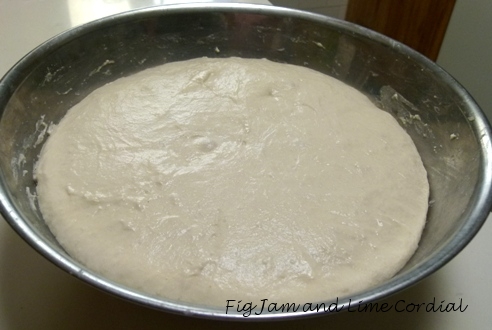
3. After about an hour, give the dough a quick knead in the bowl, and cover it up again.  Repeat this procedure when you’re next in the kitchen (within the next hour or so).  Then cover the dough up and allow it to rise until doubled in size.  In our Sydney weather, the time from initial squelching to the photo you see below was about six hours.

Place pizza stones into the oven if you’re using them, and preheat the oven to maximum (about 250C with fan).

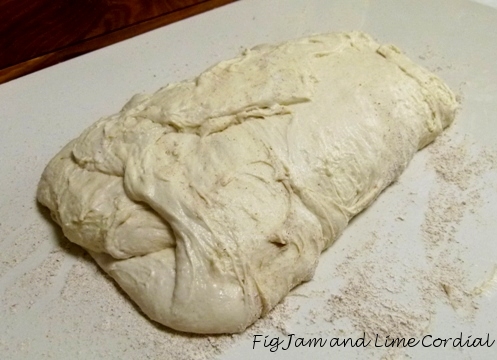
4. When the oven is hot, generously dust the bench with rye flour.  Scrape the dough onto the bench, flour your hands and gently pat it into a large rectangle.  Now fold one third into the middle, and the other third over the top of it, to create a long thick rectangle.  You might need to use the scraper to help you, as the dough will be quite sticky and wet.

5. Cut the dough into four roughly equal pieces.

6. Tear off four sheets of parchment paper and with well floured hands and the scraper, gently transfer a cut slice of dough onto a sheet of parchment, giving it a little stretch as you go to emulate the “slipper” that ciabatta is so famously named after.  The dough will be quite soft and a bit sticky, so dust it with a little more rye flour if necessary, and also make sure you’ve got plenty of flour on your hands.

If you don’t have pizza stones, you can place the loaves onto a parchment lined tray instead.  The loaves are immediately ready to bake – there’s no need for a second prove. Note: please check your parchment paper instructions to ensure that it can cope with these oven temperatures.

7. Spritz the tops of the dough with water, and immediately slide them onto the pizza stones to bake.  Reduce the oven temperature to 220C with fan and bake for 20 minutes, then further reduce to 175C with fan and bake for another 15 – 20 minutes, until the crust is set to your liking.  After the first 10 minutes or so, I like to carefully remove the parchment paper from under the loaves to allow the bottoms to brown up (don’t bother with this if you’re baking on a lined tray).

My oven will take four loaves at the one time, but if yours isn’t quite as ginormous, you could halve the recipe, or shape the dough into larger loaves to begin with.

Click here for a printable version of this recipe

PS. A little bread trivia from my miller friend Kevin Sherrie – research has shown that including a small percentage of durum wheat flour into bread dough will keep the finished loaves fresher than bread made solely from soft wheat flour.  More information here.

. . . . .

Addendum:  Maths isn’t my forte, but if you’re using a sourdough starter at 100% hydration, the following formula should work:

  • 300g active sourdough starter (100%)
  • 715g iced water
  • 485g bakers/bread flour
  • 485g Semola Rimacinata di Grano Duro (fine durum wheat semolina flour)
  • 18g fine sea salt

Oh Amazon, thou art a wicked temptress!

“Free shipping!” said the email and I, unable to resist a bargain, went cookbook shopping.  It wasn’t really an impulse purchase – I’d had my eye on the latest River Cottage book for quite a while.

I’m a big fan of the series, but when my dear friend Joanna raved about the book, I knew it had to be a winner.

It has a very approachable feel to it, reminiscent of some of the early Jamie Oliver cookbooks – simple, wholesome food which we really could eat every day.

The book arrived less than a week ago and I’ve already made several recipes from it – a good indication that this will be a well-used resource in our kitchen.  Here are a couple of dishes that have gone down particularly well with the tribe!

. . . . .

Tupperware Mexican Chorizo

This is a genius recipe.

The basic idea is to make a seasoned mince, which is left to mature in the fridge, and dipped into periodically to create various meals.  Definitely the sort of thing that appeals to me, although I didn’t have the nerve to store it in the fridge for two weeks as HFW suggests!  My variation is listed below, with the original ingredients in brackets:

  • 750g coarsely minced pork shoulder, preferably free-range
  • 1 tablespoon sweet paprika (1 tablespoon smoked sweet paprika)
  • 2 teaspoons smoked sweet paprika (2 teaspoons hot smoked paprika)
  • 1 teaspoon chipotle chilli powder (¼ teaspoon cayenne pepper)
  • 1½ teaspoons fennel seeds
  • 2 garlic cloves, finely minced
  • 10g /2 teaspoons fine sea salt
  • 50ml red wine
  • freshly ground black pepper

Put all the ingredients in a large mixing bowl and squelch everything together with your hands until evenly combined.  Hugh suggests frying a little of the mix in oil to taste for seasoning – we did this by microwaving a tiny patty for just a few seconds until it was cooked.

The mix starts off quite salty to begin with, but as it matures, the flavours mellow out and integrate.  Remember though that the salt is necessary to preserve the meat, and Hugh suggests covering the mixture and storing it in the fridge for at least 24 hours to begin with, and for up to two weeks in total.

Edit: I asked Lee, who is a food chemist, whether or not he would be happy with keeping the raw chorizo mince for two weeks, and this was his reply:

No, I wouldn’t be happy with it. The only protection is temperature. The salt will not be enough, the spices may have some protective effect but I wouldn’t rely on them. The meat is diced/chopped so plenty of opportunity to get ‘seeded’ with bacteria. The saving grace is that all recipes cook the meat well.

Please use your discretion – I know that on Lee’s advice, I now won’t be keeping the mixture for more than a few days, and I might start making half batches from now on.

Over the course of the next four days, we turned this 750g mixture into…

…mini meatballs, and served them in our roasted tomato passata, tapas-style…

…five plates of Migas, each topped with a freshly laid egg and Picasso sheeps’ cheese…

…and the ultimate meatlover’s pizza!

There was something fabulous about having a container of raw savoury mince in the fridge, waiting to be turned into an instant meal. This is a recipe we’ll be making regularly!

. . . . .

Easy Rich Chocolate Cake

This was the recipe that convinced me to buy the book, after Joanna posted about it on her blog!

  • 250g (8.8oz) dark chocolate (70% cocoa – I used Callebaut callets)
  • 250g (1 cup) unsalted butter, cut into pieces
  • 4 medium free-range eggs, separated
  • 150g (5.3oz) caster (superfine) sugar and 50g (1.75oz) light brown sugar (or use 200g/7oz ordinary caster sugar)
  • 50g (1.75oz) plain (AP) flour
  • 50g (1.75oz) ground almonds

1. Grease a 20cm/8″ springform cake tin and line the base with parchment paper.  Preheat oven to 170C/340F or 160C/320F with fan.

2. In a large pyrex bowl, melt together the chocolate and butter in the microwave using short bursts, being careful not to scorch the chocolate.  Stir until smooth and combined.

3. In a large mixing bowl, whisk together the egg yolks and sugar to form a paste, then stir in the melted chocolate and butter.  Carefully fold in the flour and almonds.

4. In a separate bowl, whisk the egg whites until stiff.  Stir a large spoonful into the chocolate mixture to lighten it, then carefully fold the remaining egg white in with a large spatula or metal spoon, trying to keep as much of the air in the mixture as possible.

5. Pour the batter into the prepared tin and bake for 35 minutes, until  just set.  The original recipe specified a 23cm/9″ tin and 30 minutes baking time, but I found my smaller tin (and therefore taller cake) needed a few more minutes to set.   The cake will still be a little wibbly in the middle – resist the urge to bake it until solid.  Allow to cool in the tin for about 15 minutes on a wire rack before opening the springform.

I’ve made this recipe twice in the last week, and both times it’s been demolished within 24 hours by family and visiting friends.

River Cottage Everyday – definitely a cookbook that suits how we  like to eat, every day!

Pete and I are pretty new at this garden thing.  That’s not to say we haven’t jumped into the project with manic enthusiasm, but there have been some bleedingly obvious things we’ve missed.

When we first set up the garden, the weather was semi-tropical – hot with lots of rain, and everything grew like crazy.  Granted we had problems with powdery mildew, and the tomatoes were waterlogged, not to mention the whole garden flooding…but on the whole, we had abundant, reassuring growth.

Then, out of the blue, a heatwave hit, and everything in the garden just frizzled.

And…don’t laugh…we really didn’t know what had happened!  We had long discussions about the ph levels of the soil, and whether our plants were suffering from a viral wilt, or nematodes.  Then it dawned on us – we just hadn’t been watering them enough.  We felt like idiots, but understand that we had barely had to water the garden at all up until then, and it had been going gangbusters!

Pete now believes that because our soil was  in pretty poor condition to begin with, everything just died as the soil dried up.  It wasn’t very well conditioned yet or rich in organic material, so it simply wasn’t able to cope with the extreme temperature change.

Water itself wasn’t a problem – we had installed two 2000 litre water tanks earlier in the year, so we had a reasonable supply.  The tricky part was delivering it – a permanent irrigation system in the garden wasn’t possible because the chickens were rotating every few months, and they would dig out anything left in a bed prior to their arrival.

My clever husband and his equally clever brother Uncle Steve solved the problem in a most ingenious way.

Pete designed, and Uncle Steve installed, a modular system consisting of the following:

1. a permanent irrigation loop under the path, circling past all the beds,

2. a snap lock connector attached to the side of each bed, joined into the loop via a T-connector, and

3. a separate unit, consisting of a piece of pipe joined to a circle of soaker hose, hooked up to the snap lock connector at the side of each bed. The soaker hose – also known as a leaky hose – is an irrigation product designed to deliver a very slow constant watering to a given area.

All the beds are hooked up in a connected loop back to the tanks, and all receive a good solid soaking once or twice a week.

When the chooks are rotated onto a given bed, the circle of hose is removed, and the connector for that bed is capped off with a bespoke plug, bypassing it for the period that the chickens are in residence.  Isn’t that clever?

To further improve water retention, we’ve invested in lucerne hay to use as mulch.  It’s expensive and will break down quickly, which means we’ll have to replace it regularly. However, as it breaks down it will improve the quality of the soil, and we think it’s worth doing that in the short term to try and bring our soil quality up to scratch.

After just a couple of good soakings, the garden has bounced back with a vengeance!

The sorrel, which had completely yellowed, is now green and lush again…

A portion of each bed is given over to growing chook food, and the lucerne planted here has taken off…

Our poor eggplants, after doing so well all year, suffered badly from the lack of water.  Yet after just a few deep waterings, they’ve started flowering again!  You can see the curled brown leaves, and the new growth starting to come through…

And this particular plant had tiny fruit which just didn’t develop for weeks – with water, they’re now all growing again…

The basil has recovered well and is now refusing to die!  Despite flowering, several of the plants are still producing large aromatic leaves…

The carrots which we forgot to harvest (I told you we were new at this!) are now a decent size…

I thought all the perennial leeks had died off, so I was chuffed today to find both a large one in amongst the purslane, and a cluster of self-seeded ones growing in the newly irrigated beds…

Finally, another lesson learnt – like most novice gardeners, when we first started, we bought seedlings.  We knew it was always going to be cheaper to grow from seed, but at the beginning, it was hard to believe that the price difference was actually going to be significant.

These strawberries are a great example.  When we first planted them, we bought strawberry seedlings at an exorbitant price – some of the slightly larger ones were $4 each.  To make things worse, none of them have done particularly well in the garden.

We’re trying again, but this time with a box of homegrown seedlings, costing just a few cents each.  Even if they don’t grow well again, at least we’re only out of pocket the price of a packet of seeds!


In my kitchen…

…is a bag of Syrian za’atar.  The gentleman in the Arabic nut and spice store convinced me that it was better than the Jordanian product I normally buy, and I couldn’t resist the artistic presentation – reminiscent of the coloured sand in glass bottles that were all the rage when I was a child…

In my kitchen…

…is a bottle of Canadian maple syrup, a gift from our friends Kevin and Carol who were over there for a holiday a couple of months ago…

In my kitchen…

…are three loaves of sourdough fruit bread, made to a new formula I’ve been playing with – a variation on the one I made last year.

The dough has 500g of fruit to the 1kg of flour (800g flour/100g rye/100g spelt) and contains a mixture of dried cranberries, Turkish figs, sultanas, currants, golden raisins and the wonderful candied peel I found at Harkola last Christmas…

The peel gives the bread a festive fruit cake touch, although I didn’t make my own like Heidi does

In my kitchen…

…is a plate of greens from the garden, including basil, Italian parsley, purslane and sorrel..

In my kitchen…

…is proof positive that my friend Marty loves me!  He spent six months sourcing this kopi luwak as a surprise for me.  The coffee beans are a rare delicacy – eaten and then shat out by civet cats, whose digestive processes ferment the beans (which come out whole), resulting in an incredibly smooth and mellow coffee…

I took a handful to Manny, the world’s best barista, and he ground  the beans and made them up for us to taste.  It was a sublime and perfect way to spend an easy afternoon…

. . . . .

Tell me, what’s happening in your kitchen this month?

If you’d like to do an In My Kitchen post on your own blog, please feel free  to use this format, and to leave a comment here linking back to your post.  We’d all love to see what’s happening in your kitchen every month too!

This is a sensory blanket.

We have a family member suffering from advanced dementia, and this is the second blanket I’ve made for her.  The first one was the size of a cot blanket, whereas this one is lap sized, and will hopefully provide both warmth and distraction.

Dementia, particularly as it advances, is an incredibly tragic and heartbreaking disease.  For some sufferers, one of the later symptoms is an almost constant need to touch and fiddle with things, which is where these blankets, also known as fidget blankets, can help.  The ones I’ve made aren’t particularly pretty, but as there isn’t a lot written about them on the internet,  I wanted to share mine with you in case others with loved ones with a similar condition might find the idea useful.

In this larger piece, I’ve sewn bits and pieces (found in my sewing room) onto the upper edge of the blanket.  The base is made of red polarfleece, which is both warm and lightweight.  I’ve tried to work in a combination of elements that allow “doing” with some that are designed just for “touching”.

There is a long zip pocket for opening and closing, as well as a button flap (the button is sewn on with dental floss for security)…

A small drawstring bag is half-stitched in, enabling it to be opened and closed…

On the tactile front, I’ve sewn in a patch of non-slip fabric, originally bought for the soles of baby shoes (which goes to show how long it’s been in my sewing room), and a patch of embossed velvet.  For added interest, I’ve sewn a small triangle into the velvet, and trapuntoed it from the back to create a little raised pillow…

A scrap of fur salvaged from Reverse Garbage…

…and some stiff braid add textural interest…

This old snap-lock came from Big Boy’s baby sling!  I’ve also added little pieces of suede fringing…

As I mentioned, this is the second blanket – the first, smaller one was filled with many of the same components, and has been very successful.

I’m hoping this one will provide some comfort as well.