Feeds:
Posts
Comments

Archive for the ‘Recipes’ Category

Empanadas

If you’ve been reading our blog for a while, you’ll notice that our dishes tend to segue into one another – the leftovers from one meal will often inspire the next, potstickers will lead to vegetarian dumplings, or a technique that we tried on Thursday will be reworked into something new on Sunday.

Such is the case with this dish – the saved fat from Römertopf pork ribs a couple of weeks ago went into the pastry for our curry puffs, and that pastry then inspired us to try our hand at empanadas.

As our good friend and neighbour Marcela is Argentinian, I was keen to make a reasonable attempt at these, so I was delighted to find this recipe with video from the old SBS Food Safari series. I followed the filling instructions quite closely, then wrapped the meat in our homemade pastry.

Pastry:

  • 600g plain (AP) flour
  • ¾ teaspoon fine sea salt
  • 112g lard or leftover fat from a roast or meat bake (or substitute more butter)
  • 112g butter
  • 225ml cold water

Filling:

  • 1 tablespoon light olive oil (or other vegetable oil)
  • 60g butter
  • 100g onions, diced
  • 100g spring onions, finely chopped
  • ½ teaspoon chilli powder, to taste (I used mild ancho chilli powder)
  • 500g beef mince
  • 125ml (½ cup) water (original recipe used beef stock)
  • 1½ tablespoons sugar
  • fine sea salt to taste
  • ½ teaspoon sweet paprika
  • ¼ teaspoon ground cinnamon
  • pinch ground cloves
  • green olives, pitted and chopped
  • sultanas
  • 2 hardboiled free range eggs, chopped coarsely
  • ground cumin

Note: the original recipe for the filling makes double this amount – we only used half of it, so I’ve provided reduced quantities above. We froze our excess filling (it defrosted perfectly a couple of weeks later).

1. Make the pastry first – put the flour into a large mixing bowl and stir in the salt. Rub in the lard and butter, then add in the cold water and knead briefly to combine. Wrap in plastic and rest in the fridge until needed.

2. Make the filling next – heat the oil and butter in large frying pan and fry the onions and spring onions until soft. Add the beef and stir to break it up and brown it a little, then add the chilli powder, paprika, cinnamon, cloves, sugar, salt and water. Cook over a low heat until the liquid and fat have separated from the meat. Check for seasoning and adjust as required.

2. This next step is optional – the original recipe uses the cooked meat from the step above as the completed filling. We scooped the meat out with a slotted spoon, then poured the residual liquid into an oil separator. We poured just the stock back into the pan and cooked it down to a thick caramel glaze, which we then stirred through the meat.

The flavoured fat (mostly butter) that was left in the separator was kept for brushing the tops of the empanadas prior to baking…

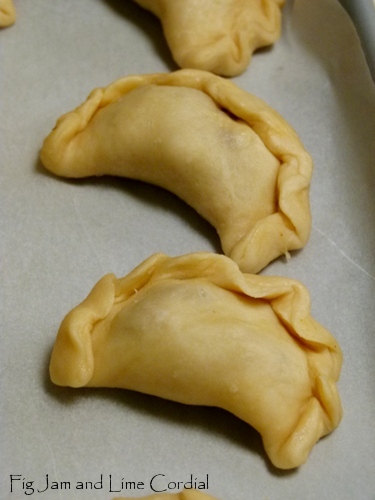
Allow the filling to cool before assembling the empanadas (a double quantity is shown below)…

3. Preheat the oven to 200C with fan. Roll out the pastry on a lightly floured surface, then using a small saucer as a template, cut out circles of dough. In the middle of each circle, place a generous spoonful of filling, topped with a few pieces of green olive and hardboiled egg, a sprinkle of sultanas, and a pinch of ground cumin…

4. Fold the pastry in half and pinch and crimp the edges together. Place on a parchment lined baking tray. When all the empanadas are made, brush the tops with either melted butter, or with the residual fat saved from the meat. Bake for 25-30 minutes until golden brown.

The original recipe uses shortcrust pastry – but I like the flakiness of our version. The filling is fabulous – the meat is slightly sweet, but still savoury, and the green olives and egg seem to balance out the sultanas perfectly…

So what was the verdict? Marcela, and more importantly, Marcela’s mum, liked these a lot. As did Pete and Big Boy (there’s no way we’d get sultanas in a savoury pastie past Small Man), so it’s definitely one to make again.

I can’t wait to see if this recipe segues into something else – I still have some of the leftover fat in the fridge, so it might!

Edit: Actually, it did. I added the leftover fat to another batch of pastry, and made more empanadas with the defrosted filling. I eggwashed the second batch rather than brushing with butter, and they baked to a deep golden brown.

Read Full Post »

I seem to have all my good bread ideas at ridiculous hours of the morning.

A couple of days ago, I was lying in bed at 5am, woken by my delightful peri-menopausal body clock, trying to decide what to do with the mountain of dough that had been proving overnight on the bench. Knotted rolls came to mind, so I put on my fluffy pink slippers and crept down the hallway to the kitchen.

Lovely Jane wrote recently about the joy of early morning bread baking, and she’s so right – there’s something incredibly peaceful and comforting about playing with dough in the quiet hour or two before anyone else is awake. It’s just not the best time for food photography.

As a result, I made these rolls twice – the second time during the day – so that I could take some decent photos of the finished rolls and the shaping process.

I began with my standard shaping dough recipe (most recently used in our cookie cutter rolls), but the technique should work with most bread doughs, providing they’re not too wet. A double batch is shown in the photos below:

  • 300g ripe, active sourdough starter (fed at a ratio of one cup water to one cup flour – for more information on how I feed my starter Priscilla, please see our tutorial here)
  • 580g cold water
  • 500g bakers/bread flour
  • 500g remilled semolina flour (Semola Rimacinata di Grano Duro – if you can’t find it, substitute 00 flour or more bakers flour, and reduce the water to 550g)
  • 18g fine sea salt
  • fine semolina for dusting the bench and dough

1. In a large mixing bowl, use a clean hand to mix the starter, water, bakers flour, remilled semolina flour and salt together to form a shaggy dough. Scrape your fingers off and cover the bowl with clingfilm. Allow the dough to rest for half an hour.

2. After the rest time, give the dough a quick knead in the bowl – literally just a minute or so. Cover it again and allow to rest until it has doubled in size – depending on your starter and the temperature in your kitchen, that could take anywhere from 4 to 10 hours.

3. Dust the bench with fine semolina, and turn out the proved dough.  Give it a few folds, then cut the dough into 235g pieces (you’ll end up with 8 rolls).

4. Dust the bench with more fine semolina. Roll each piece of dough into a long log, ensuring that all sides are well coated in semolina.

5. Fold the dough into a charity ribbon shape…

6. Bring one end up and over, and into the middle of the loop…

7. Tuck the other end underneath into the bottom of the loop…

 8. Place the rolls on a parchment lined baking tray, cover with a tea towel and allow them to prove a second time. Preheat the oven to 240C with fan.

9. Once the rolls have had their second rise, spritz the top of each roll with a little water, then put the tray into the oven, reducing the temperature to 220C with fan at the same time.

10. Bake the rolls for 20 minutes, then rotate the tray(s) and turn the oven down to 175C with fan. Allow a further 15-20 minutes baking time until the rolls are golden brown and hollow when tapped on the base (photo below shows the underside of the roll).

Pete was very taken with the look of these – he found them sculptural and dynamic. He particularly liked the “movement” cracks in the crust (I didn’t point out that they were actually a result of dodgy dough handling on my part)…

My double batch of dough made six knotted rolls…

…eight rosette rolls (using my bread stamp)…

…and three baguettes…

A crumb shot from the knotted roll…

I was very chuffed with how these turned out – sourdough isn’t the best medium for this type of shaping, but these rolls held their definition well.

If more intricate dough braiding takes your fancy, you might be interested in some of our earlier (non-sourdough) posts:

Be warned though, it can be very addictive!

Read Full Post »

Vegetarian Dumplings

To all my vegetarian and vegan readers – thank you for being so lovely.

You pop in to visit our omnivorous and occasionally very carnivorous blog, but you’re always so gracious – I’ve never had a single judgmental or proselytising comment. This recipe was developed just for you.

I couldn’t find a vegetarian dumpling recipe that wasn’t tofu-based, so I played around with one of my own. It uses the same seasoning mix as our original dumpling filling.

  • 300g wombok (also known as Chinese cabbage or Napa cabbage)
  • 6 – 8 dried shiitake mushrooms
  • 1 walnut-sized knob of young ginger, peeled and finely diced
  • a small bunch of garlic chives
  • 3 fat spring onions
  • 1 small bunch of baby bok choy
  • 2 – 3 tablespoons vegetable oil
  • 2 teaspoons Shao Hsing rice wine
  • 2 teaspoons light soy sauce
  • 2 teaspoons oyster sauce (see note below)
  • ½ teaspoon white sugar
  • ½ teaspoon fine sea salt
  • 1 teaspoon sesame oil
  • 1 packet of dumpling skins (30 – 35 pieces)

Note: I know oyster sauce isn’t vegetarian, but it’s worth using if your personal ideology permits, as it adds a wonderful flavour to the dish. If not, try substituting vegetarian oyster sauce, or more soy sauce.

1. Chop the vegetables and ginger finely. Soak the shiitake mushrooms in cold water for at least half an hour, or until softened. Cut off the hard stems, and dice the softened flesh. Combine the rice wine, soy, oyster sauce (or vegetarian equivalent), sugar, salt and sesame oil in a small bowl.

2. Heat the vegetable oil in a wok, and fry the mushrooms, ginger and vegetables for a few minutes until softened. Add the sauce mix and continue to fry until the mushrooms are cooked through and the greens have wilted.

3. Allow the filling to cool. As you can see from the photo below, the greens will cook down substantially.

4. Using either square or round skins, add a teaspoonful of filling and fold or pleat to enclose. Use either the wonton folding technique shown here, or the half-moon pleating one from our original post.

The vegetarian dumplings take a bit of practice, as the filling is less compact than its meat equivalent. It’s important to try and get as much air out of the finished dumpling as possible, or it could burst during the cooking process.

5. The dumplings can be cooked in a variety of ways – we boiled the ones in the top photo (they were our test batch) and deep-fried the ones in the photo below. I loved the deep-fried ones, but Pete preferred them boiled. We didn’t try pan-frying them (as we did with our original ones), but that should work as well.

I pleated the remainder of the filling into little parcels and sent them across the road to our neighbours Shaun and Michelle. They loved them!

PS. A funny story for you – my friend Moo walked into his local supermarket in Adelaide and asked for gourmet mushrooms. The young man working in the fruit and veg section called out..”Hey Joe! Do we have any more of those shit-take mushrooms?”

Read Full Post »

My Dumpling Recipe

You might recall that just over a month ago, I made my first dumplings.

Well, since that time, my sons have gone mad for them. I walked into the kitchen last Sunday and found that they’d raided the freezer and were boiling some for lunch. And when I say some, I mean sixty dumplings.

Potstickers are delicious, but at the moment, boiled dumplings are all the rage at our house. I mentioned this to a friend, who commented that we were “harnessing our inner Asian” – steamed and fried were nice, she said, but silky boiled ones were the real deal.

As you know, I can’t leave things well enough alone, so I’ve been tweaking my dumpling filling with every batch and have finally come up with a recipe that I’m completely happy with. My sons approve – Small Man said, “the dumplings get better every time you make them, Mum”. Bless him.

  • 500g free range pork mince
  • 1 small bunch of baby bok choy, finely diced
  • small handful of garlic chives, finely chopped
  • walnut sized knob of young ginger, peeled and finely diced
  • 1 small leek, finely chopped (I use two baby perennial leeks)
  • 2 teaspoons Shao Hsing rice wine
  • 2 teaspoons light soy sauce
  • 2 teaspoons oyster sauce
  • ½ teaspoon white sugar
  • ½ teaspoon fine sea salt
  • 1 teaspoon sesame oil
  • 1 teaspoon cornflour (cornstarch)
  • ½ teaspoon bicarbonate of soda (baking soda)
  • good pinch of white pepper
  • ¼ – ½ cup water

Note: we use bok choy, garlic chives and perennial leeks simply because they’re growing in our backyard. Substitute freely!

Mix all the ingredients together excluding the water and allow the filling to rest covered in the fridge until needed. Before using, stir in the water – start with ¼ cup and gradually add more as needed. The filling will absorb the water – it shouldn’t be wet or sloppy, but it should be slightly loose and easily scoopable.

A suggestion: before I start folding dumplings, I bring a small saucepan of water to the boil. I fill and pleat a single dumpling, then boil it for about 4 minutes until cooked. Then I taste it, and adjust seasonings as needed.

Use whatever wrappers take your fancy – for this batch, I used locally made square wonton wrappers made from egg dough. Moisten the edges of the wrappers with a little water mixed with cornflour to seal. This quantity of filling is sufficient for about 70 dumplings. Pop any uneaten ones into plastic containers and stash them in the freezer – they boil up perfectly from frozen.

Bring a large quantity of water to the boil, then add the wontons gently and boil for 6 – 8 minutes until cooked through and hot in the middle. (Frozen ones take longer to cook – about 10 – 12 minutes. Don’t bother defrosting them first.) Take one out and cut it open to check it’s cooked through. If it is, scoop the rest out with a slotted spoon and serve immediately.

Small Man likes dipping his in light soy, Pete adds Lingham’s chilli sauce to his, and Big Boy prefers the soy and ginger dressing that follows.

This sauce was inspired by one from Kylie Kwong’s Simple Chinese Cooking. The original recipe (which can be found here) included coriander and used malt vinegar and spring onions, but I didn’t have any on hand.

  • 2 tablespoons light soy sauce
  • 1 tablespoons kecap manis
  • 1 tablespoons black rice (Chin Kiang) vinegar
  • ½ teaspoon chilli oil
  • 2 tablespoons finely diced ginger
  • 2 tablespoons finely chopped baby leeks (or spring onion)
  • dash of sesame oil

As my sons are eating dumplings at a rapid clip, I seem to spend a lot of time sitting at the dining room table folding them these days (fortunately I find it very enjoyable). It’s definitely worth the effort though, as they can grab a few boxes out of the freezer and feed themselves in less than twenty minutes flat!

Edit: Indu asked me how I folded my wonton dumplings, so I took some photos for her when I made another batch today.

Put a teaspoonful of filling in the centre of a square dumpling wrapper…

Moisten two edges with cornflour slurry, then seal to form a triangle. Press the wrapper together around the filling to exclude the air from the dumpling (or it might burst when boiled)…

Fold the top down a little…

Moisten one corner of the triangle, then grasp both corners…

…and fold them in, overlapping the points and sticking them together…

Check the edges are well sealed and move onto the next one!

Read Full Post »

Curry Puffs

Last December, I bought two packets of supermarket puff pastry.

The plan was to use the six sheets (it was butter puff, so there were only three sheets per packet) to make sausage rolls for the street Christmas party. It didn’t eventuate – I made pâte brisée instead – and the bought pastry continued to take up valuable freezer space.

Last weekend, I thought I’d turn it into curry puffs, a traditional Malaysian snack. Using a modified version of Amy Beh’s recipe, I made the filling, let it cool, then took the pastry out of the freezer and waited for it to defrost.

It was a complete disaster.

I’ve used sheets of puff pastry before, but on this particular day, I just couldn’t get them to work. By the time the pastry had defrosted enough to cut the circles of dough, it was too soft to handle and I ended up smooshing it around the filling as I tried to pleat the tops. I’d taken all three sheets out to defrost, and suddenly they were like goop, so I tried again with the second packet. Same thing happened again, even though I was being extra careful and trying to work quickly this time.

In a fit of pique, I threw the whole lot away.

I then rummaged through the fridge for leftover fat and butter, and made a pastry from scratch. It was simple, tasty and easy to work with – it’s really what I should have done in the first place.

Filling:

  • 400g free range chicken mince
  • 2 onions, diced
  • 400g potatoes, peeled and diced
  • 2 tablespoons curry powder, mixed with a little water to form a paste (I use the house blend hot curry powder from Fiji Market)
  • 2 stalks of curry leaves, leaves only
  • 2cm cinnamon stick
  • 1 star anise
  • 250ml (1 cup) water
  • 1 tablespoon dark soy
  • salt and sugar to taste

Heat a little oil in a wok, and fry the onions until soft. Add the cinnamon, star anise, curry paste and curry leaves and fry for a couple of minutes, then add the potatoes and continue to stir fry for a few minutes more.

Add the chicken mince and stir until combined, then add the water, dark soy and salt and sugar to taste. Stir well, then cover and allow the pan to simmer until the potatoes are cooked through and the water has evaporated.  Spoon the mixture onto a plate and allow to cool.

Note that this makes more filling than needed – freeze the excess for another day (or halve the quantities, as per the original recipe, or eat the leftovers on rice).

Pastry:

  • 400g plain flour
  • ½ teaspoon fine sea salt
  • 75g lard or drippings saved from the last roast or meat bake
  • 75g unsalted butter
  • 125-150ml cold water
  • 1 small free range egg, beaten with 1 tablespoon water (for egg wash)

Put the flour into a large mixing bowl and stir in the salt. Rub in the lard and butter, then add in the cold water and knead briefly to combine…

Preheat oven to 200C with fan.

On a floured bench, roll the dough out to 3mm thick, and cut out 9cm circles. I used a large (7½cm) cookie cutter, then rolled each piece out a bit thinner after cutting.

Put a generous teaspoonful of filling in the centre of each dough circle, fold it in half, then fold and pinch the edges to seal…

Lay the puffs out on a lined baking tray and brush with the egg wash. Bake for 20 – 30 minutes until golden brown, rotating the tray halfway through the baking time.

The finished puffs have a sturdy, flaky and slightly bread-like pastry. The original recipe suggests deep frying (in which case, the egg wash would be omitted), but we opted for the less decadent approach…

I served these with our Lingham’s chilli sauce, and Pete and the boys demolished them. I ended up with thirty small puffs in total, and I think Small Man ate ten on his own!

Read Full Post »

« Newer Posts - Older Posts »