Feeds:
Posts
Comments

Archive for the ‘Recipes’ Category

A Fifty Chocolate Salute

Our friend Gill turned fifty recently, and I made him this fifty piece tray of goodies. It was so well received that I think it might become my new standard 50th birthday gift!

Our assortment included a batch each of butterscotch bars and classic brownies

…four dark milk feuilletine-filled chocolate cane toads…

…a couple of (less than successful) experimental lollipops and some Amedei treasure chest coins

The treats were assembled on two layers of thick cake board, and wrapped in cellophane. Merchandising isn’t my strong suit, and after attempting several different layouts, I gave up and simply stacked all the brownies and butterscotch bars on the board (nobody seemed to mind).

Gill’s littlest Beatle was quite excited, he’d woken on the morning of his dad’s birthday looking for cake!

Read Full Post »

Lentils and Rice

Our friends Gill and Therese (affectionately known as “G&T”) are vegetarian. We were cooking dinner for them the other night, and I made this simple Lebanese rice and lentil dish to accompany a root vegetable tagine. The rice stole the tagine’s thunder – we were all surprised by how delicious it was!

The original recipe is from Abla’s Lebanese Kitchen, a truly fabulous cookbook and one I’d highly recommend if you’re looking for a Christmas gift…

I changed Abla’s recipe slightly, substituting French lentils and Basmati rice for her original ingredients…

Here’s my take on the recipe:

  • 300g (1½ cups) French lentils, washed and drained (original recipe used brown lentils)
  • 1 teaspoon fine sea salt
  • 125ml (½ cup) light olive oil (or other neutral oil for frying)
  • 2 medium brown onions, halved and sliced thinly (I used a mandoline)
  • 200g (1 cup) Basmati rice (or other long grain rice)

1. If using Basmati, put the rice in a bowl of water to soak. If using regular long grain rice, rinse and drain well.

2. Put the lentils and salt in a large saucepan with 750ml (3 cups) water, cover and bring to the boil over a high heat. Once the pot is boiling, add another cup (250ml) of cold water and boil for 15 minutes (the extra water is supposed to stop the lentils from splitting). Check the lentils – they should be tender but not mushy.

3. In the meantime, in a large pan (I used a wok), heat the oil over high heat and fry the onions until golden brown – the time this takes will vary depending on your onions (Abla specifies 6-7 minutes, but mine took longer). A lot of the flavour in the dish comes from this step, so take the time to really brown them well. Once they’re done, scoop out a quarter of the onions with a slotted spoon and reserve for garnishing.

4. At this point, carefully combine the cooked lentils with the remaining onions and their oil. I did this by turning the heat off on the onions in the wok, and then carefully ladling in the lentils and their cooking liquid. Take care to go slowly, as the oil will  bubble and pop. Abla’s original instructions are to add the onions and their oil to the lentil pot.

5. Drain the Basmati rice (if using), rinse well and drain again. Add the rice to the cooking pot, then add another cup (250ml) of water and stir well. Cook, covered, over a low heat for 20-30 minutes or until the water is absorbed and the rice tender (keep an eye on it and stir occasionally).

6. Scatter over the reserved fried onions and serve. This dish reheats well – I made it the day before and the flavours seemed to intensify overnight. If you plan to do that, keep the fried onions in reserve and scatter them over the dish just before serving.

This dish was so good that I made it again a few days later for Big Boy and Small Man, who both loved it. Definitely a keeper!

Read Full Post »

One of the skills that even experienced bread bakers can find daunting is slashing – the process of making sharp cuts in the risen dough to control and direct its oven spring. By contrast, it’s easy to make attractive and impressive loaves by cutting the dough with scissors.

The epi in the top photo are a doddle to make, and cover up a multitude of shaping flaws which might otherwise show up in a straight baguette (instructions are here). The dough can also be snipped through and rejoined into star shapes, as we showed in an earlier tutorial

Dragon tail baguettes are always stunning, and their appearance belies how simple they are to shape…

Balls of dough can easily be transformed into hearts with a single scissor cut…

And last weekend, I made these experimental sourdough wreaths…

  • 300g ripe sourdough starter (see here for more information)
  • 500g bakers/bread flour
  • 250g remilled semolina flour*
  • 250g 00 flour
  • 565g water
  • 18g fine sea salt
  • fine semolina for dusting the bench

Note: if you can’t find the remilled semolina flour (it’s usually imported from Italy – look for packets marked Semola Rimacinata di Grano Duro), then substitute more 00 flour or bakers flour and reduce the water to 550g.

1. Combine all the ingredients to form a shaggy dough, then cover and allow to rest for 30 minutes. After this time, uncover the dough and give it a short knead in the bowl. Cover again, and allow to prove until doubled in size.  Please refer to our Basic Sourdough Tutorial for more detailed information.

2. Dust the bench with fine semolina, and shape 350 – 400g portions of the risen dough into long sausages…

3. Shape each into a ring, and sit it on a parchment lined tray. Cover and allow to prove a second time. Preheat oven to 240C with fan.

4. Once the dough has had a second prove, dust your hands with fine semolina and widen the ring by lifting and stretching very gently…

5. With kitchen scissors, snip the dough into leaf shapes, taking care not to cut all the way through the dough. Gently rotate each cut section outwards…

6. Spritz the top of the loaves with a little water, then place the tray in the oven, reducing the temperature to 220C with fan. Bake for 15 minutes (keep an eye on them, as they can brown up very quickly), then rotate the tray and further reduce the oven temperature to 175C with fan. Bake for another 15 – 20 minutes or until well browned.

The finished wreath is deliciously crusty, and perfect for breaking apart and sharing…

I always have enormous fun making scissor cut breads, and I hope you will too. Please let us know if you come up with any clever new designs!

Read Full Post »

A Quick Garden Tour

I wish I had prettier garden photos to share with you!

Unfortunately, the combination of nutty weather and sore joints (I’ve given myself tennis elbow from rowing) means that the backyard has been sorely neglected for several months now. Three of our beds are currently unplanted.

But, it’s never anything to stress over, having an established garden means there’s always something to eat, even if it’s self-sown. Basil has started popping up in the back bed, and is already looking wonderful…

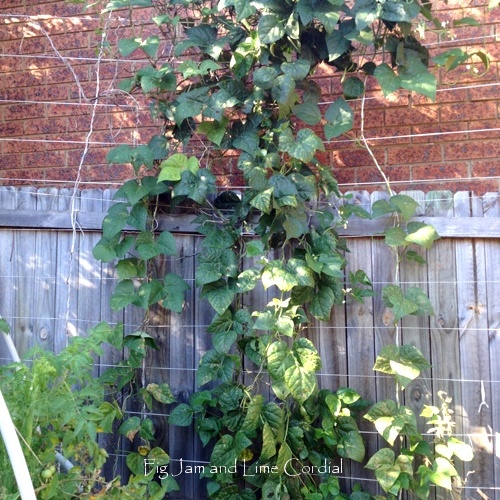
One thing we did plant a while back was beans…these growing near the back fence aren’t producing yet, but they are growing well…

The Blue Lake beans growing on the side fence are self-sown, which means they had a head start on the others. We’re found that letting things go to seed means there’s always something to eat in the garden, even when we’re behind schedule – nature knows better than we do when conditions are right for seeds to germinate!

The Blue Lakes have kept us in daily beans for weeks now…

We’ve had difficulty raising seedlings this year – possibly because of the bizarre weather (35C days followed by 12C days) – and we haven’t had any successful tromboncino seedlings yet. A couple of cucumber seedlings did germinate though, so they’re planted in the self-watering pot next to the driveway…

Our perennial leeks are going crazy making babies – we would have enough to fill an entire bed with leeks if we wanted. I need to go outside with a long stick and plant a whole stack of them…

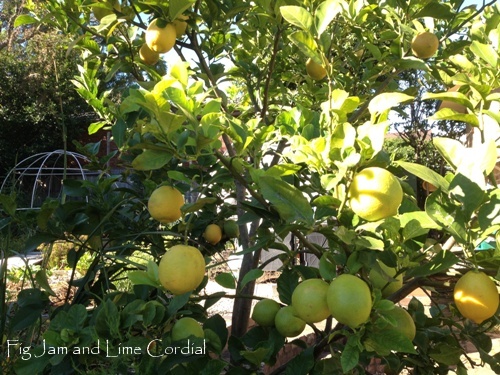
Our lemon tree is now making more fruit that we can use…

Broccoli rabé has self-sown all over the garden, and it’s absolutely delicious – we’ve already had a couple of pasta dinners from it…

Red amaranth is a newbie in our garden, the seeds germinated easily and we planted them out as small seedlings…

Our sage has survived winter and the chook rotation (they didn’t eat it), and is now flowering…

A mystery squash is growing in the back – we’re going to let it ramble into the adjacent vacant bed. We don’t think it’s a trombie, but we can’t be sure…

Linda’s lovely yellow cherry tomatoes have been joyously prolific and relatively pest-free so far. Predator numbers have increased substantially in our garden, with the paper wasps making short work of the white moth grubs…

In other news, sadly we’re now down to six chickens, with Harriet and Francesca dying within a week of each other. Both of them were chasing their food one day, and then a couple of days later, lay down on the ground and died. Frannie was my favourite, so I was particularly sad to see her go.

The last remaining chook from our initial flock is Rosemary, and we think she’s on her last legs as well – she’s looking extremely old and tired these days. On a more positive note, the new girls all seem to be fine, and we’re getting between one and three eggs a day. Recently, one of them laid our first ever double-yolker…

And finally, our pond frog seems to be doing very well! We still haven’t seen him, but we know from his call that he’s male and we think he’s a Brown-Striped Frog. He has a “tock tock” call, which sounds like a stick being beaten slowly and rhythmically on a hollow log, like this. Does anyone know more about this particular species?

Read Full Post »

Baby Barramundi

This is one of those recipes which caught us by surprise.

We don’t normally eat barramundi, but they were so fresh when we were last at the fishmongers that we couldn’t resist buying them. Not having cooked this fish before, we had no idea where to start.

Google turned up this recipe at Taste.com, and it was absolutely brilliant. So despite the dodgy photo, we decided that this definitely warranted a blogpost – to ensure that we could find it again, if nothing else!

We used two small baby barramundi (about half a kilo each) and began by slashing both sides of the cleaned fishes, then drizzling them with a little oil and scattering over a couple of tablespoons of sesame seeds and a little sea salt (not too much, as the soy dressing was quite salty). The fish were placed in a well oiled pan and baked in a preheated 200C (180C with fan) oven for 25 minutes, until the flesh flaked away easily from the bone (it’s easy to check at the slashes).

While the fish was roasting, we prepared the sauce, using:

  • 2 tablespoons light vegetable oil
  • a 4cm chunk of ginger, peeled and julienned
  • 2 cloves of garlic, sliced
  • 2 red chillies, deseeded and sliced
  • ½ cup soy sauce
  • 1 tablespoon rice wine vinegar (we used Japanese grain vinegar)
  • ½ tablespoon sesame oil

In a small saucepan, we heated the oil, then added the ginger, garlic and chillies, allowing them to cook for a couple of minutes until softened. The soy, vinegar and sesame oil was then added and warmed through.

Once out of the oven, the sauce was spooned over the hot fish. We served this with steamed rice and the boys were very taken with it – Small Man ate an entire baby barra on his own. Definitely a dish we’ll make again!

Read Full Post »

« Newer Posts - Older Posts »