Feeds:
Posts
Comments

Archive for the ‘Recipes’ Category

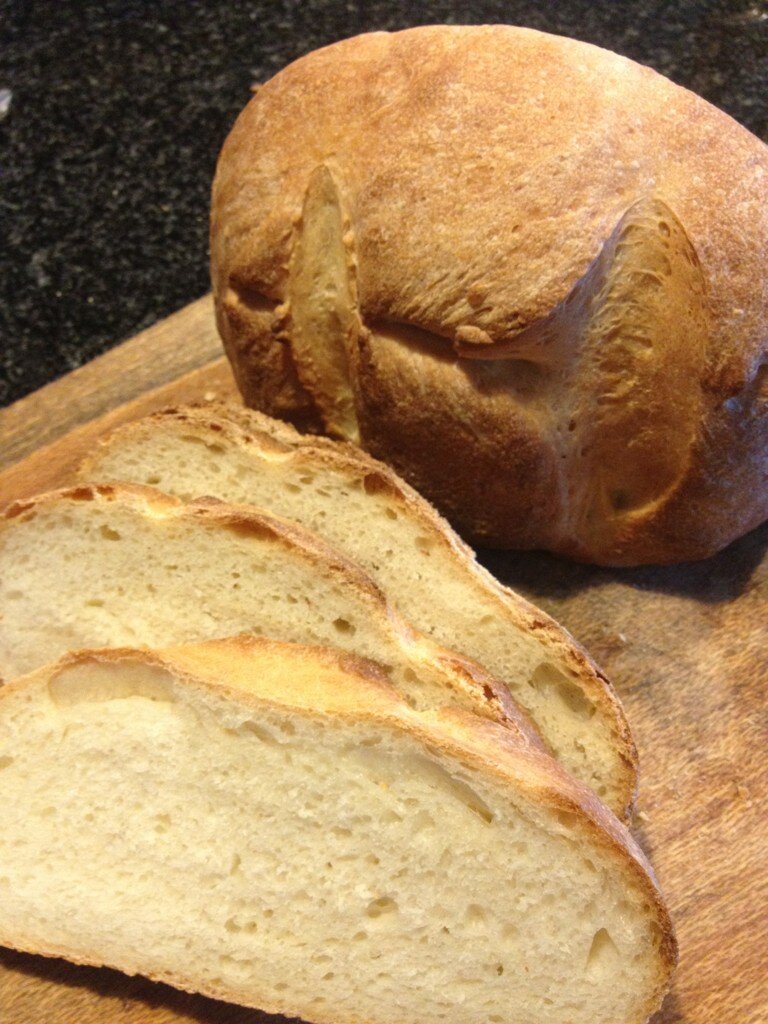
I’ve been having so much fun experimenting with the basic sourdough recipe that I wrote up a few weeks ago!

Even though the formula was one I made up (did you notice the nice round numbers?), it’s nevertheless proven to be quite versatile.  Recently, when I was baking along on Twitter with my buddies Alison and Rachel, I made epi stars and fruit loaves.

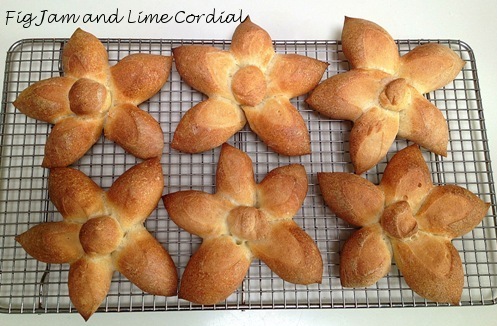
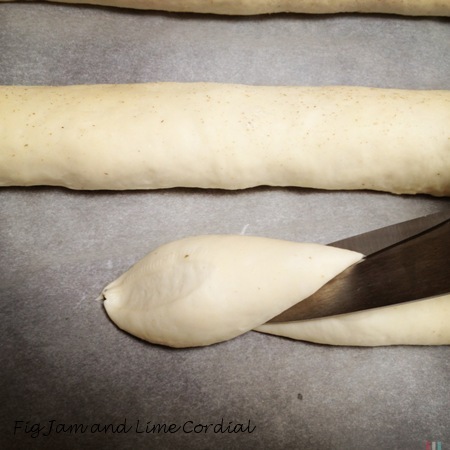
The stars were made from a single batch of the basic sourdough. After the bulk prove, they were rolled into long skinny sausages. These were covered with a tea towel and left to prove a second time…

Once they had puffed up a bit, I cut them into “ears”, using my kitchen scissors (which unlike Charlie Louie’s, hadn’t been used to amputate a lorikeet’s leg).  This is the method used to make epi, which I wrote about here, except in this case, I cut all the way through the dough…

The “ears” were arranged on a sheet of parchment paper to form a star, and the round ends of each log were pressed into the middle to cover up the join…

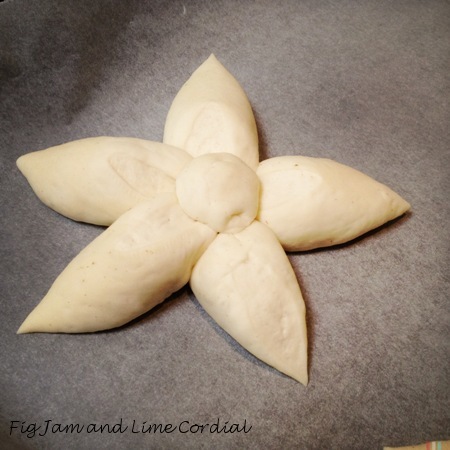
The stars were sprayed with a little water and then baked in a preheated 220C fan-forced oven for 15 minutes, followed by a further 20 minutes at 175C with fan…

. . . . .

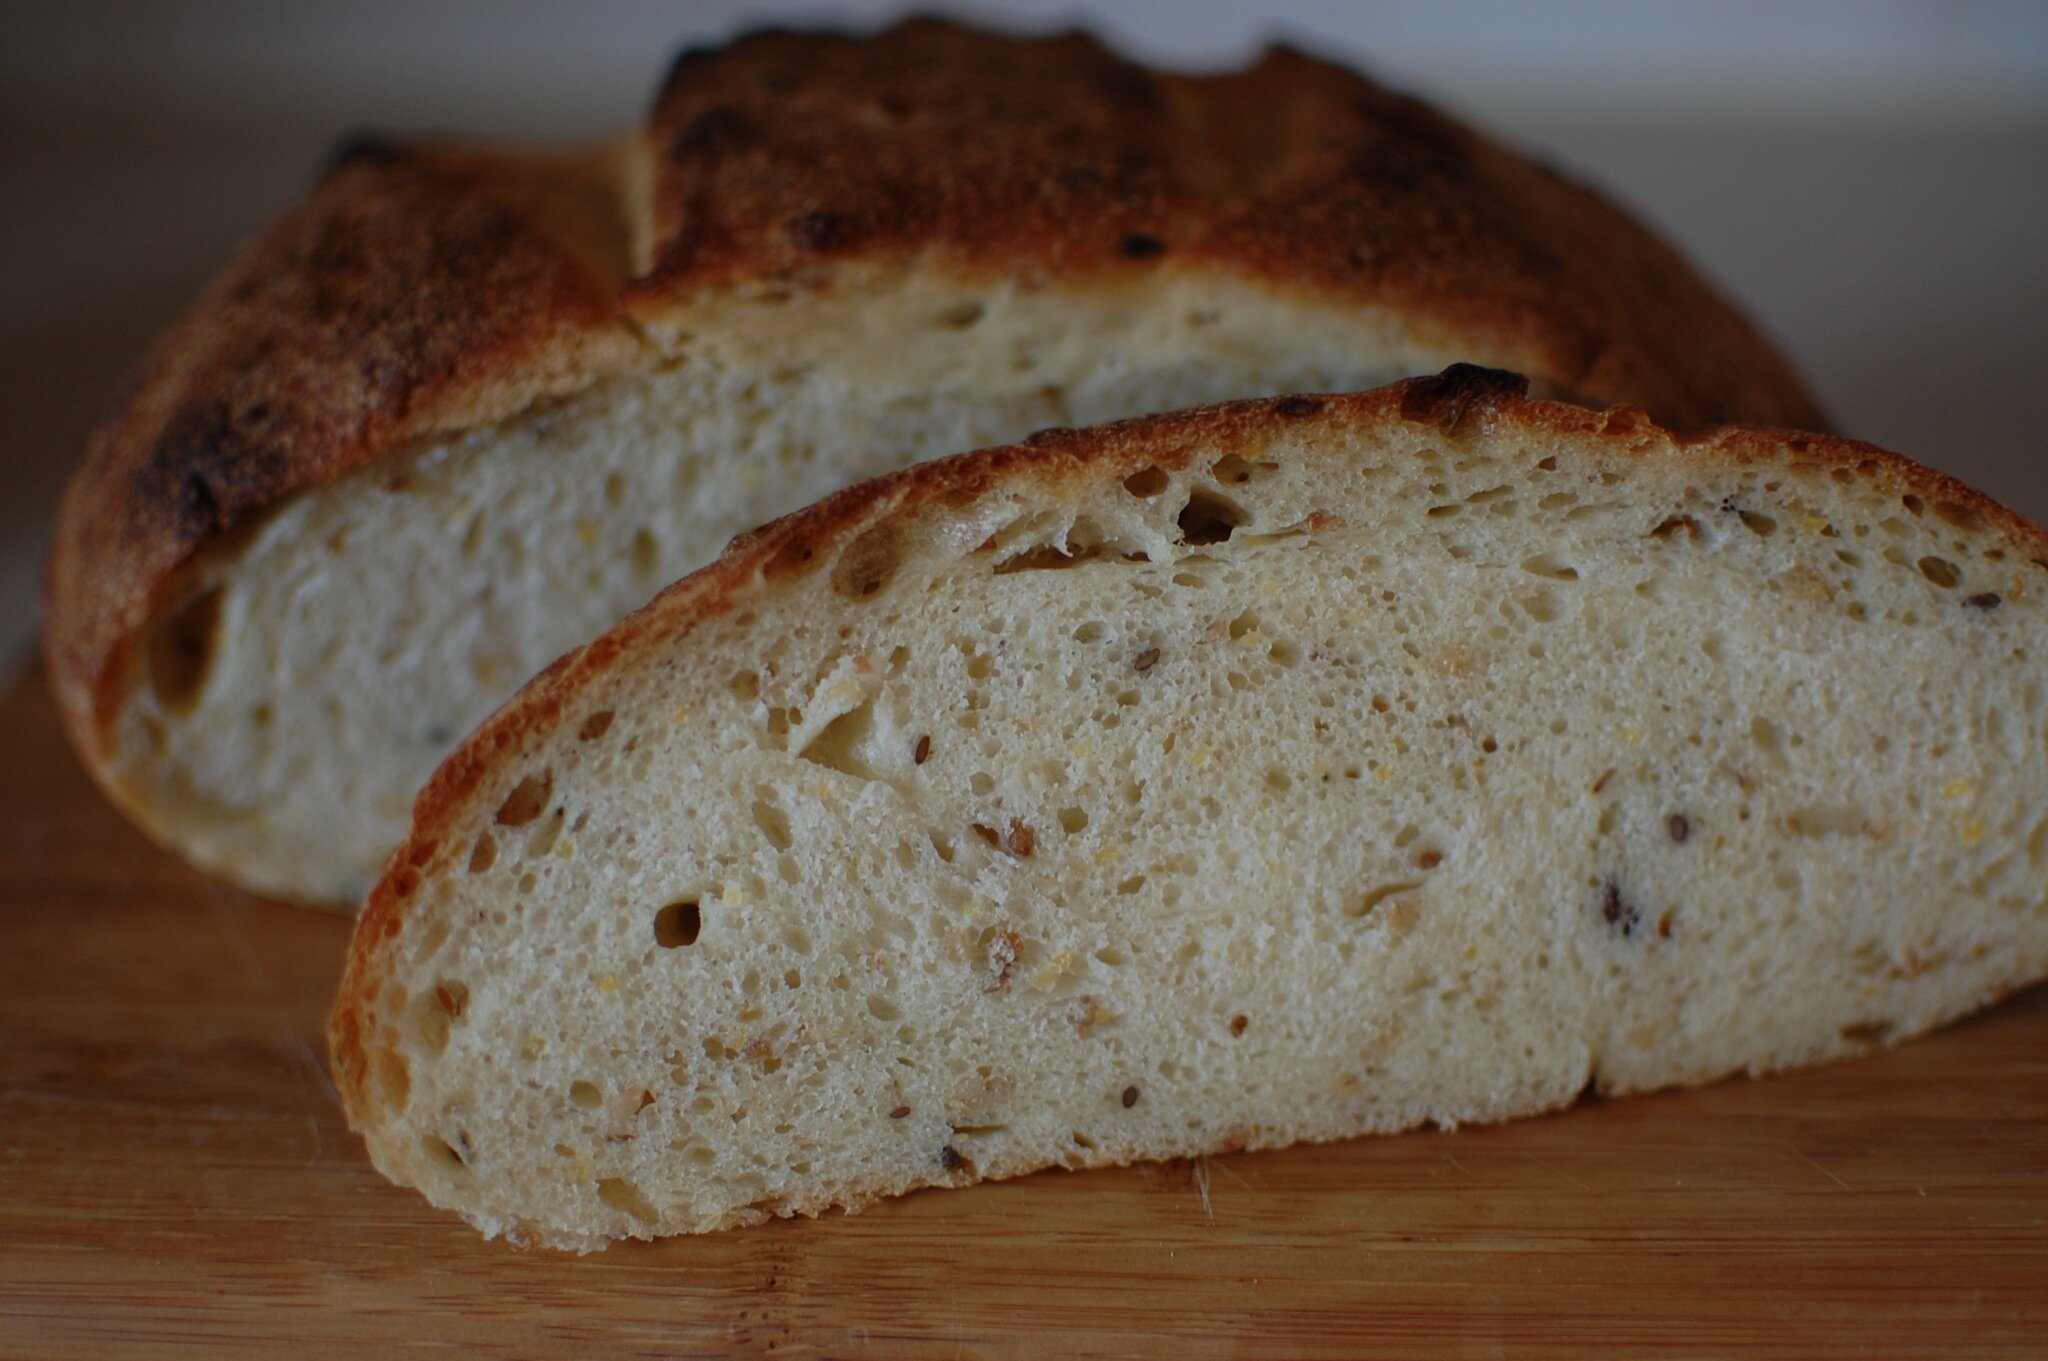
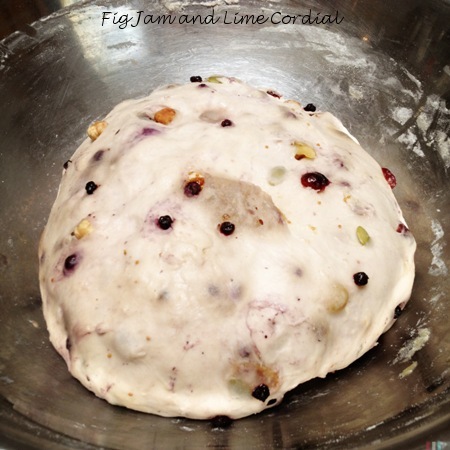
My second batch of sourdough was used to make two small fruit loaves…

As usual, I got carried away with the fruit and nuts, and ended up adding way more than was sensible.  If you do try this, I’d recommend using 200g worth of additions rather than 350g – the larger quantity made kneading and shaping the dough very fiddly…

  • 150g ripe sourdough starter
  • 250g water
  • 25g olive oil
  • 500g bakers/bread flour
  • 10g fine sea salt
  • 200g dried fruit and nuts (I used 350g – a mix of cranberries, dried blueberries, Turkish figs, roasted hazelnuts, macadamia nuts, pepitoes, raisins, dried cherries and walnuts)

Add the fruit and nuts to the wet ingredients and stir to combine before mixing in the flour and salt.  Otherwise, I just followed the basic instructions in the tutorial here.  Here’s a photo of the dough after its bulk prove…

The dough was shaped (clumsily, because  bits of fruit kept popping out and flying across the bench) into two small loaves and allowed to rise a second time.  I used my bannetons, but this would work equally well on a paper lined tray as per the tutorial.

When I shape fruit loaves, I always try to have as little fruit on the top of the dough as possible, as these tend to burn in the oven.

After a second rise (these didn’t actually rise very much the second time, despite my giving them over an hour), I slashed the tops, spritzed them with a little water, and baked the loaves in a preheated 220C fan forced oven for 15 minutes (it might need 20, depending on your oven), before dropping the temperature to 175C with fan for a further 30 minutes baking time.

I’ve learned over the years that fruit loaves need a watchful eye, as they can brown up very quickly, and might scorch a little at the higher temperature.  This batch, however, were fine…

I sliced up a loaf and a half for the freezer, and left just half a loaf out for eating the next day. This is Pete’s favourite, so he was very happy indeed!

Read Full Post »

Heidi’s Teddy Bear

Last year, my dear friend Heidi, the Queen of Bread Shaping, wrote a tutorial on making teddy bears from bread dough.

I finally had a chance to try it out last weekend, and was delighted with the result – isn’t he cute?  I used our Pain Viennois recipe, but the bear would probably have had more definition if I’d used a lower hydration dough.

I skyped Heidi midway through the process to ask for help and ended up having a lovely long chat with her as the bear baked…

If you’d like to try making a bear for yourself, Heidi’s instructions can be found here.  I used the following dough proportions:

  • Body 200g
  • Head 100g
  • Limbs 25g each
  • Ears 16g each
  • Snout 12g

We gave our bear to Small Girl, who marched across the road to pick him up.  After she had disarticulated him with the help of her sisters, she turned to her mother and said, “Do you think Auntie Celia will make me a rabbit next?”

Auntie Heidi, do you know how to make a bread rabbit? ♥

. . . . .

Edit: And look at what Auntie Heidi came up with – a bread rabbit for Easter!  Her tutorial is here!

Read Full Post »

Priscilla’s Family Tree

A few weeks ago, excited by Michelle and Rachel’s successful attempts at sourdough baking, I wrote a basic sourdough tutorial.

At the same time, I was trying to figure out a viable way to send starter to friends. Posting liquid starter, as I’d done on a few occasions in the past, was expensive and bulky – and I always had the niggling concern that it might leak in transit and cause a bio-hazard scare at the post office.

I mentioned this to my neighbour Maude, who told me that she’d recently dehydrated some of her starter to send overseas.  It seemed like a sensible option, and one that should work, given that the original starter I bought had arrived in a dried form.

I fed a bowl of my starter (Priscilla) until she was bubbly and frothy, and then ladled her out onto a couple of silicone mats.  Spread the starter out as thinly as possible and then leave in a warm spot to dry – we used to sit it on top of the fish tank, but these days we just leave it on the dining room table for a few days…

The dried starter was crumbled into small flakes. Because it was quite thick and chunky (as can be seen in the photo below), I gave it a quick blitz in the food processor to break it down a little more. I tested it (twice!) and then packaged it up, crossed my fingers, and mailed it out to friends.

I whizzed this up in the food processor (briefly) to make it a little finer…

I can’t tell you how happy I was when the photos starting coming back!

Priscilla’s offspring have spread far and wide!  Allow me to introduce you to part of her family tree (hopefully there will be more to come)…

. . . . .

Son: Navarone (Linda Woodrow)

–> Grandsons: Elvis (x2), Boy George, Bruce
–> Granddaughters: Bubbles and Julie.

I sent starter to Linda in liquid form nearly two years ago, and she’s been baking up a storm ever since.  She has also passed the starter on to her family and friends, and most of the offspring have thrived!

Linda’s loaves are baked in a completely different way to mine (I love that!) – her everyday sourdough recipe is here, and this photo is of her gorgeous oat and linseed bread

. . . . .

Daughter: Stella (Rachel @ The Food Sage)

Rachel has truly hit the ground running – the diary of her first attempt at sourdough sparked our latest baking frenzy, and her second loaf (using this recipe) was a great success. You can read all about her grain bread here

. . . . .

Daughter: Marion (Ali and Nick @ This Blooming Life)

I’ve had so much fun chatting to Ali and Nick in the past couple of weeks about everything from baking bread to growing leeks to rowing. Marion is only a couple of weeks old, but they’ve had some fabulous adventures with her already – their very first loaf (below) involved an emergency drive to pick up a new oven door

. . . . .

Daughter: Princess Patsy (so named by Jan in Brisbane because she’s absolutely fabulous, daaarling..)

Darling Jan rehydrated her starter and whipped up a loaf as soon as she got her envelope in the mail.  We were both squealing with excitement when she sent this photo of her first attempt at sourdough – a pair of kissing loaves…

. . . . .

Son: Kevin, aka “Big Kev” (Claire and Will @ Claire K Creations)

Big Kev is pulling out all stops! Claire has a deft hand with all things baked, and not surprisingly, her first loaf was a stunner – read all about it from start to finish here

. . . . .

Son: Sydney (who now lives in Bristol with my beloved friend Joanna @ Zeb Bakes)

Joanna didn’t need my sourdough starter as she has several of her own, but when she mentioned that she’d be happy to give Priscilla a go, I eagerly popped an envelope in the mail to her.  I was so thrilled that she’d be baking with my starter, because I knew she’d create amazing bread with it. And she has…

. . . . .

Son: MO (named by Moo’s son, an acronym of Michael and Oliver)

Our old friend Moo is a perfectionist.  When he pulled his first sourdough rolls out of the oven, he said to me, “Hmmm. It’s a bit dense, and I’d like a bit more of a blistered crust next time”.  I thought they looked fantastic, as did his young son Oliver, who helped to shape them…

. . . . .

Sharing Priscilla’s clones has been like giving away a litter of puppies from a treasured pet – they’ve all gone to friends who will look after them and hopefully get years of baking pleasure from them. There are still a few envelopes in transit – I’ll let you know of any future additions to Priscilla’s family tree!

Read Full Post »

Grilled Vegetable Salad

Uncle Steve (Pete’s brother) was over for a birthday lunch last week.

As his partner Ali doesn’t eat meat, we created this grilled vegetable salad to serve as a main meal.  We’ve been cooking a lot of vegetarian dishes in the past couple of years, and our current thinking is this: vegetable only main courses need to be more complex than meat based ones in order to achieve the same “oomph”.

That’s not to say a dish of steamed young vegetables with a light dressing isn’t the perfect starter, but it just doesn’t offer the mix of flavours that we seek in a main meal.

We began by slicing peeled potatoes, carrots, zucchini and eggplant (the latter two from our garden), tossing them in a little olive oil and salt, and roasting them in a 200C fan-forced oven…

A tray of peeled and sliced sweet potato was roasted in the same way.

Once the grilled vegetables had cooled to warm, they were combined with cos lettuce, sliced jalapeño chillies, and lightly blanched beans.

We toasted a handful of macadamia nuts, flaked almonds and sunflower seeds, and mixed them in a small bowl with a handful of our marinated feta and Pete’s dressing of:

  • 2 parts pumpkin seed oil (thanks Karen!)
  • 2 parts extra virgin olive oil
  • 1 part hazelnut oil

The vegetables were seasoned with sea salt and a little ground black pepper, then the nuts, feta and dressing were tossed through.  We served the salad with a homemade basil and macadamia nut pesto…

The second time we made this dish (for our vegetarian friend Craig), it included potatoes, tromboncinos, eggplant, sweet potatoes, raw purple beans, fried snake beans, mixed lettuce and Bella Rosa tomatoes. We increased the quantity of seeds, nuts and feta, adding sunflower seeds as well. It was even better than our first attempt!

Read Full Post »

I’ve been playing with some variations on the Basic Sourdough Tutorial I wrote last week…

Grain bread isn’t popular at our house, but I was inspired by Michelle’s recent loaves to give it another go. I picked up a bag of mixed grains at Harkola for just $1.30. It contained kibbled wheat, kibbled corn, kibbled rye, malted wheat and linseed.  The night prior to baking, I soaked 100g of the grains in a large quantity of water…

The next morning, I made a double batch of sourdough, reducing the water just a little to take into account the extra liquid from the grains. Here’s the formula I used, and I constructed the loaves following the basic instructions, although I did (optionally) prove them in my bannetons.  The soaked grains were drained really well and then added to the wet ingredients…

  • 300g ripe sourdough starter
  • 480g water
  • 50g olive oil
  • 1kg bakers flour
  • 20g fine sea salt
  • soaked grains

These quantities made one large and two small loaves with a tasty, elastic crumb. The presoaking softened most of the grains to a chewy consistency, although the linseed was still quite hard.

I delivered the two small loaves to neighbours, and have been enjoying the large one sliced and toasted. I still can’t sell it to the family though!

Read Full Post »

« Newer Posts - Older Posts »