Feeds:
Posts
Comments

For Father’s Day lunch, my mother suggested roast lamb. My dad is now in his eighties and quite a fussy eater, but a good roast is something he’ll eat with relish.

Of course, this meant getting up at 6am on Sunday morning to prep the meat, which wasn’t particularly easy as we’d been at a 50th birthday dinner the night before. Thank goodness for Jamie! His roasted lamb shoulder recipe was an absolute stunner and will be our house standard from now on…

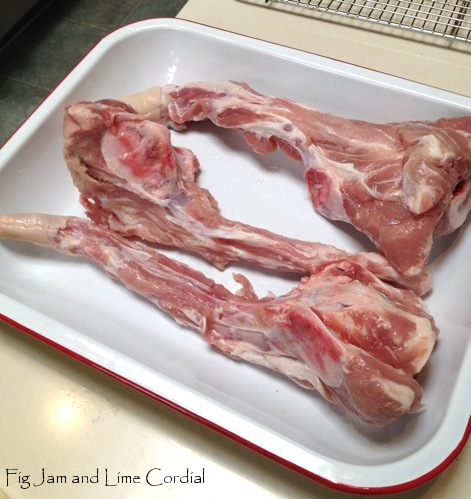
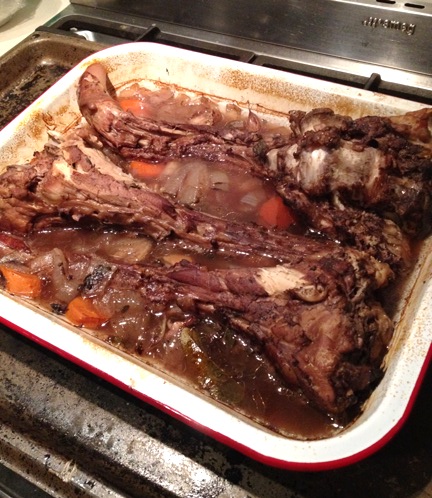
I began with two 1.5kg lamb shoulders from George at Dulwich Hill Gourmet Meats. Jamie uses a single 2.5kg shoulder, but I’ve never seen them quite that large here. I baked each cut in its own Falcon enamel roasting pan side by side in my 90cm oven.

Here’s our take on Jamie’s recipe…

  • handful of garlic cloves
  • bunch of rosemary
  • olive oil
  • sea salt
  • 1.5kg lamb shoulder (I baked double this amount – two shoulders – for seven adults, and we had about half a shoulder leftover)
  • 2 onions

1. Preheat the oven to 175C (I used the top and bottom elements only, without the fan). Peel and chop the garlic cloves coarsely, strip the rosemary leaves off the stems and then combine both in a bowl with a generous glug of olive oil and salt (Jamie uses a mortar and pestle, but I was too hungover to wrestle it out of the pantry at 6am). Give the mixture a good squelch with your hand.

2. Peel and chop the onion into eighths. Lightly oil the roasting pan – it should be a snug fit – then lay in the onion wedges to form a base to rest the meat on.

3. Stab the lamb several times with a sharp knife, then rub over the garlic and rosemary, pushing bits of garlic into the cuts. Place it on top of the onions, then add 50ml of water. Cover tightly with foil and cook for three hours. Over that time, the house will start to smell amazing.

4. After three hours, remove the foil and carefully pour all the juices and fat into a bowl. Add another 200ml of water to the pan and return to the oven (uncovered) for a further 45 minutes to an hour, until the meat is well browned and incredibly tender. Keep an eye on it to make sure it doesn’t burn or dry out – add more water if needed.

5. Remove the finished meat from the oven and cover with clean foil, then allow to rest until serving time. Mum and dad were running a bit late, so we put our covered meat back into the oven after the potatoes were done to warm up a little in the residual heat.

The leftover bowl of pan drippings didn’t go to waste – the potatoes and pumpkin were tossed in a large spoonful of lamb fat before baking, and the rich stock was used for gravy (cooked up with a little flour, a dash of port and seasoned carefully with salt and pepper).

I was seriously chuffed with how well this turned out – and not just because it looked almost exactly like the photo in the book! The meat was sticky and incredibly tender – the bones pulled out cleanly and we shredded and served the meat with two forks. Pete commented that the days of carving lamb are over!

The quality of the lamb shoulders was amazing – full credit to George and Yiota for always having such superb meat on offer. They weren’t cheap – $46 for both shoulders – but that was more than enough for seven adults, and we could easily have fed ten to twelve. That’s surprisingly economical for such a protein rich, special occasion meal!

When I first started blogging more than six years ago, I read a piece of advice which said, “stay on topic”. The thinking was that if you wanted to grow your blog readership, you should write with focus on your chosen subject, whatever it might be.

Honestly, I’ve never been able to do that.

Whilst most of my posts are about food, over the years I’ve also written about nasal lavaging, fossils, cowboy boots, fat lady sculptures and paper dragons (to name but a few). I guess this blog has ended up as a record of whatever has intrigued and delighted me in any given week. I get excited at the thought of sharing those moments with you – a bit like I’d tell a friend about them over a cup of coffee.

So today I’m letting you know about this fun book that I found! I picked it up in paperback as a birthday gift for a friend, but loved it so much that I then bought myself a Kindle version as well.

It’s called Life In Five Seconds, and I’ll let the author describe it to you…

 It reads particularly well on the iPad using the Kindle reader app and costs just $6 in that format. The iPad version has the answers on the following page rather than the bottom of the page (as the paperback version does), which means it’s easier to try and guess what the images represent without sneaking a peek at the answer.

Here are a few screen grabs to give you an idea (I’ll put the answers at the end of the post)…there are 200 of these in the book…

Lots of fun! Hope you’re all having a great weekend! x

* Adam and Eve
* French Revolution
*Michael Jackson

Goodness we’ve been busy!

There’s a string of birthdays at the end of August and beginning of September, and I’ve been baking cakes. Lots of cakes. I’ve simplified the process this year by baking in the paper pans I bought from Southern Cross Supplies…

I always use our Chocolate Slab recipe, and for Small Man’s cake above, I divided the batter between two of the 8″ pans (I’ll include another copy of the recipe below).

For Carol, Lily and Maude’s cakes, we made a batch of dark caramel in our new copper pot and squiggled it out onto an oiled tray. Once set, it was broken into shards (or “wings”, as Nic called them) which were positioned on top of the cakes after frosting…

We still have to work a bit on our presentation, but overall we were pretty happy with the result!

Chocolate Birthday Cake

Cake

  • 1¾  cups (440ml) boiling water
  • 170g (6oz) dark chocolate, chopped finely (we use Callebaut 811/54% dark callets)
  • 1 cup (110g) Dutched cocoa
  • 2 cups (300g) plain (all purpose) flour
  • 2 teaspoons bicarbonate of soda (baking soda), sifted
  • good pinch salt
  • 285g (10oz) unsalted butter, softened
  • 1¾  cups (packed) (380g) brown sugar
  • 4 large (59g) free range eggs
  • 2 teaspoons vanilla extract (we use homemade)

1. Preheat oven to  either 165C (330F) with fan (if baking in paper pan) or 175C (350F) with fan (if baking in a metal pan). Spray two 8″/20cm paper pan with oil. Alternatively, line two 8″ round pans with parchment paper. Note that the original Mrs Fields’ recipe specified 9″ pans for a wider, flatter layered cake.

2. In a medium bowl, pour the boiling water over the dark chocolate and let it sit for five minutes.  Add the cocoa and stir with a whisk until the mixture is smooth.  Allow to cool while you prepare the rest of the cake.

3. In another bowl, whisk together the flour, sifted bicarb soda and salt.

4. In a large mixing bowl with an electric mixer, cream the butter and brown sugar, then add the eggs one at a time, beating well after each addition. Beat in the vanilla, then add all the flour mixture and half the chocolate mixture. Beat on low speed to combine, then on high for 1½  minutes. Add remaining chocolate mixture and beat on low to combine.

5. Pour the batter into the prepared pans and bake for 40-50 minutes (time will vary depending on the thickness of the batter and your oven temp), until a cake tester inserted into the centre comes out clean. Be careful not to overcook. Remove the cakes from the oven and place on a wire rack to cool. Once cool, carefully tear the sides and base of the paper pans away.

This quantity of batter is sufficient for a very large double-layered cake. For the cakes we were giving away, I made single layers (each using a half batch of the batter) and decorated them with chocolate frosting and toffee shards.

. . . . .

Chocolate Frosting (makes enough for one large double layered cake)

  • 315g (1¼ cups) unsalted butter, softened
  • 500g (4 cups) icing sugar mixture (powdered sugar), sifted
  • 110g (1 cup) Dutched cocoa powder, sifted
  • 10ml (2 teaspoons) vanilla extract
  • Milk as required to make a spreadable frosting – start with 65g (¼ cup) milk and add more as needed

1. Sift the icing sugar mixture and cocoa together in a large bowl. Be warned – if you don’t sift, you’ll end up with lumpy icing!

2. Using an electric mixer, cream the butter in a large bowl, then beat in a third of the icing sugar/cocoa mixture and the vanilla. Beat in the remainder of the icing sugar/cocoa mixture alternately with as much milk as needed to create a spreadable frosting.

This recipe is a family favourite, and I find that it always works. When baked as a large sheet cake, the texture is a little tenderer (possibly because I top it with a chocolate glaze while still hot). As round layers, the crumb is a bit sturdier, which makes them perfect for stacking and decorating with frosting.

Oh, and a note to my friend Sally – we did try making spun sugar. I ended up with hard toffee stuck to my hair, on my fleece vest, on my slippers, concreted to the floor tiles…suffice to say it didn’t go all that well the first time. We’ll have to try again!

Wow, hasn’t our little In My Kitchen get-together grown!

It’s getting so big that it’s difficult to find the time to visit every post, and I’m getting emails from bloggers who feel they can’t join in because they don’t have time to “do the rounds”.

Some of you make a huge effort to comment on every single post each month (thank you!), but it’s not an option for most people, as there are just so many contributors now.

I’d like to encourage everyone who does an IMK post to visit a few others, but please don’t feel you have to read and comment on every one. We all know how busy life can get and this gathering was only ever meant to be a bit of fun, not a chore! xxx

. . . . .

In my kitchen…

…is a fifty chocolate platter for my friend Carol’s 50th birthday…

. . . . .

In my kitchen…

… is a surprise present from my darling friend Celi from The Kitchen’s Garden! She sent me a copy of the original Moosewood cookbook…

Published over thirty years ago, the recipes are handwritten in a very intuitive way…

. . . . .

In my kitchen…

…are organic, sustainably harvested local mussels. They’re a ludicrously good buy these days – I picked these up for just $5/kilo…

. . . . .

In my kitchen…

 …is a new Lebanese coffee pot from Harkola, which I use to make my morning chocolate shot…

. . . . .

In my kitchen…

 …are two savoury squash slices…

I used just half of our monster squash (harvested over a month ago), six eggs, a large perennial leek, a little chipotle salsa and the last of our Bishops’ crown chillis. The recipe we use is a neighbourhood classic, and it’s infinitely adaptable. The original version is here.

 . . …

In my kitchen…

…are frozen blocks of Rochester Ginger, lime zest and soda, ready for the next round of Moscow Mules

. . . . .

In my kitchen…

…is a bottle of flavoured macadamia oil from Hawaii (thanks Lorraine!) and a bottle of Lingham’s Extra Hot chilli sauce. When Malaysians say “extra hot”, they’re not kidding…

, , , , ,

In my kitchen…

…are three pigs’ tails, bought on a whim…

I braised them for three hours in a low oven, then picked off all the meat. Although not overly tender (or attractive), it was very flavoursome…

I used most of the meat in lasagnes – there was enough filling for two trays’ worth…

The last little bit of meat went into Chinese rice congee…

. . . . .

Tell me, what’s happening in your kitchen this month?

If you’d like to do an In My Kitchen post on your own blog, please feel free  to do so. We’d love to see what’s happening in your kitchen this month!  Please link back to this blog, and let us know when your post is up, and we’ll add it to our monthly listing. Please upload your post by the 10th of each month.

. . . . .

Here are this month’s posts…

Giulia @ Love at Every Bite (Canberra, ACT)

Selma @ Selma’s Table (London, UK)

Diane @ Photographs and Recipes (Massachusetts, USA)

Bernice @ Dish ‘n’ the Kitchen (Calgary, Canada)

JJ @ 84th & 3rd (Sydney, NSW)

Clare @ The Life of Clare (Geelong, VIC)

Claire @ Claire K Creations (Brisbane, QLD)

Nicole @ Miss Food Fairy (Melbourne, VIC)

Mel @ The Cook’s Notebook (Brisbane, QLD)

Lisa @ I’ll Be There With A Fork (Brisbane, QLD)

Olivia @ Mademoiselle Mange a Sydney (first IMK post! Sydney, NSW)

Moya @ Food & Tools (Bahrain)

Shaheen @ Allotment2Kitchen (Wales)

Johanna @ Green Gourmet Giraffe (Melbourne, VIC)

Maree @ Around The Mulberry Tree (Gippsland, VIC)

Emily @ Cooking for Kishore (New Jersey, USA)

Luca @ Oh La Vache! (first IMK post! Paris, France)

Maureen @ Orgasmic Chef (Sunshine Coast, QLD)

Catherine @ Cate’s Cate (Melbourne, VIC)

Lorraine @ Not Quite Nigella (Sydney, NSW)

Glenda @ Healthy Stories (Melbourne, VIC)

Laila @ Table of Colors (Finland)

Fiona @ TIFFIN – Bite Sized Food Adventures (Brisbane, QLD)

Christine @ Food Wine Travel (in France this month!)

Fran @ Life in the Food Lane (Houston, Texas, USA)

Tania @ The Cook’s Pyjamas (Perth, Western Australia)

Liz @ Mother Hubbard’s Cupboard (Gold Coast, QLD)

Emma @ SurreyKitchen (Surrey, UK)

Ngan @ Ngan Made It (San Francisco, USA)

Clara @ Heritage Recipe Box (first IMK post! Boston, MA, USA)

Vicki @ Boiled Eggs & Soldiers (Sydney, NSW)

Danielle @ The nOATbook (Melbourne, VIC)

Sherry @ Sherry’s Pickings (Brisbane, QLD)

Charlie Louie @ Hotly Spiced (Sydney, NSW)

Liz @ Bizzy Lizzy’s Good Things (Canberra ACT)

Taryn @ The Wooden Spoons (Canberra, ACT)

Indira @ I’ll Cook, You Wash (Georgetown, Guyana)

Brydie @ CityHippyFarmGirl (Sydney, NSW)

Gretchen @ Feeding My 3 Sons (South Carolina, USA)

Sandra @ Pass The Recipe (Melbourne, VIC)

Fran @ The Food Marshall (Canberra, ACT)

Debi @ My Kitchen Witch (Sheffield, UK)

Ardys @ Ardysez (Alice Springs, Northern Territory)

Misky @ The Chalk Hills Kitchen (West Sussex, UK)

Greg and Katherine @ Rufus’ Food and Spirits Guide (Little Rock, Arkansas, USA)

Sally @ My Custard Pie (Dubai)

Jennifer @ Milk and Honey (Gippsland, VIC)

Becca @ The InTolerant Chef (Canberra, ACT)

Joanne @ What’s on the List? (Adelaide, South Australia)

Tandy @ Lavender and Lime (Gordons Bay, South Africa)

Glenda @ Passion Fruit Garden (Perth, Western Australia)

Marian @ Apricot Tart (Coffin Bay, South Australia)

Melissa @ The Glen House (first IMK post! Ireland)

Mandy @ The Complete Cookbook (Sundays River, South Africa)

Jane @ The Shady Baker (Broken Hill, NSW)

Tania @ My Kitchen Stories (Sydney, NSW)

Francesca @ Almost Italian (Melbourne, VIC)

“Celia, are you paying attention to what I’m saying?”

Christopher at Chefs’ Warehouse was using his serious voice.

“The pot is ONLY for sugar, and you have to clean it each time BEFORE you use it to remove any verdigris, which is poisonous..”

Ok, so that got my attention. I was ready to put the Mauviel unlined copper pot back on the shelf, but Pete was so excited that I couldn’t veto him. The last time he was this taken with a piece of cookware, we ended up with a waffle iron that has been in constant use for nearly thirty years.

That didn’t stop me wondering though – why on earth would anyone make a pot that was potentially dangerous? What advantage could it possibly offer? It breaks all the rules we have for buying cookware – it’s heavy (weighing in at over a kilo), it doesn’t go in the dishwasher, it’s not multipurpose and it’s going to look grotty within a month. Having said that, it is stunningly gorgeous at the moment.

We soon found out that it’s also absolutely amazing.

It seems to turn sugar and water into caramel all by itself. No stirring, no brushing down the sides, no fussing. It heats incredibly evenly, both on the base and up the sides, which helps to prevent crystals forming.

I was after a dark caramel for my hazelnut praline…

The caramel remained liquid while we stirred in the roasted chopped nuts and spread them out onto a greased sheet pan…

I chopped the praline into chunks…

…and added them to a bowl of tempered dark chocolate…

I love how the glistening golden praline matches the pot…

As usual, Pete was right – our new copper sugar pot is the bomb. Maybe we’ll try making spun sugar next!