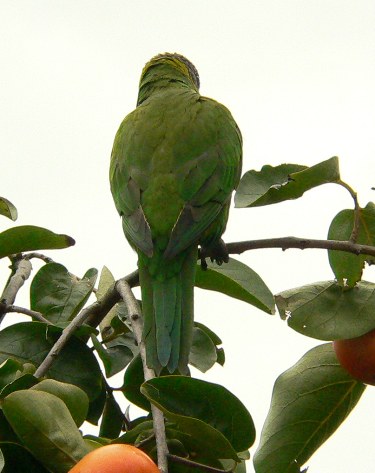
The Rainbow Lorikeets have been calling for days, but I couldn’t track them down.
Today, determined to get a photo for birdlovers Joanna and Brian, I went walking the street with my camera – and found them happily settled into the neighbour’s persimmon tree, jealously guarding it against all intruders. Rainbow Lorikeets always travel in pairs, but this handsome couple refused to pose together in the one photo for me. Here’s a shot of the all green back…
There’s more information about these gorgeous Australasian natives in this Wiki article. They’re a noisy bird, and if you listen to their calls here, you’ll understand why I knew they were in the neighbourhood!
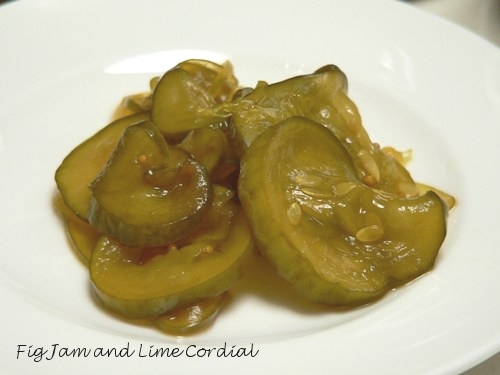
I’m a bit of a pickle fiend, so when Diana gave me surplus cucumbers and zucchinis from her garden, it seemed like the perfect opportunity to try my hand at making some at home.
Linda emailed me her fabulous bread and butter cucumber pickle recipe (which in turn came from a lady named Margaret) and so far I’ve made eight jars. Linda tells me they’ll keep for ages on the shelf, although I doubt they’ll last a month in our house!
In a large mixing bowl, combine:
6 cups thinly sliced cucumber
500 grams (1.1 lbs) of peeled and thinly sliced onion
1 shredded green capsicum
¼ cup of fine sea salt
Allow to stand for three hours, then rinse well with several changes of cold water. Note: I used a mandoline to slice the onion and capsicum, but thinly cut the cucumber by hand.
In a large stainless steel pot, combine:
2 cups (420g) brown sugar
2 cups (500g) of mild vinegar (I used white wine vinegar)
2 dessertspoons (15g) of mustard seed
1/2 teaspoon turmeric powder, or a teaspoon of grated fresh
a pinch of ground cloves
Heat gently until the sugar is dissolved, and then bring the mixture to the boil for five minutes. Reduce the heat and add the well-rinsed cucumber, onion and capsicum. Heat gently to just below boiling point, stirring gently from time to time. Be careful not to allow the pickle to boil.
Sterilise four 300ml jars and carefully fill with the pickle, ensuring the cucumbers are completely covered in pickling solution. Seal while hot.
. . . . .
This giant golden zucchini…
…produced five jars of delicious pickle. Only four are shown below, as I’d already given one to Maude before the photo was taken.
I followed Sally Wise’s recipe (the link is here), using white wine vinegar and all of the giant zucchini above. The sweet mustard pickle is a little reminiscent of corn relish in flavour, and matched perfectly with fresh ricotta, cheddar cheese and prosciutto for lunch today!
I use it several times a week to keep allergies and sinus problems at bay, and it always leaves me feeling sooo much better.
For the uninitiated, a neti pot is a device used to irrigate nasal passages by pouring a weak saline solution through them. It takes a little getting used to at first, but in our family of hayfever sufferers, it’s an invaluable tool. If you’re interested, do have a look on YouTube where there are several videoclips of the pot in use (I’ve opted to spare you from the direct link here – it’s not exactly the most appealing viewing!).
A word of advice though – don’t let your husband use it for separating the fat off gravy, or it will never be quite the same ever again. Sigh.
****************
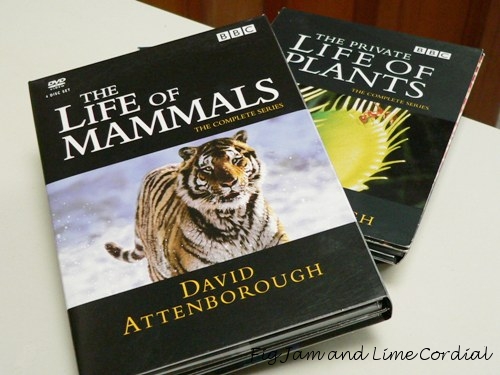
I love David Attenborough wildlife documentaries.
Oh, how I love these! We have almost every series he’s ever hosted or narrated, and many a bad day has been cured by an hour or so of marveling at the natural world with Sir David. And it doesn’t seem to matter how often I watch an episode, there’s always something new that I missed last time, or some detail I’ve forgotten, and each and every time I’m blown away all over again.
My current favourite series is Planet Earth, with its groundbreaking cinematography and astonishing breadth of material. I found an excerpt on YouTube:
A tip for fellow Aussies – many of these dvds are now on sale at Amazon.co.uk at massively reduced prices. I believe the UK, like Australia, use a PAL system rather than NTSC and therefore the discs should be compatible with our local dvd players (but please don’t hold me to that, as we have a multi-region player, so I can’t be certain).
****************
I love my industrial sewing machine.
In a tale reminiscent of a Thomas the Tank Engine story, we saved it from scrap and had it repaired, and now it’s living a happy and productive life in my sewing room. It’s over 40 years old, but still happily chugs along, powering its way through heavy duty fabrics and anything else I throw at it.
It’s a straight-stitch only machine, which back tacks at the beginning and end of each line of stitching, and then, best of all, automatically trims off the loose threads. I’ve used it to sew everything from giant kites to vinyl beanbags to children’s clothing, and it’s never let me down. It’s produced over 500 beanies for charity, pieced together a wetsuit from scrap neoprene, and sewn leather handguards for all the French horns in the school orchestra. The last repairman who serviced it told me that it would probably outlast me!
****************
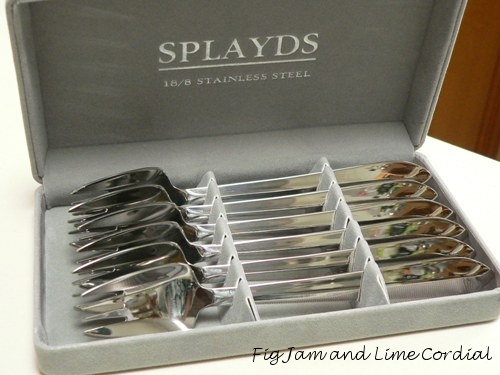
I love Splayds. So much so that I have a box set aside for each of my sons when they move out of home.
A dozen of these clever and aesthetically pleasing eating utensils live in our kitchen drawer, sharing space with the more mundane cutlery. A shiny splayd makes eating dessert a special affair!
And since we’re big xkcd.com fans, it seemed apt to post their splayd (spork) strip here…
****************
Finally, I love my Panasonic Lumix camera.
I’ve previously blogged about my pocket Lumix, but this larger version is my everyday camera. It takes almost all the photos on our blog, with the exception of pics shot when we’re out and about.
My larger Lumix is an SLR with a fixed zoom lens, autofocus, an adjustable white balance and an ISO range between 80 and 400. It’s now nearly eight years old, and I use it every single day. Compared to newer cameras, it’s old and clunky – even the little pocket Lumix is lightyears ahead of it in terms of functionality. Plastic bits are starting to fall off the back of the unit, there’s flour caught in the crevices, and the rechargeable batteries are near the end of their life, but I’m resisting the urge to upgrade. It’s been such a loyal worker for so long, I’ll just use it until it can’t do the job anymore.
Christina’s brother James is one of the nicest, most interesting people you’re ever likely to meet.
While we were chatting at Christina’s birthday party (themed 1970’s, so James was in a Luke Skywalker t-shirt and I was in a bright orange kaftan), he mentioned that he was planning to make blackberry jam for his wedding. As a present. For every one of the sixty guests.
And James isn’t one to do things by half measures – first he was going to make pectin from scratch (using his dad’s homegrown apples), and then he was planning to spend a weekend blackberry picking to gather enough fruit for the jam. His ever patient bride-to-be Suzanne just smiled as we discussed the intricacies of jar sizes and hot water processing.
A week or so later, Chris’ hubby Steve dropped around a jar of the aforementioned blackberry jam. I was both excited and somewhat surprised at how quickly the whole plan had been put into action – when James sets his mind to something, he clearly doesn’t procrastinate!
Serendipitously, the following day, Diana gave me frozen blackberries from her farm. I couldn’t resist combining the two into a sweet weekend treat.
Inspired by the Blackcurrant Crown recipe in Dan Lepard’s The Handmade Loaf, I made a version using our pain viennois dough (the step by step instructions are here), Di’s frozen blackberries, and James’ blackberry jam. It was an absolute treat – buttery, briochey and filled with oozing fruit.
1. Prepare the dough and allow it to rise in the mixing bowl until doubled in size. In the meantime, grease a 10 cup bundt pan well.
2. In a separate bowl, stir together the brown sugar and blackberries.
3. Turn the risen dough out onto an oiled bench and divide it into 18 x 50g pieces. Shape each piece into a ball.
4. Turn each ball seam-side up, and flatten it out. Spoon a scant teaspoon of blackberry jam into the middle of the circle…
…and then gather the edges together to enclose the jam completely.
5. Layer the filled balls into the bundt pan, sprinkling with the blackberries and sugar as you go. Don’t squash them in too tightly.
6. Once all the balls are layered into the pan, cover and allow to rise in a warm spot until puffed up (Dan’s recipe specifies letting the dough rise until doubled in size, but mine didn’t rise that much). Preheat the oven to 200C with fan.
7. Bake the crown in the oven for 10 – 15 minutes at 200C with fan, then reduce the heat and bake for a further 20 – 30 minutes at 175C with fan. The top of the crown went very brown in my oven, so I dropped the heat after 10 minutes. Do keep an eye on this – particularly if you’re using a cast aluminium bundt pan as I was – as it can colour up very quickly. I let mine cook an extra few minutes to dry up the berry juices.
Edit: Living Delilah made this recipe, and found that the brown sugar burnt during baking. Do watch out for that and if your oven runs hot or you’re using cast aluminium, you might want to lower the starting temperature by 10 degrees or so, or reduce the initial baking time at the higher temp.
8. Rest the pan for five minutes before carefully turning it onto a plate (watch out for the hot syrup). Serve the crown warm, with a hot cup of tea!
Some time ago, Michelle gave me a recipe for an easy pear, brandy and chocolate torte (thanks again, Michelle!).
This rich, dense dessert is a perfect way to use up leftover egg whites – in this case, the surplus from our shortbread cookie dough. Please excuse the slightly tragic arrangement of pears on top – I’ve always been a little design-challenged. I also baked the torte in a 25cm/10″ flan dish with a removable base rather than the smaller springform specified, so I probably should have used more fruit.
250g fresh pears (use tinned if fresh are not available)
4 tbsp brandy
25g cocoa powder (I used Dutched)
100g dark chocolate, preferably 70% cocoa, in pieces
50g unsalted butter
175g caster sugar
100ml hot water
4 large (59g) egg whites
85g plain (AP) flour
1 tsp ground cinnamon (optional)
1. Peel and core the pears, cutting each pear in half. Place the pears and brandy in a small bowl and allow to steep for about 30 minutes until most of the brandy has been absorbed.
2. Preheat the oven to 190C/170C with fan. Grease a 23cm/9in loose-bottomed cake tin or springform tin. Put the cocoa, chocolate, butter, hot water and 140g of the sugar in a small saucepan. Whisk gently over a low heat until the mixture is smooth. Leave to cool slightly.
3. Whisk the egg whites to soft peaks, then gradually whisk in the remaining 35g sugar. In a separate bowl, sift the flour and cinnamon together. Sprinkling in a little at a time, gently fold the flour into the egg whites with a metal spoon, until almost combined. Add the chocolate and fold in until evenly combined, being careful not to overwork the mix.
4. Pour the batter into the prepared tin and arrange the pears over the top (they will sink into the torte during baking). Sprinkle over any remaining brandy and bake for about 40 minutes until just firm. Serve warm with a generous dollop of homemade vanilla icecream or, in our case, softly whipped vanilla cream (made by whipping a little vanilla syrup into heavy cream).