Feeds:
Posts
Comments

Fig Jam and Lime Cordial is two years old today!

We celebrated with a sourdough fruit bread based on Dan Lepard’s Raisin and Cinnamon Loaf (from The Handmade Loaf).

I ended up adding a little wholemeal spelt for good measure, and a mix of golden raisins, cranberries and currants…

I also made some bread muppets (aka cottage loaves)…

…and Big Boy picked winners for our Book Darts giveaway! Given he’s both a writer and the most widely read in our family, it seemed appropriate to ask him to choose.

Congratulations to…

A tin of our Fig Jam and Lime Cordial Book Darts will be in the mail to you shortly!

And because you’re all so wonderful, I asked Big Boy to pick two runners-up.  He chose Sandy and Anne –  I’ll be sending you both a little something in the mail as well!

Thank you all again for reading and supporting our blog. It’s been a wonderful two years, and we look forward to sharing many more with you!

PS. I’ve been playing with Wordle (thanks to a tip from the lovely Joanna), and created the graphic above.  It’s a fun programme to while away some time on!

My dear friend Diana dropped over for a cup of tea last week.

She brought with her a bag full of large squashes from her farm garden, with a couple of turnips thrown in for good measure.  Aren’t they magnificent?  I was a little tempted to keep them as a table decoration.

Instead, I stuffed the two large ones with rice, using the purple rice I’d bought at Alfalfa House and following this recipe from Yotam Ottolenghi’s Plenty

It was particularly good served at room temperature with Pete’s homemade Greek yoghurt!

The remaining squash were grated and baked into Genie’s zucchini slice

This savoury slice recipe is one of the most popular on our blog, and with due cause – Genie’s recipe is incredibly simple and absolutely delicious. We ate it for dinner last night, and then Big Boy demolished the leftovers for breakfast this morning.

Instead of zucchini, I used Di’s squashes (skin and all) and substituted  diced uncooked pancetta for the fried bacon.  Combined with fresh eggs from our chooks, and a mix of fresh mozzarella and Picasso sheeps’ cheese, it made for a very simple and delicious  dinner!

bagl 004

I was reading some of the comments to yesterday’s post, and it made me reflect on my first attempts at sourdough baking.

If you’re new to baking with a sourdough starter, please let me reassure you – it isn’t scary.  Don’t be put off by all the numbers and detailed instructions out there, adhering to them really isn’t as critical as some of the more diehard bakers will have you believe.

Let me explain.

A lot of sourdough bakers take it all very seriously – they measure their ingredients to the last gram, set up spreadsheets to crunch numbers to determine hydration percentages, measure the dough temperature and the ambient room temperature, control the amount of steam during the baking process – and so on.

This makes a great deal of sense in a commercial bakery situation – loaves need to be consistent in size and shape, and even the slightest variation in a batch can impact on quality and profit.

But if, like me, you’re just baking at home, for fun, sourdough baking can be an adventure.  Even after nearly five years of breadbaking, my loaves will still turn out a little bit differently each time.  That’s because I’m not overly concerned about exact quantities, my ambient kitchen temperature changes with the seasons, and my proving times vary depending on whatever else is happening in our lives.

My preferred dough is at 74% hydration purely because that lets me work in round numbers for the ingredients.  It doesn’t really matter or make a great deal of difference (and I probably wouldn’t notice) if the finished dough was 72% or 76% – the baked loaves would still be delicious and my sons would still devour them.

So please don’t be put off by the thought that sourdough baking is an overly technical exercise.  It really doesn’t have to be, and it’s great fun to play around with quantities and ingredients to see what works and what doesn’t.

Let me try to explain what I do in simple terms, so that those of you who are considering it can get a clear picture of the process in your mind:

Step 1: feed your starter on flour and water.  Make sure to use a good bread or bakers flour, which is higher protein than plain (AP) flour.  Keep feeding your starter and giving it time to digest its food.  You’ll know it’s ready when it’s all bubbly and frothy.

Step 2: in a large mixing bowl, mix together the starter, water, flour and salt.  I add oil to the dough because I like the taste it imparts on the finished loaf.  Let it rest for about ten minutes, then turn it onto an oiled bench and give it a knead.  Now turn it back into the mixing bowl (which has been scraped out and oiled), cover it and allow it to rise.  This might take three hours, or it might take thirteen.  With experience, you’ll instinctively know when the dough is ready, but to start with, let the dough rise until it’s almost doubled in size.

Step 3: turn the risen dough onto an oiled bench, divide it up, and shape it however you choose.  This is the really fun part, where you can turn the dough into almost anything – from pizza to epi to loaves.  You could make stuffed rolls like I do every week, or work the dough into a tray and dimple it into foccacia.  Let it rise again while you preheat the oven.

Step 4: bake the dough.  Once it’s baked, let it cool, and then scoff it blissfully!

Lastly, don’t be afraid to stuff up. Every time you bake a loaf which is a bit ordinary, you’re one step closer to baking one that is perfect!

Lyn just left me a comment asking for my basic sourdough recipe, and I realised that I’ve never posted it here before!  Just for reference, here are formulas I use for almost all my sourdough baking.

Starter

I bought my sourdough starter from the US, and it arrived as a small envelope of white flakes. These were rehydrated by mixing the flakes with flour and water over a period of several days.

Now that it is mature, I feed my starter at a ratio of one cup of water to one cup of flour.  I’ve often thought about changing it to equal water and flour by weight (ie. 100g flour to 100g water), but I started with the former ratio, and it would be difficult to change all my formulas now.  In addition, my very liquid starter has never blown its top or grown out of the bowl it was being fed in.

Hydration

Most of the bread I bake uses a high hydration dough.

A quick explanation (with apologies to all my breadbaking friends who already know this) – the hydration of the dough refers to the percentage of total liquid to flour.  So if a dough has 750g of liquid (water, oil, milk etc) to 1kg of flour, the hydration of the dough would be 75%.  This is slightly more complicated with sourdough, as the amount of water and flour in the starter needs to be taken into account as well.

Higher hydration doughs are wetter and can therefore be harder to manipulate and knead.  I use the flip and fold kneading method for wet doughs (as described here), whereas lower hydration doughs require an old-fashioned pummelling.

Here is my standard formula for almost all the sourdough breads I’ve posted here – loaves, baguettes, scrolls, epi and more.  The sourdough focaccia is an exception, as it uses both starter and yeast, and follows the Dan Lepard recipe that Joanna posted on her blog recently.

. . . . .

Celia’s Sourdough Formula (74% hydration)

  • 200g starter (fed at a ratio of one cup water to one cup bakers flour)
  • 400g water
  • 50g olive oil
  • 700g bakers (bread) flour, or combination of flours
  • 10g fine sea salt

I routinely use a mix of flours in this recipe, and will often make the following variations:

  • half spelt flour, half bakers flour
  • 10% dark organic rye flour, 90% bakers flour
  • 500g bakers flour, 200g chestnut flour (see more here)

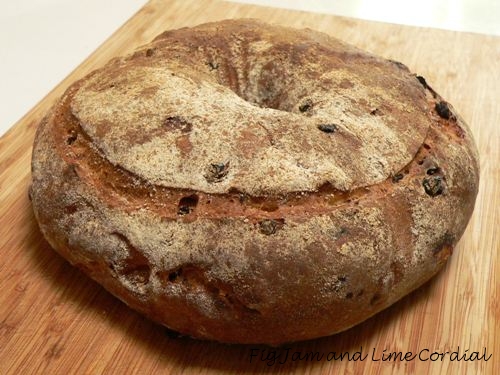
In conjunction with my starter (and so much of the look and taste of the finished loaf is determined by the starter), this 74% formula will produce a well risen, holey loaf with a chewy texture that my family loves.

. . . . .

When I need a lower hydration dough – useful if I’m trying to create a finished loaf that holds its shape or slashes – this is the formula I use.  It’s the dough I make when I’m shaping cottage loaves – a wet dough won’t work in that instance, as the two storeys simply prove into one amorphous blob.

Celia’s Sourdough Formula (60% hydration)

  • 300g starter (fed at a ratio of one cup water to one cup bakers flour)
  • 1kg bakers (bread) flour
  • 430g water
  • 50g oil
  • 15g fine sea salt

This lower hydration dough requires a more traditional kneading method, as it’s too firm to flip and fold.  It is a much easier dough to handle, and therefore a good formula to begin baking sourdough with, although it will produce quite a closed, tight crumb rather than a holey one.

One final note – out of personal preference, I’ve reduced the amount of salt in my sourdough breads.  The usual quantity of salt added is 10g per 500g flour, but I’ve reduced that to 7g. I thought it prudent given the large quantities of bread my sons eat every day!

Please feel free to ask any questions – I have so many wonderful breadbaking friends who check in here, so if it’s something I don’t know the answer too, I’m sure one of them will be able to help!

Edit: At Lyn’s request, here are brief instructions I wrote some time ago on how I make my 74% hydration sourdough.   They’re a little rough, but I don’t have time at the moment to edit them, so I hope you’ll excuse the lack of polish.  The instructions were written for a friend who was starting with dried starter – obviously if your starter is already active, it’s not necessary to feed it up for several days before using it.

Basic instructions for sourdough (74% hydration dough)

It’s hard to find a good crumpet recipe.  Most of the ones I’ve tried in the past have turned out as doughy fat pancakes, lacking the characteristic holes and texture of an old-fashioned crumpet.

I was excited and optimistic when I found this recipe – it was quite different to previous ones I’d tried, and as you can see from the photo above, it was a great success!

I tweaked the quantities and methodology a little and was delighted with the end result.  The original recipe is here – it’s a great read and has lots of useful tips on the cooking process.

  • 240g/8oz bakers flour (bread flour)
  • 240g/8oz plain (AP) flour
  • ¾ teaspoon cream of tartar, sifted
  • 10g or 1 sachet dry yeast
  • 500ml/2 cups tepid water
  • 7g fine sea salt
  • ½ teaspoon bicarbonate of soda (baking soda)
  • 140ml/5oz milk, at room temperature (I used UHT milk)

1. In a large mixing bowl, stir together the flours, sifted cream of tartar and dry yeast (don’t add the salt at this stage).

2. Make a well in the middle of the flour and add the water.  Starting from the centre and gradually working outwards, stir with a wooden or silicone spoon to form a thick, smooth batter.  Beat well by hand for two minutes.  Cover the bowl with plastic wrap and allow to rest in a warm spot for an hour. Below is a photo of the mixed batter, before resting.

3. Add the salt and beat the batter for another minute to incorporate.  Cover the bowl again and allow to rest for another 20 minutes.

4. Dissolve the bicarbonate of soda in the room temperature milk.  Stir this into the batter gently.  The thickness of the batter will determine whether or not the crumpets will set properly – if it is too thick, the crumpets will lack holes, but if it’s too thin, the mixture will run out of the bottom of the rings.  Here’s a photo of the batter after the milk and bicarb have been added.

5. To test the batter, heat a frypan or griddle over a medium-low heat until hot.  I used a heat resistant non-stick pan.  Depending on your pan, you might need to add just a tiny bit of butter or oil to stop the batter from sticking.

6. Grease a crumpet ring and place it in the middle of the pan.  Spoon batter into the ring – my 10cm/4″ rings needed 1/3 cup of batter each.  Allow the crumpet to cook over low heat.  If the test crumpet doesn’t form holes, you’ll need to gently stir a little more lukewarm water into the batter – I needed to add several  tablespoons  of water to achieve the consistency below.

7.  The cooking process involves a little trial and error.  The crumpets need to be cooked until the tops are covered with holes and the bottoms are quite brown. The original recipe suggests 7 to 8 minutes over a low heat for this stage. Photo below of the crumpets midway through the cooking process.

8. Once the tops are covered with holes that keep their shape, carefully remove the rings and flip the crumpets over, cooking the tops for just a couple of minutes to set them.  Re-grease the rings well after each use. As the crumpets will be toasted before eating, be careful not to overcook them at this stage.

Click here for a printable version of this recipe

We ate our crumpets toasted and spread with butter and honey, and with Pete’s new cherry and strawberry jam.  A perfect weekend treat!