Feeds:
Posts
Comments

Breadmaking is a wonderfully therapeutic process.

Life has been crazy busy lately, but my weekly Saturday breadmaking always affords me a little downtime.

I’ve been baking bread at home for over four years now, and the routine has become both comforting and easy. And since we don’t buy bread (with the exception of Lebanese pita bread), I have no choice but to bake at least once a week, often more.

I fed my starter up on Friday night, spent twenty minutes making the dough the following morning, then another twenty minutes or so shaping the dough after lunch.  The sourdough process takes a long time, but very little hands on involvement is required on my part.  Yeasted breads are even faster!

As the new school year is about to start, I baked a large  (90cm/36″) tray of sourdough focaccia for Small Man.  He takes a substantial slice for lunch each day, spread with Vegemite…

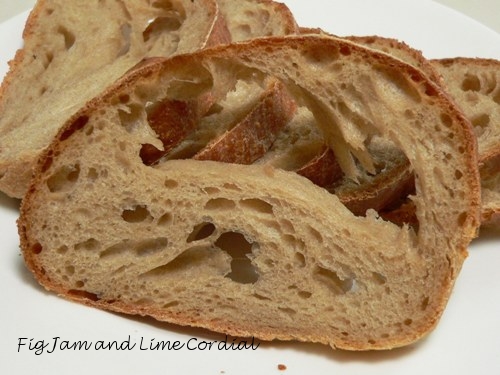
I also knocked up a very large batch of sourdough (half spelt, half bakers’ flour). The finished dough weight was 2700g (nearly 6lb), and it became two pointy-eared epi…

…six oversized lunch rolls…

and three baguettes.

If you’ve never made bread before and would like to give it a go, you might find this basic tutorial useful.  But be warned, breadmaking is addictive!

Inspired by Lorraine and Claire, I attempted my first ever batch of lamingtons for Australia Day. They worked so well that I had to make a second batch the following day!

Named after Lord Lamington, former Governor of Queensland, lamingtons are an indisputably Australian cake, and the backbone of many a fundraiser as I was growing up.

Like Claire, I used an old Australian Women’s Weekly recipe, specifically one from the now out-of-print Cakes and Slices Cookbook. The recipe included the unusual step of adding melted butter and hot water to the sponge, resulting in a light cake, which absorbed the icing like..um..a sponge.

I substituted coconut thread for the dessicated coconut, much to the delight of both Big Boy and Pete, neither of whom are fans of the latter, and tinkered just a little with the methodology.

Sponge:

  • 6 large (59g) eggs
  • ¾ cup (165g) caster sugar
  • 1 cup (150g) self-raising flour
  • 1/3 cup (45g) cornflour (cornstarch)
  • 1/3 cup (80ml) hot water
  • 15g (1 tablespoon) butter, melted
  • coconut thread, or dessicated coconut, about 3 cups (250g)

Icing:

  • 4 cups (500g) icing sugar mixture (confectioner’s sugar)
  • 1/3 cup (40g) cocoa (I used dutched)
  • 15g (1 tablespoon) butter, melted
  • ½ cup (125ml) milk

1. Line a 23cm/9″ baking tin with parchment paper.  Preheat oven to 175C/350F or 160C/320F with fan.

2. In a medium bowl, sift together the flour and cornflour.  In a cup, stir together the hot water and melted butter.

3. In a large bowl, beat the eggs together with an electric mixer until thick, then gradually add the sugar, beating well between each addition.  The batter will be thick and frothy.

4. Carefully fold in the sifted flours, then quickly but gently fold in the hot water and butter.  Pour the batter into the prepared pan, and bake for about 35 minutes.

5. Stand for five minutes in the tin, before removing to cool on a wire rack.  Allow the cake to cool completely before proceeding.

6. Cut the cooled cake into 25 squares, trimming any rough edges as required.

7. In a large heatproof bowl, sift together the cocoa and icing sugar mixture.  The original instructions are to then add the milk and butter, and stir the mixture over hot water until smooth.  Instead, I heated the milk and butter in a microwave-proof cup, and gradually whisked it into the icing sugar and cocoa until smooth.

8. Using a fork, dip the cake squares into the liquid icing, then toss them in the coconut threads.  Allow to set on a wire rack.

Click here for a printable version of this recipe

I really, really like Nigel Slater.

My friend Joanna of Zeb Bakes sent me one of his recipes over a year ago, and since that time we’ve become avid fans of this well-known English food writer, enjoying both his dvd and cookbooks.

I really, really like this brownie recipe.  It comes from Nigel Slater’s The Kitchen Diaries: A Year in the Kitchen, and I’ve adapted it only slightly to suit the ingredients I had on hand.

The combination of dutched cocoa and 70% chocolate gives it a deep, not overly sweet flavour, and the large quantity of eggs ensures a light, almost moussy texture.  Pete is less enamoured – he loves the flavour, but prefers his brownies to be dense and fudgy.  He happily ate several pieces nonetheless!

Apologies to my US friends, but the original recipe was written in metric weights, rather than cup measures. I’ve included imperial  weight conversions wherever possible.

  • 300g (10.5 oz) caster (superfine) sugar (original recipe specified golden caster sugar)
  • 250g (1 cup) unsalted butter
  • 250g (8.8oz) dark chocolate (70%) – I used Callebaut callets
  • 3 large (59g) eggs, plus 1 extra yolk
  • 60g (2oz) plain (AP) flour
  • 60g (2oz) dutched cocoa (or the best quality cocoa you have)
  • ½ teaspoon baking powder
  • pinch of salt

1. Line a 23cm square baking tin with parchment paper.  Preheat the oven to 175C/350F or 160C/320F with fan.

2. Melt 200g/7oz of the chocolate, either in a pyrex bowl in the microwave on short bursts, or over a pan of simmering water.  Remove from heat as soon as the chocolate is melted. If you’re not using callets, chop the remaining chocolate into small pieces.

3. In a medium bowl, sift together the cocoa, flour and baking powder.  Stir in a pinch of salt.

4. In a small bowl, lightly beat together the eggs and yolk with a fork.

5. In a large bowl, use an electric mixer to beat the sugar and butter until very light and fluffy.  Gradually mix in the beaten eggs, mixing well between each addition.

6. Using a spatula, gently mix in both the melted chocolate and chocolate pieces, then carefully fold in the flour-cocoa mixture.  Use a light touch, and try to keep as much air in the mix as possible.

7. Scrape the mixture into the prepared baking tin, smooth the top, and bake for 30 minutes, or until a tester inserted into the centre comes out a little moist, but free of raw batter.  The brownie will firm up on cooling, so be careful not to overbake it.  Allow to cool for at least an hour before serving.

I was despairing over the huge cavern in my most recent sourdough spelt loaf.  I suspect I underproved the shaped dough, which resulted in excessive oven spring, producing this giant hole.

However, when my parents arrived for dinner, my mum took one look at the sliced bread, and exclaimed, “Holey bread!  That means you’re about to come into some money!”.

Whilst I’m not a believer in luck, that one made me smile a lot.

Just for fun, do you know any bread related sayings or superstitions?  The only other one I could recall was the plea to small people to eat their crusts to ensure their hair would go curly!

What about any related to baked goods in general? You can’t have your cake and eat it is the only one that comes to my mind.  Do you know of any others?

We don’t have a lot of surplus vegetables in the garden.

Our aim is to grow a small quantity of a large variety of produce – sufficient for our daily consumption – rather than large quantities of just a few.  As a result we’re unlikely to have a glut of cucumbers, but we’re usually able to put three or four different veg on the table each night for dinner.

Having said that, we’ve had enough to do some small scale preserving, and it’s been very rewarding!

We harvested about six kilos of roma tomatoes in total – after cooking and eating, there was enough left over for a  small batch of passata and a bottle of roasted tomato ketchup

Capsicums have been a poor performer in our garden – we’ve only had a few little green ones that never turned red, but the Japanese eggplants have been fantastic!  I turned a kilo of our homegrown crop into three and a half jars of eggplant pickle

Finally, I was keen to try Pam the Jam’s piccalilli following the recipe here.  Most people make preserves when they have garden surplus, but I  did the reverse – I came across the recipe first and then went hunting in the garden to see what I could find.  In the end, I was able to cobble together a kilo of crisp vegetables, including a couple of straggly beets, some Lebanese cucumbers, celery, green tomatoes, an assortment of multi-coloured carrots and the aforementioned green capsicums…

The piccalilli (top photo) was very easy to make and is currently maturing in the pantry.  Great stuff!