Feeds:
Posts
Comments

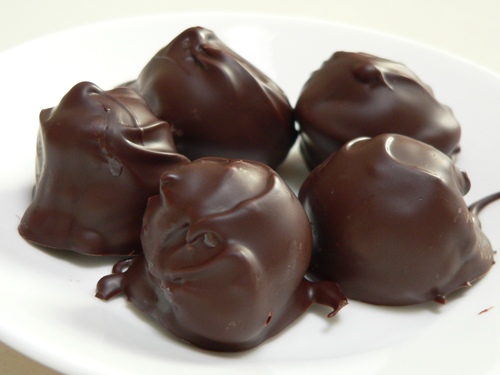
Here’s an easy and delicious dark cacao treat from Willie Harcourt-Couze.

The chocolate isn’t tempered in this recipe, so you’ll need to keep these bars in the fridge to stop them from blooming.  And as they’re made from 100% cacao with no added white sugar, flour or butter, I’m sure they must be quite healthy, right?

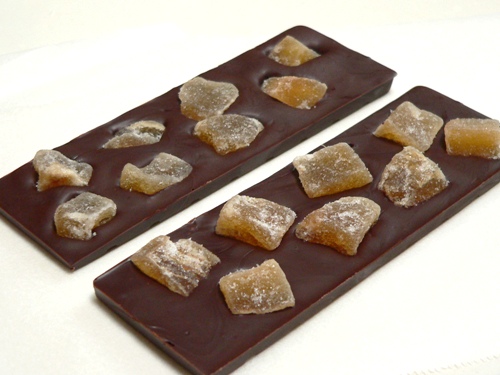
I amended the recipe slightly to include my intoxicated figs, but please feel free to use whatever dried fruit and nuts you have on hand.

  • 180g 100% cacao or unsweetened chocolate (see note)
  • 100g walnuts, hazelnuts or Brazil nuts, chopped (I used Brazil nuts)
  • 100g dried fruit, chopped (I used a mix of intoxicated figs and raisins)
  • 100g crystallised ginger, sugar shaken off, chopped
  • 1 teaspoon ground cinnamon
  • 2 teaspoons vanilla extract (I used homemade)
  • 1 Tablespoon honey, optional
  • Splash of rum or cognac

Note: I used Callebaut Cocoa Mass, but the recipe was designed for Willie’s Cacao.  If you don’t have either of these, you could try using 70% or 85% chocolate, and omit the honey.  Try to use the best you can though, as the cacao is the dominant flavour here.  Note that you won’t be able to substitute powdered cocoa in this recipe.

1. Line the base and sides of a 20cm square tin with parchment paper or cling film.

2. If the cacao is in a block, chop it roughly.  Place it in a large pyrex bowl and melt in the microwave in short bursts on high.  Heat only until mostly melted, then stir with a rubber spatula until smooth.  Take care not to scorch the cocoa mass or it will turn bitter and grainy.

3.  Add all the remaining ingredients and stir to coat well.  Scrape the mixture into the lined tin, smooth the top and refrigerate until firm, preferably overnight.

4. Remove from the tin and cut into bite-sized pieces.  Store in the refrigerator in a covered container.

Click here for a printable version of this recipe

It’s Saturday morning, and I’ve been waiting all week to try this recipe by Bruce Weinstein and Mark Scarbrough, authors of The Ultimate Cookbook.

Here it is – although if you’d prefer sensible, easy to follow instructions rather than my crib notes, just stop by their blog, Real Food Has Curves.  I only used two tomatoes instead of four – the original recipe specified eight cherry toms, but I didn’t have any on hand.

The end result is a deliciously textured, flavoursome salad which will keep well in the fridge for several days.

One thing – I was speaking to my friend Dan from Tutus and Ladybeetles today, and she mentioned that she uses couscous in her tabbouleh rather than bulgur (or as it’s known here, burghul).  According to Wiki, the two cereals are actually quite similar, although bulgur is lower in GI and therefore probably a bit better for you.  But if you’re having trouble finding it, couscous would probably make an acceptable substitute (sorry, Bruce!).

Today’s lunch is tabbouleh with roasted chicken breast and  Pete’s marinated feta.  Simple and perfect!

A couple of weeks ago, I picked up a box of Tahitian limes at the markets – at $7 for nearly 60 limes, they were just too much of a bargain to pass up!

They were in great condition too – green and unblemished.  Of course, I promptly forgot all about them, so by the time I opened the box a week later they were looking a little sad – softer and yellower, and in need of using up in a hurry.  That wasn’t a bad thing, as they were also riper and juicier, and better suited to pickling.

I’ve turned them into two large jars of lime preserves – on the left are traditional Moroccan style preserved limes, made by salting the quartered fruit and squishing them into a sterile jar with a few bay leaves, cinnamon sticks and cloves.  On the right is a sweet lime pickle, spiced with brown sugar, turmeric and salt.  Both recipes are from Stephanie Alexander’s cookbook, and  I haven’t tried either before.  I’ll let you know how they go!

Edit:  As a couple of people have asked for this, here is the preserved lemons recipe I used.  It comes from The Cook’s Companion by Stephanie Alexander.

  • 250g coarse kitchen salt (I used sea salt)
  • 10 lemons, scrubbed and quartered (I used 18 limes)
  • 1 bay leaf
  • 2 – 3 cloves
  • 1 stick cinnamon
  • extra lemon (lime) juice

1. Scatter a spoonful of salt into a 1 litre sterilised jar.  Tip the lemons into a large plastic tub with remaining salt and mix well, massaging the fruit vigorously.

2. Pack the fruit curved-side out into the jar, adding bits of bay leaf, clovers and pieces of cinnamon as you go.

3. Press down hard on the fruit to extract as much juice as possible, then scrape in any leftover salt from the tub.   Cover with extra lemon juice if required. (Stephanie points out that a wedge of lemon left exposed might develop a white mould, which she says is harmless.  That was enough to make me squeeze extra limes to ensure there was enough juice to cover it all!)

4. Wipe the rim and neck of the jar with a clean cloth dipped in boiling water and seal with an acid proof lid.  Let the lemons mature for at least 1 month in a cool place (not the fridge) before using.

Note: I haven’t tried this particular recipe before, but preserved lemons I’ve made in the past have occasionally fizzed a little during the first week.  Apparently that can happen as part of the preserving process – just loosen the lid occasionally to let the gas out.

Update: Here’s how they turned out!

These spiced nuts are very moreish. I made them in large quantities last Christmas, and they were incredibly popular – we actually had friends  ringing to ask for more!

They’re based on a recipe by Hugh Fearnley-Whittingstall and are very easy to make, with the advantage of not requiring any added fat.  A lonely egg white leftover from last night’s dinner inspired me to make a fresh batch.

  • 500g (about 4 cups) mixed nuts – I used Brazil nuts, walnuts and almonds
  • 1 egg white
  • 25g (about 2 US tablespoons) brown sugar
  • 2 teaspoons Maldon or kosher salt flakes or 1 teaspoon fine sea salt
  • ½ teaspoon ground cumin
  • ½ teaspoon smoked paprika
  • ½ teaspoon chilli powder or cayenne pepper – I used chipotle powder

Note: I’ve added approximate imperial measures for my friends in the US.  This isn’t an overly precise recipe and you could use what you have on hand, although I have found the above combination of spices particularly appealing.

1. Preheat oven to 160C/325F with fan. Line a large baking tray with a sheet of parchment paper.

2. In a large mixing bowl, whisk the egg white until foamy, then whisk in all the other ingredients except the nuts.  Add the nuts, and stir well to coat completely in the spice mix.

3. Tip the nuts onto the lined tray and spread them out into a single layer.  Bake for 15 minutes, then remove the tray from the oven and stir the nuts to unstick them from the paper and break up any clumps.  Don’t burn yourself!

4. Return the tray to the oven for another 5 – 7 minutes, until golden brown.  Allow the nuts to cool on the tray, during which time they’ll harden up and go crunchy.  If you like, you could sprinkle over extra salt at this point.  Once the nuts are completely cool, store in an airtight container for up to three weeks.

Click here for a printable version of this recipe

I’ve invented the perfect chocolate bar.

Of course, the use of the word “invented” is completely outrageous, since it’s been done a million times before, and the word “perfect” completely subjective, as it’s really only perfect for me.

I was inspired by the caramelised almond egg we had from Colefax at Easter.  It was delicious, but the balance of flavours wasn’t quite right – even in dark chocolate, I still found the egg a little too sweet.

So I’ve been experimenting – I started by making the roasted almonds, adapting the recipe I use for almond rochers.  I tried scattering these over a tempered bar of 70% cacao, but found the chocolate too dark for the sweet almonds.  I also discovered that encasing the almonds inside the bar gave a better mouthfeel and eating experience than using them as a topping.

Here’s the final outcome – sweet roasted almond slivers encased in a 63% cacao dark blend.  I’m in chocolate heaven…

  • 250g slivered almonds
  • 20ml Kirsch
  • 80g icing sugar mixture (confectioners or powdered sugar)
  • tempered chocolate (see below)

1. Preheat the oven to 175C.  In a small bowl, combine the almonds, Kirsch and sifted icing sugar.

2. Line a baking tray with a sheet of parchment paper, and pour the nuts onto the tray.  Bake the nuts for 10 minutes, or until golden, stirring often (watch them carefully, as they burn easily).  Allow these to cool on the tray, during which time they’ll harden up and become very crunchy.  Once cool, break up any clumps with your fingers.

3. Tip the nuts into a bowl of tempered dark chocolate (see here for tempering instructions) – my perfect blend is:

  • 250g Callebaut 811 (54% cacao)
  • 125g Callebaut 70% cacao
  • 125g Cacao Barry Tanzanie Origin 75% cacao

Pour the mixture into moulds and allow to set briefly in the fridge.  I’ve made several large bars, as well as these speckled chocolate cane toads.  It’s probably the only time I’ve found a cane toad appealing – they’re a major pest here in Australia!

Click here for a printable version of this recipe