Feeds:
Posts
Comments

I’ve had an epiphany, and it’s making me uncomfortable.

At 53, I’ve reached “peak stuff“.

And my backup plan for downsizing – donating it to charities – has hit a hurdle. They don’t want most of my “stuff”.

It all started with our holiday viewing of Tidying Up with Marie Kondo on Netflix. The show was simultaneously inspiring and terrifying in equal parts. In one episode, the family who were decluttering sent 150 giant bags of trash to landfill. That’s just the stuff they weren’t able to donate – there was a mountain of bags going to charity as well.

Anyway, Pete and I were inspired to sort through our old clothing. We culled ruthlessly, ending up with six bags of good quality (albeit very dated) items to donate. And then we hit stage two, which was trying to find a place that would take them. The CEO of the Salvation Army might well berate folks for not donating, but he’s obviously never been knocked back when trying to donate to their North Parramatta store like my friend was last week.

Other friends fronted up to Vinnies in Leichhardt with lightly worn, undamaged clothing that their children had grown out of, only to be told that they weren’t accepting donations at that time. The charities are fussy because they have to be – they’re spending millions of dollars each year managing waste. We might feel good believing that our donated items are going to a worthy cause, but there’s a strong chance that much of it will be deemed unsaleable and sent to landfill. According to this article, more than 30 per cent of charity donations end up there.

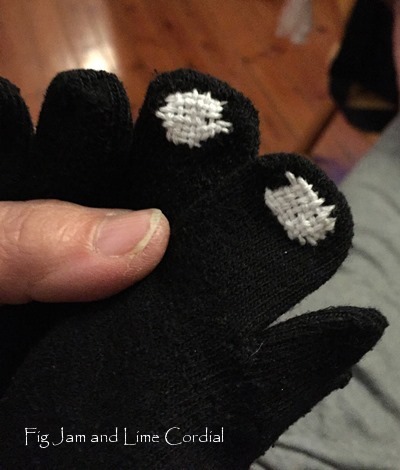
I was already aware of this problem as a result of the rescued socks. I finally found a refugee support group who are incredibly grateful to have them, but none of the big name charities would touch them, even after I’d sanitised them to within an inch of their lives. Even those working with the homeless didn’t want them. The Exodus Foundation reluctantly took some last year and said they’d call me back if they wanted any more (they never did). Vinnies’ night patrol were happy to take the beanies we made, but they received a regular supply of new socks, so weren’t able to take any from us. It was a real eye-opener about how affluent and privileged a society we’re fortunate enough to live in.

Which leads me back to my epiphany. I have two difficult tasks ahead of me now.

Firstly, I have to be accountable for my stuff. I’ve never really done that before, but our waste reduction efforts this past year have focused my attention on this point. What happens to the things I own when they’re no longer needed? Throwing an item into landfill has to be an absolute last resort and only done after every effort has been made to extend its life.

An example – the base of our car phone holder broke recently, but the cradle was still fine, so we attached it to a shelf in the kitchen. Nothing lasts forever, but this will at least save part of it from the bin for a few more years…

More importantly though, is that I have to start buying things with a different mindset.

Whatever comes into the house needs to have an exit plan.

Will it have a long life? Can it be repaired? Donated? Repurposed? Recycled? Will it biodegrade, or live in landfill for eternity? What about the packaging it comes in? Asking these questions inevitably lead to…do I really need it? Do I really want it?

I have to work much harder at this. It’s far easier to type than to put into practice, because like most extroverts, I like new things. I am, however, trying my best to improve. Last year I assuaged my guilt by shopping mostly at op shops and places like Reverse Garbage, telling myself that I was already further down the landfill ladder by buying items that had already been used and/or discarded. But what the Kondo show made me realise was that even this stuff needs an exit plan. And I have to consider that before I think about bringing something new into the house.

Secondly, I have to figure out what to do with the things I already have. There is a room full of fabric and craft supplies that needs rationalising, and I want to do it in a careful, considered way. On the show, folks worked through their houses in a whirlwind fashion – the premise being that you start tidying and don’t stop until you’re finished – but I don’t want to simply throw out items without giving them a great deal of thought first.

I have a responsibility to do more than simply hold an item in my hands to see if it “sparks joy”. I have yards of boring green polarfleece (leftover from school jumpers) that I can turn into beanies for the homeless over the next few years rather than discarding for the sake of clear floor space. And having to buy something to replace a perfectly good item that I threw/gave away previously drives me bonkers.

I have to make a greater effort to repair and extend the life of items. In her book (I haven’t read it, but I’m quoting from this article), Kondo writes that “when a button falls off, it’s a sign that the particular shirt or blouse has … reached the end of its life.” I find that incredibly disturbing. Our goal is to repair for as long as possible – made easier if we choose well in the first place. Although I must admit that my sock repairs are starting to drive my poor mother to despair…

So those are my new goals for 2019. Tidying up in a careful, considered way. Minimising new purchases as much as possible. Buying only when necessary, with a view to longevity, and with an exit plan. It won’t be easy, but I’m going to try. ♥

When I posted about my adventures at Gardens by the Bay in Singapore, Claire left me a comment (thanks Claire!) to tell me about the Plants with Bite exhibition at the Royal Botanic Gardens in Sydney. Pete and I popped in for an explore last week and it’s great!

Entry is free and even though it’s not a huge space, there are oodles of carnivorous plants on display. Including lots of very robust Venus Fly Traps (anyone who has ever tried to grow these at home will tell you how easily they die off)…

Tiny, sticky sundews, with sparkly globules that catch bugs like superglue…

Butterworts and bladderworts, although I didn’t take any photos of the latter…

And the most wonderful array of pitcher plants, both the North American ones that grow on the ground…

…and my all time favourites, these Nepenthes or tropical pitcher plants. Known colloquially as “monkey cups” (as monkeys have been seen drinking rainwater out of them)  the pitchers form from the end of specialised leaves.

Apparently there are 170 different varieties currently known…

The exit is guarded by Audrey II, straight from the theatrical production of Little Shop of Horrors…

I always try to buy something in support when I attend a free exhibition, so I came home with a Gardens magazine and stick-on tattoos, because I’m a child…

I was told the display will be open for at least the first half of this year. It’s based in the Calyx at the Royal Botanic Gardens, Sydney and well worth a visit if you get a chance. Make sure you have a good look at the green wall while you’re there – it’s the largest in Australia!

I was messing about with my denim stash yesterday and ended up making this little bag from the leg of an old pair of jeans. It was the perfect size for our neighbourhood bread deliveries.

It worked so well and was so quick to make that I started experimenting with other fabrics. Three hours and ten bags later, and I’m happy to share the instructions!

Start with two rectangles of fabric – approximately 15″ x 11″ (38cm x 28cm). Also, cut a strap 2½” (6½cm) wide by whatever length you prefer.  My handles all ended up different lengths, determined by whatever scrap I was using…

Place the rectangles right sides together. Cut 2″ (5cm) squares out of the bottom corners…

Sew the bottom and side seams, then overlock around the top. I overlocked all the seams just because it’s easier, but you could straight stitch and finish them if you prefer…

Now open up the fabric in the corners and match the side and bottom seams…

Stitch to form a boxed base…

Turn the top edge over and hem. At the same time, hem the long sides of the strap. At this point, down tools and go and iron everything as it will be harder to do so later…

Centre the strap over the side seams and attach it in place with two rows of stitching. That’s it, all done! Easy, right?

These bags are proving to be very useful! They’re the perfect size for one of my loaves…

…and for BYOing two bottles of wine to dinner…

I’ve made them in quilting scrap, denim, tea towels – just about any sturdy non-stretch fabric will work…

If you’re a bit more experienced and want to try making the bag from old jeans, you’ll need to make sure the leg circumference is wide enough (most skinny jeans won’t work). Make sure you have a sturdy sewing machine and walk the needle over the thick seams or risk breaking it (I learnt that the hard way).

Here’s how I cut the bag out of a jean’s leg…

I love how they turn out, but mitering the corners is a bit trickier. You could, of course, just leave that step out…

I love quick and easy sewing projects like this! The dimensions can be easily adapted as needed, so in theory the basic pattern could be used for everything from lolly bags to shopping totes (although the straps might need changing for the latter to provide more support).

I’ll be making them as bread and wine carriers, but I suspect we’ll find a multitude of different things to do with them.  I hope you’ll give them a go! ♥

It’s taken us a few attempts, but we’ve figured out how to smoke beef brisket in Rosie theTraeger Pro 34.

Well, we’ve figured out a method that works for us – I suspect true barbecue aficionados will take umbrage to some of our suggestions…

We start with a grassfed Cape Grim brisket. This alone is a fabulous find – Cape Grim produces some of the best beef in Australia and it usually carries a hefty price tag. However, brisket is less popular than other cuts, and Harris Farm Markets in Leichhardt sells it for just $13.99/kg…

Traditional American barbecue uses grainfed beef, but we try to avoid it for animal welfare reasons, plus we find it a bit too rich and fatty for our tastes. Because it isn’t as heavily marbled, grassfed brisket is less moist when smoked, but it’s incredibly delicious nonetheless!

We took advice from two sources – the amazing Steven Raichlen book Project Smoke, which is available in Kindle/iPad format for about $10…

…and the excellent PBS series BBQ with Franklin, as well as Aaron’s fabulous YouTube videos…

. . . . .

We start by trimming most of the fat from the brisket, leaving just a few millimetres (about ¼”) all over. It’s a rookie error to leave too much fat, as the low smoking temperature doesn’t render it all out or crisp it up.

The meat is coated with ground black pepper and kosher salt (flaky salt would work as well) in equal parts by volume. The pepper is ground in a spice grinder and then sieved to remove the superfine dust – we only use the coarser bits. The rub is evenly sprinkled on and patted into the meat, which is fridge cold for trimming and coating, and then left to come to room temperature before smoking.

We place the brisket in an aluminium tray, fat side up. A temperature probe is inserted  into the thickest part (more on that later). Now, conventional wisdom is to place the meat straight on the bars, and I’m sure you get a better result that way, but we’re lazy and don’t want the extra cleaning up.

It’s worth mentioning that Rosie is a 34″/90cm pellet smoker, with a relatively large hopper. This means that we can confidently load her up with wood pellets before going to bed, knowing that she’ll have more than enough fuel to keep her chugging along until the following morning. You might need to make adjustments if you’re using a different type or size of smoker.

We started off using the Traeger Hickory pellets, but we now buy the Green Mountain Premium Fruitwood Blend from BBQ Aroma in Leichhardt. They’re a slightly more affordable option and they burn well…

If we’re having people over for lunch the following day, we start smoking at 9pm the night before. Rosie is brought to temperature (107°C/225ºF) and the tray is placed in the smoker with an accompanying pie tin of water. It’s then left to do its magic overnight.

The briskets we buy vary from five to six kilos, but trimming reduces that substantially. We’ve found the meat can take anywhere from 12 to 14 hours to smoke (depending on the thickness of the cut), so we need to allow extra time just in case. In addition, the longer the meat rests (within reason), the better the final result!

Once the internal temperature of the meat gets to between 76ºC to 80ºC (169ºF to 176ºF), which is usually about 6am the following morning, I turn the temperature up to 121ºC (250ºF), refill the water tin, and cover the meat with parchment paper.

On that point – Aaron Franklin recommends taking the meat out, wrapping it in butchers paper, and then putting it back in to finish smoking. When we tried that, the temperature of the meat dropped massively and took ages to heat up again. As our brisket is already on a tray,  just covering it with parchment to prevent it from drying out seems to work well for us.

When the internal temperature reaches 93ºC (200°F), we take the meat out. The test for doneness is if you can insert a finger into the brisket without too much difficulty – we use a wooden spoon handle.

Here’s how our last smoke looked just out of Rosie…

. . . . .

We remove the cooked meat from the tray and wrap it in a double layer of butchers paper, then pop it into a clean esky (insulated cool box) to rest for up to four hours. It probably needs at least two hours resting time.

A note on the wrapping – smoked meats are traditionally wrapped in foil to rest, but recent thinking suggests that the foil causes the meat to steam a little as it cools, resulting in a slightly stewed flavour. Franklin and Raichlen both suggest butchers paper – I didn’t want to pay for the fancy peach coloured paper they recommended, so I sourced a locally made food safe white version on eBay…

And the moment of truth, the slicing! Because of the tray, we don’t get a smoke ring the whole way around, but there is usually a decent pink stripe at the top…

. . . . .

So…how to serve it? With coleslaw of course – we like to make ours with Chinese cabbage as it’s a little sweeter and gentler on my stomach.

Pete also made an amazing cheese souffle last time, using this dead simple recipe from Kitchn. It will be a house staple from now on…

I made potato salad using Kestrels and dressed it in an excellent honey mustard vinaigrette from Chew Out Loud – this will also be our go-to henceforth.

Now here’s our personal contribution – we served our brisket in…tah-dah!…deepfried DOUGHNUT buns. Brisket doughnut sliders are a thing!

I made a large batch of yeasted sweet dough and once it had proved, shaped it into 50g balls. These were given a second rise before flattening slightly and deepfrying…

Here’s my assorted plate of leftovers. Because there are always leftovers!

And before I forget – a final note on probe thermometers. The Traeger Pro 34 comes with two, which record the internal temperature of the meat as it smokes. The problem though is that the smoker sits on the back deck and the first time we used it for brisket, I found myself getting up three times overnight to check the temps. It was like having a newborn baby!

Our darling friend and neighbour PeteV took pity on us and bought us a Meater Thermometer. It’s the bomb. It bluetooths to our phones and iPads, and the alarm function has saved us on more than one occasion from badly overcooked meat. Brisket is a particularly tough cut, so it needs to be cooked very slowly until well done (93ºC or 200ºF). It’s much easier not to stuff that up when the internal temperature is being electronically tracked…

Image result for meater thermometer

. . . . .

We’re still newbies to smoking and barbecues, so if you have any tips, we’d be very grateful for them. And I’d love to hear about your barbecue adventures as well!

.

.

PS. I loved this show about spending 24 hours working at Franklin Barbecue – it’s fun to watch if you have ten minutes spare. I can’t believe folks queue up for six hours!

One final post on our Singapore trip, but this one’s a doozy, so you might want to grab a cup of tea and pull up a chair. It was a busy, family-filled two weeks with too many happy moments to recount, so let me just share some highlights with you.

. . . . .

I spent a joyous afternoon exploring Chinatown, Arab Street, Haji Lane and Little India on foot. I started at the Buddha Tooth Relic Temple and Museum in Chinatown…

I stopped to listen to the call to prayers at Masjid Sultan in Muscat Street.This national monument was built in 1824…

The Sri Veeramakaliamman Temple (Hindu) was hard to photograph against the bright sky, but it was wonderful in person. I walked past it in Little India…

Arab Street and Haji Lane run parallel to each other, offering amazing textiles and ceramics, as well as fabulous street art…

On Big Boy’s recommendation, I had lunch at the legendary Zam Zam restaurant on North Bridge Road, where this enormous beef murtabak and teh tarik set me back a tiny $6.20…

Little India was less touristy than Arab Street, selling essential food supplies…

…and wonderful handicrafts like these dabu ink blocks. The streets were filled with sari shops, grocers, eateries and gold merchants…

. . . . .

The following day, my lovely new niece Rachel (we were in Singapore to attend her wedding to our nephew Nick), took me to the National Gallery of Singapore.

We had fun posing in front of Anish Kapoor’s mirror creation…

Tatsuo Miyajima’s Mega Death is always stunning, but it was particularly interesting to see it installed in a different space to the MCA

My favourite work of the day was Passages and Bridges (2018) by Filipino artist Mark Justiniani. It was structured as a perspex bridge that the viewer walked on, over a seemingly bottomless abyss filled with books and other memorabilia.

I loved it so much that Rach had to drag me away. The photos below were taken looking straight down as I walked over the bridge…

. . . . .

Sentosa Island in Singapore has one of the world’s largest aquariums! It can get very crowded, but if you pick your time carefully (go early), there’s a great deal to see and do.

If for no other reason, go to see the amazing Open Ocean habitat, which measures 36 metres wide by 8.3 metres tall. It’s hard to comprehend just how large that is, so I took these videos to show you. We’re talking full size manta rays and sharks…


. . . . .

Being in the tropics meant that fascinating wildlife was everywhere. We saw tortoises and monkeys and hornbills and sea eagles and colourful, noisy parrots. And peacocks, just wandering about…

While on Sentosa Island, we visited a butterfly park – Pete found it a bit underwhelming, but Small Man and I loved watching these Rice Paper Butterflies emerging and drying off their wings before their maiden flights…

The park also had scarlet macaws and tortoises…

And how often do you get to pat a green land iguana? (Yes, I really did pat him)

. . . . .

I have, of course, left the best for last. Food! Singaporeans seem to live for food! Coupled with the country’s diverse cultural and religious influences, the result is an astonishing array of cuisines at almost every price point.

Having said that…are you sitting down?

Singapore is reputed to have the best Japanese food outside of Japan. My sister and brother-in-law very kindly took us to Kuriya Dining for the finest sushi I’ve ever eaten…

Then this came out. And I tried it. It’s cod sperm. Raw cod sperm. Well, technically, the whole male reproductive tract.

It’s a rare delicacy and I was incredibly grateful for the opportunity to taste it…just once. And in case you’re curious, it has a texture similar to a raw oyster…

Then we had monkfish liver, which was actually very good…

The following day, we went to Outram Park Ya Hua Bak Kut Teh (which is no longer in Outram Park) to try their traditional pork rib soup. Proper, delicious hawker fare, eaten in an open air setting, served family style for sharing…

That evening, we went out for a feast!

Possibly the best thing I ate in Singapore (big call, I know) was the dry prawn noodle (har mee) served from a stall at the Zion Riverside Food Centre. It’s so good that it’s been awarded Michelin Bib Gourmand status. This is my niece Sweet Pea and her dad’s favourite – they always order the dry version, which comes with separate chilli noodles and large prawns in the most flavourful broth imaginable…

Finally (not really finally, as there was so much more to tell, but I’m exercising restraint), we ate some amazing Teochew food during our visit. My brother-in-law CC was appalled that I’d never been to a Teochew restaurant before (as it’s our native province), so he took us to one on our second night there.

Suckling pig is a regional specialty…

I can still remember my grandmother making ngoh hiang – minced pork and prawn wrapped in bean curd skin and deep fried…

That really is just a small sample of our two weeks of manic eating – we also had an amazing Peranakan meal, oodles of awesome street food and delicious home cooking, but I was too slow to take photos. It was hard to hold back the eaters long enough to frame a shot!

. . . . .

My niece Baby Girl has been completely obsessed with my fudge brownies for years now, so I taught her how to make them. And yep, she’s wearing one of my rescued denim aprons

She nailed the brownies on her first attempt!

. . . . .

This trip to Singapore was our first overseas holiday since the start of our waste reduction plan, and I was curious to see if we could stick to our goals while travelling.

It actually proved to be quite easy. As you can see from the photos above, the low cost of labour means that, in some areas, Singapore is much better at waste minimisation than we are – all the food courts and hawker centres serve their dishes on melamine crockery and provide non-disposable cutlery. Eaters bus their dirty plates to a central collection spot and stack them on either Halal and non-Halal racks.

In terms of shopping, we avoided the large malls and instead spent time exploring interesting and unique handicrafts. I picked up these hand painted teaspoons and pendant from a small Peranakan store on Bussorah Lane, and was so happy when owner Robert packaged everything in reused fruit wrap for me. The pendant is made from a fragment of an old Chinese vase…

As I mentioned in my previous post, I was thrilled to find these Iranian plates at 64 Arab Street. Hand beaten, hand painted copper, and very affordable…

I travelled to Singapore with my Keep Cup and cloth napkins, the latter making my sister laugh on several occasions.

She thought it was hilarious when I insisted that stall holders put items directly on to my napkin rather than into a takeaway box – after all, I planned to eat them straight away! I washed our napkins each night in our bathroom sink, and they were dry and ready to go the next morning. No ironing needed…

Lastly, I managed to attend all three weddings last year wearing as much eco-friendly fashion as possible. For Nick and Rachel’s, I wore my recycled sari jacket from Cash Palace Emporium, my Chinese vase pendant and the most gorgeous earrings, which I bought from Fold Formations at a Sydney market before I left.

Kirsty Gorman makes her jewellery entirely from reclaimed materials – even the hooks are recycled sterling silver. The fuschias were carefully crafted from rescued bathroom copper, anodized to create different hues and then trimmed, shaped and assembled. Best of all, they tinkle when I shake my head…

The earrings were labour intensive and therefore expensive, but I’ve worn them half a dozen times since I bought them in December. And I think it’s important that we support young artists who work so hard at being sustainable…

. . . . .

What a long post – if you’ve made it all the way to the end, thank you! It was a lovely, fun-filled holiday and a wonderful way to end 2018! ♥