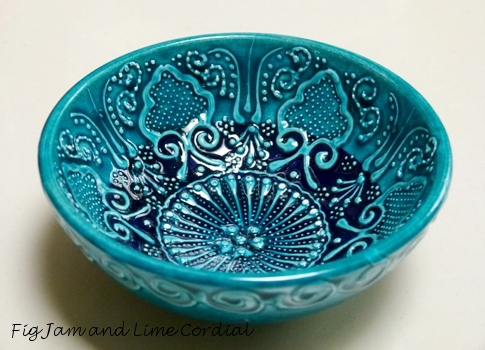
Feeds:
Posts
Comments

Posts Tagged ‘Ottolenghi’

In my kitchen…

…are magnificent Turkish ceramics, purchased from Metin at the Orange Grove Markets.  I’m a big fan of these intricately detailed pieces, and couldn’t resist these new offerings when I passed his stall last week…

Metin and his wife now have the store in Crows Nest full time, with a wide range of pieces on offer…
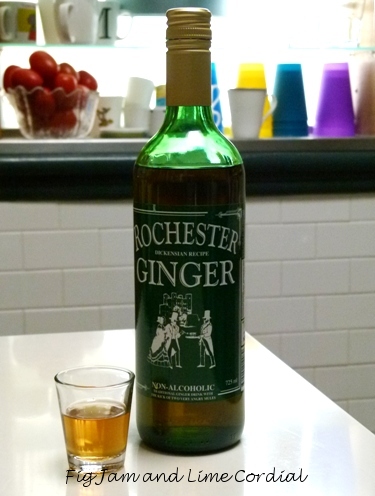
In my kitchen…

…is Pete’s favourite drink – Rochester Ginger.  This sweet brew is non-alcoholic, but carries a serious ginger hit, so it needs to either be sipped slowly, or diluted with soda or water.  Pete likes it neat, but I love it with hot water and honey.  The promotional blurb on the bottle describes it as having the “kick of two very angry mules”…

In my kitchen…

…is an Ottolenghi-inspired vegetarian paella, created for dinner with our lovely friend Craig, who came over to give us a yoga lesson…
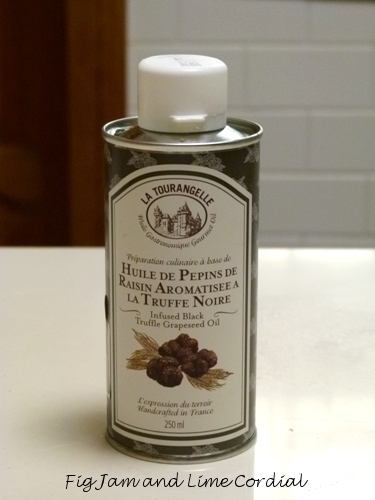
In my kitchen…

…is the strongest truffle oil I’ve ever tried!  Unlike versions made with extra virgin olive oil, this one uses grapeseed oil, a neutral base that doesn’t overpower the truffle aroma…

In my kitchen…

…is a Scanpan bread knife with holder. My homemade ciabatta can be challenging to slice with a dodgy knife, so I thought I’d buy a sharp serrated blade that I could take on my travels…

In my kitchen…

…is a collection of Miellerie Honey from Tasmania.  Gorgeous Roz from Taste Travel gifted me a jar of the Lake Pedder honey, and I’ve been hooked ever since…

This creamed honey is unheated, and has a texture which varies from a thick caramel (in the case of Lake Pedder) to firm toffee (Blue Gum).  My current favourite is the Prickly Box, but all the varieties are delicious and distinctly different from one another.  I bought mine online from Honey Tasmania

. . . . .

Tell me, what’s happening in your kitchen this month?

If you’d like to do an In My Kitchen post on your own blog, please feel free  to use this format, and to leave a comment here linking back to your post.  We’d all love to see what’s happening in your kitchen every month too!

Read Full Post »

It’s funny what motivates us sometimes.  I bought this tray of sardine fillets simply to avoid paying parking at the Sydney Fish Market (I needed to spend more than $50 to get free parking), and it sat in my freezer for a few weeks until I came across this lovely recipe in my Ottolenghi cookbook.

It’s a recipe with lots of ingredients, but most of the work is in the assembling – the actual cooking part is quite easy.  Sorry, no imperial measures this time – as the cookbook is a UK edition, all ingredients were provided in metric.

  • 100g medium bulgur (burghul) wheat (I used fine, leftover from my attempt at tabbouleh)
  • 30g currants
  • 30g slivered almonds, lightly toasted (original recipe used pistachio nuts)
  • grated zest of 1 lemon
  • 40ml lemon juice
  • 2 tablespoons chopped flat-leaf parsley
  • ½ teaspoon ground cinnamon
  • 1 teaspoon ground allspice
  • 3 tablespoons dried mint
  • 2 garlic cloves, crushed
  • 2 tablespoons pomegranate molasses
  • 1 teaspoon caster (superfine) sugar
  • 6 tablespoons olive oil
  • 8 fresh sardines, scaled, boned and butterflied (I used a tray of sardine fillets)
  • salt and black pepper
  • lemon wedges to serve

1. Soak the bulgur in a bowl of cold water for about 20 minutes, until soft.  Drain in a fine sieve and squeeze out any excess moisture.

2. In a separate bowl, soak the currants in a little warm water for five minutes, then drain.

3. Add the currants and almond slivers to the bulgur, along with the zest, juice and most of the chopped parsley, keeping back a little to garnish.  Mix in the crushed garlic, spices, mint, molasses, sugar and 5 tablespoons of oil, then season with salt and pepper to taste.  Try not to eat this with a spoon (which is what I found myself doing..)

4. In yet another bowl, mix the sardine fillets with 1 tablespoon of olive oil and season with salt and pepper.  Preheat the oven to 180C.

5. Stuff the sardines by lying them on a plate skin-down, and spooning a little of the stuffing mixture into the middle of each fish.  Roll the fillet around the stuffing and secure with a toothpick or cocktail skewer.

6.  Arrange the sardines on a baking tray lined with parchment and roast for 5 – 6 minutes, until just cooked through.  My sardine fillets were quite small, so I scattered all the excess stuffing around the rolls prior to baking in the oven.  Serve scattered with the remaining parsley and accompanied by the lemon wedges.

Click here for a printable version of this recipe

Read Full Post »

Everyone has their culinary bugbear – some can’t bake cakes, others struggle with pastry, and many are put off by tempering chocolate.  For us, it’s always been homemade pasta.  That’s not to say we haven’t thrown time and money at trying to get it right, but each attempt has turned out stodgy, floury and brittle.

So it was with some trepidation that we decided to try a recipe from Yotam Ottolenghi’s new cookbook, Plenty.   But oh, we were so delighted with the results!  The pasta was mixed in minutes in our large food processor, and passed easily through the rollers and cutters without the usual shredding and crumbling.

We began with four eggs from our girls, and gifts from friends – a small box of saffron from James and a knob of turmeric that Diana grew in her backyard.  The recipe specifies ground turmeric, but Di’s fresh version was too good to pass up.

The finished dough was a glorious golden yellow…

  • 440g pasta flour or 00 flour
  • 4 large free range eggs
  • 4 tablespoons (80ml) boiling water
  • 4 tablespoons (80ml) extra virgin olive oil
  • 2 scant teaspoons saffron threads
  • 1 teaspoon ground turmeric (we used grated fresh)

1. In a medium sized bowl, soak the saffron threads in the boiling water for ten minutes, then stir in the turmeric and olive oil.  Add the eggs and beat well to combine.

2. Place the flour in the large bowl of a heavy duty food processor and, with the motor running, gradually pour the egg and oil mixture through the chute.  Pulse the food processor until the ingredients are thoroughly mixed and start to come together.

3. Tip the dough and any loose flour onto a clean bench and knead briefly until smooth.  Wrap snuggly in a plastic bag, and then rest the dough in the fridge for at least 30 minutes, or up to one day.

4. Cut the rested dough into four pieces, keeping three covered as you work the first one. Shape the small ball into a long rectangle, then pass it through the rollers of a pasta machine, starting with the thickest setting.  Pass the sheet through, fold it, and pass it through again – repeating this process a few times to give the dough strength.

5. Once the pasta is elastic and doesn’t tear or crumble through the rollers, gradually reduce the  settings until it reaches the desired thickness.  Flour the thin sheet of pasta well, then either cut it into strips with a knife, or pass it through the cutting blades of the pasta machine.  Hang the noodles up while you process the remaining dough – we used a laundry rack, but I think tradition dictates a wooden dowel supported between two kitchen chairs!

This pasta cooks in mere minutes in salted boiling water, and we served it with slivered almonds, mint, parsley and the spiced butter and shallot sauce which accompanied the recipe in the cookbook.  Truly superb vegetarian fare!

PS. We’ve repeated this recipe without the turmeric and saffron and found it works perfectly well for “everyday” egg pasta.  The quantities given above make approximately 750g of pasta dough.

Click here for a printable version of this recipe

Read Full Post »

Yet another recipe from my wonderful Ottolenghi cookbook, and this one is an absolute winner.

If, like me, you’re a florentine fan, this is a very easy version which results in a crisp, delectable cookie.  I’ve modified the methodology just the tiniest bit, added a little Kirsch and omitted the orange zest – simply because I didn’t have any on hand.  I also measured everything in cups as I went along for my friends in the US.

  • 2 free-range egg whites
  • 100g (¾ cup)  icing sugar mixture (confectioner’s sugar)
  • 260g (3 cups) flaked almonds
  • splash of Kirsch (optional)
  • 70% dark chocolate, tempered (optional)

1. Preheat the oven to 150C (300F) with fan.  Line a couple of baking trays with parchment paper, then spray the paper with a little vegetable oil (I used canola oil).

2. Whisk the egg whites gently for about 30 seconds (just to break it up a bit, not to get it whipped up or aerated), then sift in the icing sugar mixture and  optional Kirsch and whisk gently to combine.  Now using a spatula, carefully stir in the flaked almonds until well coated.

3. Spoon small mounds of the mixture onto the prepared baking trays – you want to end up with about 20 in total.   Leave room between each mound.  Now, with a wet fork and a wet hand, gently flatten out each mound as thinly as possible without too many gaps between the almond flakes (or they’ll fall apart).

4. Bake until the florentines are golden brown – the original instructions recommend 12 minutes, but my three batches took 15, 18 and 14 minutes respectively.  All I can suggest is that you keep a close eye on them after the 12 minute mark, as the cooking time will depend greatly on how flat you’ve managed to get the mixture before baking.  What you want to achieve is a well cooked bottom, so once the tops appear done, take the trays out and carefully spatula one over to check.  It should look like the photo below, without any soft bits on the base.

5. The florentines will harden as they cool on the trays, after which time they can be removed to finish cooling on a wire rack.  If you find that some of the bases are still a little undercooked when you start removing them from the parchment, turn those particular florentines upside down and put them back on the trays, and bake for a few more minutes in the oven (I like these really crisp!).

6. The florentines can be left plain, or they can be coated with tempered chocolate.  I spread it over the bottom of each cookie, and then place them chocolate side down onto a sheet of parchment to set.

Click here for a printable version of this recipe

Read Full Post »

Kosheri

When Lisa gave me the Ottolenghi cookbook a few months ago, I had no idea that I’d end up quite this smitten with it!

It has a huge range of interesting recipes, including this one for kosheri – Egyptian lentils and rice.  I modified the recipe slightly to finish the cooking process in the microwave, but only because I needed space on the cooktop for other dishes.

  • 300g green or brown lentils
  • 200g basmati rice
  • 40g unsalted butter
  • 50g fine vermicelli or egg noodles, broken into 4 cm pieces
  • 400 – 500ml water*
  • ½ teaspoon grated nutmeg
  • 1½ teaspoons ground cinnamon
  • 1½ teaspoons salt
  • several grinds of black pepper
  • 4 tablespoons olive oil
  • 2 large onions, thinly sliced

* The original recipe specifies 400ml water, but I found that I needed 500ml to cook my Basmati rice (apparently it varies enormously from region to region).  Check your rice halfway through the cooking process, and if it looks like the liquid has been completely absorbed, add a little more.

1. Pick over the lentils well, removing any debris, then wash in a sieve under cold running water.  Place in a large saucepan and cover with lots of cold water and bring to a boil.  Reduce heat and simmer until the lentils are tender but not mushy (about 20 minutes).  Alternatively, you could use drained and rinsed tinned lentils.

2. Rinse the rice well in a sieve under running water and leave to drain.  In a large saucepan, melt the butter over medium heat and then add the uncooked vermicelli and fry until it turns golden brown. Add the drained rice and stir well to coat with the butter.

Original instructions at this point are to then add the water, nutmeg, cinnamon, salt and pepper to the pan.   Bring to the boil, cover and then reduce the heat to a minimum and simmer for 12 minutes.  Turn off the heat, remove the lid and cover the pan with a clean teatowel before replacing the lid and allowing the rice to sit for a further five minutes. 

What I did was transfer the fried rice and vermicelli to a microwave-proof container, added the water and spices and cooked the rice in my microwave for 5 minutes on high, and then 16 minutes on medium (timing will vary depending on your microwave).

Alternatively, I think that you should be able to put everything into an electric rice cooker, adjusting the amount of liquid if necessary and cooking the rice in there.

3. While the rice is cooking, heat the olive oil in a large frying pan and sauté the onions over a medium heat until they turn a dark brown.  Drain them on a kitchen towel.

4. Once the rice is cooked, stir in the lentils and most of the onions, reserving a few for decoration.  Adjust for seasoning if required.

This dish is traditionally served with a spicy tomato sauce, but we had it with a chermoula chicken tagine!

Click here for a printable version of this recipe

. . . . .

Addendum: I started writing this post a couple of weeks ago, and since then I’ve made this dish again.  Second time around I cooked it on the stove as instructed, using egg noodles and two x 400g tins of lentils (rinsed and well drained).  I needed at least 500ml water, and figured out that the most important part of the dish is the fried onions – don’t skimp on them!

Read Full Post »

Older Posts »

%d bloggers like this: