Feeds:
Posts
Comments

Archive for November, 2013

One of the skills that even experienced bread bakers can find daunting is slashing – the process of making sharp cuts in the risen dough to control and direct its oven spring. By contrast, it’s easy to make attractive and impressive loaves by cutting the dough with scissors.

The epi in the top photo are a doddle to make, and cover up a multitude of shaping flaws which might otherwise show up in a straight baguette (instructions are here). The dough can also be snipped through and rejoined into star shapes, as we showed in an earlier tutorial

Dragon tail baguettes are always stunning, and their appearance belies how simple they are to shape…

Balls of dough can easily be transformed into hearts with a single scissor cut…

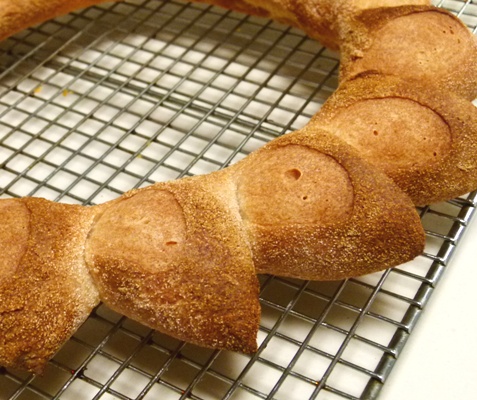
And last weekend, I made these experimental sourdough wreaths…

  • 300g ripe sourdough starter (see here for more information)
  • 500g bakers/bread flour
  • 250g remilled semolina flour*
  • 250g 00 flour
  • 565g water
  • 18g fine sea salt
  • fine semolina for dusting the bench

Note: if you can’t find the remilled semolina flour (it’s usually imported from Italy – look for packets marked Semola Rimacinata di Grano Duro), then substitute more 00 flour or bakers flour and reduce the water to 550g.

1. Combine all the ingredients to form a shaggy dough, then cover and allow to rest for 30 minutes. After this time, uncover the dough and give it a short knead in the bowl. Cover again, and allow to prove until doubled in size.  Please refer to our Basic Sourdough Tutorial for more detailed information.

2. Dust the bench with fine semolina, and shape 350 – 400g portions of the risen dough into long sausages…

3. Shape each into a ring, and sit it on a parchment lined tray. Cover and allow to prove a second time. Preheat oven to 240C with fan.

4. Once the dough has had a second prove, dust your hands with fine semolina and widen the ring by lifting and stretching very gently…

5. With kitchen scissors, snip the dough into leaf shapes, taking care not to cut all the way through the dough. Gently rotate each cut section outwards…

6. Spritz the top of the loaves with a little water, then place the tray in the oven, reducing the temperature to 220C with fan. Bake for 15 minutes (keep an eye on them, as they can brown up very quickly), then rotate the tray and further reduce the oven temperature to 175C with fan. Bake for another 15 – 20 minutes or until well browned.

The finished wreath is deliciously crusty, and perfect for breaking apart and sharing…

I always have enormous fun making scissor cut breads, and I hope you will too. Please let us know if you come up with any clever new designs!

Read Full Post »

A Quick Garden Tour

I wish I had prettier garden photos to share with you!

Unfortunately, the combination of nutty weather and sore joints (I’ve given myself tennis elbow from rowing) means that the backyard has been sorely neglected for several months now. Three of our beds are currently unplanted.

But, it’s never anything to stress over, having an established garden means there’s always something to eat, even if it’s self-sown. Basil has started popping up in the back bed, and is already looking wonderful…

One thing we did plant a while back was beans…these growing near the back fence aren’t producing yet, but they are growing well…

The Blue Lake beans growing on the side fence are self-sown, which means they had a head start on the others. We’re found that letting things go to seed means there’s always something to eat in the garden, even when we’re behind schedule – nature knows better than we do when conditions are right for seeds to germinate!

The Blue Lakes have kept us in daily beans for weeks now…

We’ve had difficulty raising seedlings this year – possibly because of the bizarre weather (35C days followed by 12C days) – and we haven’t had any successful tromboncino seedlings yet. A couple of cucumber seedlings did germinate though, so they’re planted in the self-watering pot next to the driveway…

Our perennial leeks are going crazy making babies – we would have enough to fill an entire bed with leeks if we wanted. I need to go outside with a long stick and plant a whole stack of them…

Our lemon tree is now making more fruit that we can use…

Broccoli rabé has self-sown all over the garden, and it’s absolutely delicious – we’ve already had a couple of pasta dinners from it…

Red amaranth is a newbie in our garden, the seeds germinated easily and we planted them out as small seedlings…

Our sage has survived winter and the chook rotation (they didn’t eat it), and is now flowering…

A mystery squash is growing in the back – we’re going to let it ramble into the adjacent vacant bed. We don’t think it’s a trombie, but we can’t be sure…

Linda’s lovely yellow cherry tomatoes have been joyously prolific and relatively pest-free so far. Predator numbers have increased substantially in our garden, with the paper wasps making short work of the white moth grubs…

In other news, sadly we’re now down to six chickens, with Harriet and Francesca dying within a week of each other. Both of them were chasing their food one day, and then a couple of days later, lay down on the ground and died. Frannie was my favourite, so I was particularly sad to see her go.

The last remaining chook from our initial flock is Rosemary, and we think she’s on her last legs as well – she’s looking extremely old and tired these days. On a more positive note, the new girls all seem to be fine, and we’re getting between one and three eggs a day. Recently, one of them laid our first ever double-yolker…

And finally, our pond frog seems to be doing very well! We still haven’t seen him, but we know from his call that he’s male and we think he’s a Brown-Striped Frog. He has a “tock tock” call, which sounds like a stick being beaten slowly and rhythmically on a hollow log, like this. Does anyone know more about this particular species?

Read Full Post »

Baby Barramundi

This is one of those recipes which caught us by surprise.

We don’t normally eat barramundi, but they were so fresh when we were last at the fishmongers that we couldn’t resist buying them. Not having cooked this fish before, we had no idea where to start.

Google turned up this recipe at Taste.com, and it was absolutely brilliant. So despite the dodgy photo, we decided that this definitely warranted a blogpost – to ensure that we could find it again, if nothing else!

We used two small baby barramundi (about half a kilo each) and began by slashing both sides of the cleaned fishes, then drizzling them with a little oil and scattering over a couple of tablespoons of sesame seeds and a little sea salt (not too much, as the soy dressing was quite salty). The fish were placed in a well oiled pan and baked in a preheated 200C (180C with fan) oven for 25 minutes, until the flesh flaked away easily from the bone (it’s easy to check at the slashes).

While the fish was roasting, we prepared the sauce, using:

  • 2 tablespoons light vegetable oil
  • a 4cm chunk of ginger, peeled and julienned
  • 2 cloves of garlic, sliced
  • 2 red chillies, deseeded and sliced
  • ½ cup soy sauce
  • 1 tablespoon rice wine vinegar (we used Japanese grain vinegar)
  • ½ tablespoon sesame oil

In a small saucepan, we heated the oil, then added the ginger, garlic and chillies, allowing them to cook for a couple of minutes until softened. The soy, vinegar and sesame oil was then added and warmed through.

Once out of the oven, the sauce was spooned over the hot fish. We served this with steamed rice and the boys were very taken with it – Small Man ate an entire baby barra on his own. Definitely a dish we’ll make again!

Read Full Post »

Muesli Bar Cookies

I wasn’t going to blog about these cookies, but Pete suggested that since he and Big Boy really liked them, perhaps some of you might as well.

You might recall them from our slice and bake post – I was attempting to make a good dunking biscuit, but instead ended up with these crumbly, not overly sweet cookies. I tried combining Jacques Pepin’s oatmeal cookies with an Alice Medrich recipe, and then added a layer of dark Sao Thomé (70% cacao) origin chocolate for reinforcement.  The end result was, in Pete’s words, “a classy muesli bar”.

  • 250g (1 cup) unsalted butter, chopped
  • 110g (½ cup) sugar
  • 2 teaspoons baking powder
  • pinch of salt
  • 200g (1 and 1/3 cups) plain (AP) flour
  • 150g (5oz) quick oats
  • 90g (3oz) currants
  • 30g (1oz) cacao nibs
  • 100g (3½oz) roasted blanched hazelnuts, chopped
  • 1 teaspoon vanilla extract (I used homemade)

1. In the large bowl of the food processor, blitz together the flour, baking powder, sugar and salt. Add the butter and pulse until the mixture starts to come together in a ball.

2. Tip the dough into a large mixing bowl and add the oats, currants, nibs, vanilla and hazelnuts.  With clean hands, knead all the ingredients into the dough until well combined.

3. Shape the dough into two logs and wrap in parchment. Chill in the fridge overnight. (The resting time allows the flavours to infuse.)

4. The following day, preheat the oven to 175C (350F) with fan. Line baking trays with parchment. With a strong thin knife, slice the dough into 1cm/½” thick discs. Place on baking tray, allowing room to spread (more room than I’ve allowed below, I just moved the pieces together for the photo)…

5. Bake for approximately 20 minutes until golden brown, rotating the tray(s) halfway through the baking time. Allow to rest on trays for a few minutes before transferring to a wire rack to cool – the cookies will be crumbly, so you’ll need to move them carefully…

6. Optional: temper a little dark chocolate and coat one side of each cookie (there’s a tutorial here). This isn’t necessary, but it helps to keep the crumbliness in check a little, and adds an extra layer of flavour.

Pete thought I should point out that these are quite a “grown up” treat. They don’t have a lot of added sugar, and the cacao nibs and dark chocolate add a hint of bitterness which little people are unlikely to find appealing. As a muesli fan, Pete likes these a lot, and he finds them very satisfying without being overly heavy. If you’re a fan of a less sweet (but not necessarily savoury) cookie, then you might like these too!

Read Full Post »

Jimmy’s Saté Sauce

When we were in our mid-20s, Pete and I discovered Jimmy’s Saté Sauce.

In the beginning, we used it straight out of the jar as a stir-fry sauce. Then one day, a friend mentioned that a chef had told him that it was widely used in the restaurant trade, but only ever in combination with other ingredients.

These days, we mix Jimmy’s with a little sesame oil, some dark sweet soy, lime juice and peanut butter. Coconut milk and a little brown sugar round off the flavours.

Our stir-fry satay sauce recipe is:

  • 60g Jimmy’s Saté Sauce
  • 50g smooth peanut butter
  • 60g coconut milk (or to taste)
  • ¼ teaspoon sesame oil
  • 10g dark sweet soy
  • 15g lime juice
  • 10g brown sugar

Whisk all the ingredients together until combined and then taste and adjust as needed.

For tonight’s dinner, we used:

  • 400g grassfed eye fillet, thinly sliced
  • 1 large capsicum, seeded and cut into strips
  • 1 large onion, sliced
  • 2 cloves garlic, crushed and minced
  • 1 sprig of curry leaves, stripped off the stem
  • 1 stalk of lemongrass, smashed
  • I tiny sweetheart cabbage (or a small wedge of a larger cabbage), sliced

In a heavy based wok, heat a little vegetable oil and toss in the curry leaves, stirring until they start to pop. Add in the onion, capsicum strips and garlic, and stir until the onions are translucent and soft. Add the cabbage and stir fry until softened, then add the lemongrass stalk. Stir well, add in the beef, and stir until it just loses its pinkness, then add the  satay sauce and stir to combine. Simmer briefly until the vegetables and meat are cooked through.  Serve with steamed rice.

This dish is easily adapted to whatever ingredients are on hand. We sometimes add sliced eggplant, beans or carrots, and occasionally substitute pork or chicken for the beef.  And since we’ve now been making one version or another of this recipe for over twenty years, it’s clearly stood the test of time!

Read Full Post »

« Newer Posts - Older Posts »