Feeds:
Posts
Comments

Archive for the ‘Recipes’ Category

Bits and Pieces

A few bits and pieces from the past couple of weeks!

. . . . .

Pete and I were thrilled to attend the wedding of our friends Belinda Jane (BJ) and Matt in Victoria Park yesterday. Beej wept for joy as she was walked down the aisle by both her parents…

The bride wore a short vintage lace dress and blue Converse shoes which let her dance the night away. Instead of a bridesmaid and a best man, they had a bride-dog and a best-dog (both of whom served as ring bearers) and their wedding vows were taken from Rick Astley’s Never Gonna Give You Up

A loud and glorious celebration followed at the Vanguard in Newtown. It was honestly the best night we’ve had in ages…

The two happiest people on the planet last night…

. . . . .

We’ve also been busy cooking this month…

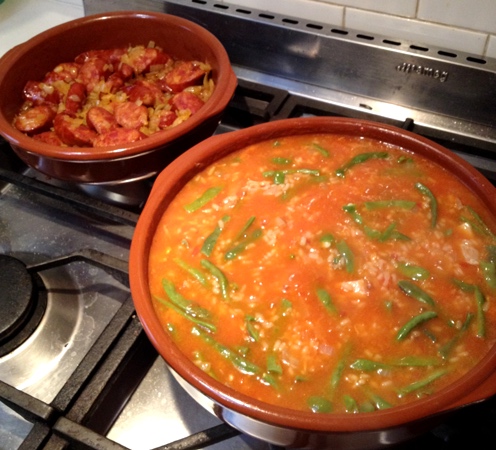
At least once a fortnight, we eat a Spanish-inspired Chica-inspired meal. The last one was Arroz Caldoso (soupy paella) with homemade confit pork and garden beans, accompanied by chorizo and onions. The boys are loving this style of food, and I’m loving being able to put all the dishes straight into the dishwasher after dinner…

. . . . .

I uncovered a baby Christmas pudding in the fridge (as one does in March) and decided to turn it into truffles…

I blitzed together half the pudding, slices of candied orange and a good splosh of Cointreau, then mixed it all with melted dark chocolate. The filling was shaped into balls, then left to harden in the fridge before dipping in tempered chocolate. They turned out well!

. . . . .

For our Chinese New Year dinner with my folks, I made Kylie Kwong’s soy sauce eggs. The recipe can be found here, and they’re very easy to make. I began by steaming the eggs in our Aldi machine

Here’s a tip – if you steam eggs rather than boil them, they’re massively easier to peel neatly…

The eggs in their soy sauce bath…

I loved these – I think I ate half of them on my own at dinner…

. . . . .

This container of fat from a roasted Burrawong Gaian duck had been sitting in my freezer for some time…

Taking inspiration from Nagi’s Crack Bread and a comment that Chica Tanya made a while back (about burly Spaniards eating lard and pimenton on toast for breakfast), I combined 50g of the duck fat, half a teaspoon of smoked paprika and a couple of pinches of sea salt, then spread it through a criss-cross sliced ciabatta loaf. After baking in a 180C oven for about 15 minutes, it was ready for eating…

Pete attempted to eat most of the loaf on his own (Big Boy helped) – it was a very nice change from garlic bread…

. . . . .

We’re having a fabulous month – hope you are too!

Read Full Post »

Burghul Flower Loaf

Last week, we had a minor mishap in the back fridge – a ziploc bag filled with glacé cherries leaked, oozing sticky bright red sugar syrup all over the top shelf.

On cleaning up, I found a bag of coarse burghul (also known as bulgur wheat). It needed a new container, but the entire kilo didn’t quite fit in the box, so I thought I’d add the excess to a batch of sourdough. I always like to soak grains before adding them to bread – I find it allows the flavour of the grains to permeate the dough, and also reduces the chances of cracking a filling on a hard kernel. In the case of the coarse burghul though, I knew from prior experience that the grains would need boiling to soften them.

I was inspired by Laila’s recent post to shape the dough into flower loaves. They’re great fun to make and in some ways resemble Anne’s huffers. Big Boy and I broke off a petal each for lunch, filling them with ham, cheese, mustard and pickles.

I reduced the liquid in my dough to allow for the water absorbed by the burghul. The slightly lower hydration dough is also easier to shape.

  • 300g active, bubbly starter (fed at a ratio of one cup water to one cup flour)
  • 550g water
  • 1kg bakers flour
  • 100g coarse burghul
  • 18g fine sea salt

1. Put the burghul into a small saucepan and cover with water. Bring to a boil and simmer for about five minutes until al dente. Pour the grains into a sieve and cool under cold running water. Drain well.

2. In a large mixing bowl, mix together the starter, water and drained cooked burghul. Add the flour and salt and mix well with a clean hand, squelching everything together until the flour is completely incorporated. Scrape off your hand, cover and allow to rest for half an hour.

3. Uncover the bowl and give the dough a quick knead. Cover again and allow to rest until well risen – anything from 6 – 12 hours, depending on weather.

4. Dust a bench with flour and turn out the risen dough. Fold it onto itself a couple of times, then divide into two. Shape each half into a round ball.

5. Place a ball of dough onto a sheet of parchment. Flatten it out into a wide circle, then make five cuts nearly to the centre as shown in the photo below. Stretch each petal out slightly to create gaps between them. Repeat with the other ball of dough. Cover with a tea towel and allow to prove. Preheat oven to 240C with fan and position pizza stones on the rack(s).

6. Once the dough has puffed up, spritz the loaves with water and slide them, still on their parchment sheets, onto the pizza stones. Reduce the oven temperature to 220C with fan and bake for 20 minutes.

7. At the 20 minute mark, carefully remove the parchment sheets, rotating the loaves if necessary. Reduce the heat to 175C with fan and bake for a further 20 – 30 minutes, until the loaves are well browned and sound hollow when tapped. Allow to cool on a wire rack.

Even though it was precooked, the burghul didn’t turn into mush in the finished bread. The crumb was elastic and chewy, with a delicious, slightly nutty flavour…

These funky 70s flower power loaves were great fun to make. The shape could be easily adapted – a four leaf clover for St Patrick’s Day perhaps? Both yeasted and sourdoughs would work – just be sure to use a lower hydration formula to make the shaping process easier.

Thanks for the inspiration, Laila!

Read Full Post »

Truffle Brownies

Don’t these brownies look fantastic?

They’re different to the ones I usually bake, but they are just so pretty. My personal preference is for a fudgy brownie rather than a cakey one – these are halfway between, with a texture reminiscent of a fallen souffle cake or devil’s food cake.

The recipe comes from Fran Bigelow’s Pure Chocolate, and it’s the very first one in her book. Amazon tells me that I’ve had this book for ten years in April, and it’s probably been nearly that long since I last made these brownies. These days I have access to unsweetened chocolate, but back then I used 70% dark – the result was a tiny bit sweeter but otherwise completely fine. I’ve also added a pinch of salt this time, which I found deepened the flavour even further.

  • 240g bittersweet chocolate (70% dark)
  • 60g unsweetened chocolate (I used Callebaut Cocoa Mass, but substitute more 70% if you don’t have any)
  • 250g unsalted butter, room temperature
  • 210g dark brown sugar
  • 110g white sugar
  • 6 large free range eggs, room temperature
  • 2 teaspoons vanilla extract (I used homemade)
  • 150g plain (AP) flour, sifted
  • pinch fine sea salt
  • dutched cocoa, for dusting

1. Preheat the oven to 160C or 150C with fan. Line a baking tray (23cm x 33cm or 9″ x 13″) with parchment. I used my small Nordic Ware quarter sheet pan

2. Melt both the chocolates in a heat-proof bowl, either in the microwave (on high in 30 second bursts, stirring in between) or over a saucepan of simmering water. Stir until smooth and set aside to cool.

3. In  a stand mixer, beat together the butter, brown sugar and white sugar until light and fluffy. This might take a few minutes. Add the eggs, one at a time, beating well after each addition. Stop periodically and scrape down the sides of the bowl as required. Add the vanilla and beat for a few more minutes.

4. Scrape in the cooled chocolate and beat until smooth. Finally, add the sifted flour and gently fold it in with a silicone spatula or wooden spoon until all the flour has been incorporated. Be careful not to overwork the batter.

5. Pour and scrape the batter into the prepared tray and bake for about 30 minutes until the top sets and is firm to the touch.

6. Allow to cool in the tray, then lift out (using the parchment paper) onto a cutting board. Dust with cocoa, then cut into 24 large squares.

Once cool, the brownie slab slices beautifully into even, sharp-edged pieces. Fran Bigelow describes them as a cross between a brownie and a truffle (hence the name), but I find them a bit more cakey than that. They’re dark and richly flavoured, with a textbook flaky top…

These brownies made a lovely change to the ones I usually bake. Apart from tasting delicious, they make a most attractive gift – I’ll be including them on our chocolate birthday platters from now on!

Read Full Post »

I’m always happier when I have one of Beth’s chickens in my kitchen.

They were out of stock for a while over Christmas, so when I saw them at Dulwich Hill Gourmet Meats last week, I bought both a duck and a chook…

It was perfect timing too, because my clever friend Selma had given me a brilliant suggestion for using up our crunchy bread croutons. I make these whenever I have leftover sourdough – the bread is torn or sliced, then baked in a 100C oven for 3 hours until bone dry. Small Man loves them and eats them like crisps…

Beth’s bird was only 1.34kg, but it was full of flavour. We had a few chicken chorizos leftover from the previous night, so I squeezed a couple out of their casings and made a cornbread, chorizo and cranberry stuffing.

I drizzled a little olive oil over the dried croutons and scattered them, with the remaining chorizos, over the base of my large Emile Henry tagine. The chook was rubbed with oil, salt and pepper, stuffed, then perched breast-down on top of the bread…

The lid when on the tagine, and the pot went into a 175C fan-forced oven…

I removed the lid at the one hour mark and gave the chook another half an hour’s roasting time until it was golden brown. I use my mother’s trick and check by inserting a chopstick into the thickest part of the thigh – if the juices run clear and free of blood, then the bird is done…

The croutons baked into super crispy, flavoursome bites which were so satisfying that no-one commented on the absence of any potatoes with their roast.

I tried to take a photo, but couldn’t hold back the wolves long enough to get the prettier pieces, so please excuse the odd plating arrangement below…

The meat was tender and succulent – I was concerned it might be overcooked, but I think the tagine protected it for most of the roasting time. And even though it was only a small bird, it was more than enough to feed all four of us.

My ever observant husband commented that the meat on a Burrawong Gaian chicken is very good, but where he notices a marked difference is in the quality of the fat. Because all the fat became part of the meal, the end result was very satiating, and we really didn’t need any more to eat.

That’s possibly because Beth’s chickens are pasture raised. We can’t afford to buy them all the time, but I’m acutely aware of the vast difference between “free range” (which can often mean a large number of birds in a barn with access to the outdoors) and “pasture raised” (where the birds roam in small flocks out in the fields).

Thanks Beth – having a Burrawong Gaian chicken on our dining table is a special treat. We greatly appreciate the care you and the Boss put into every bird!

Read Full Post »

Savoury Brunch Slice

Are you a fan of the Eurovision Song Contest?

I’m not (yet), but I am a huge fan of Jason from Don’t Boil the Sauce! When J announced his Chow Down to Eurovision Brunch Contest, I thought it might be fun to contribute an entry.

I’ll let him tell you about it in his own, inimitable style…

. . . . .

My contribution is this savoury brunch slice.

Many years ago, I met an older woman at a party who plonked a dish very similar to this one onto the buffet table. She then announced (loudly) that it was called a “wifesaver” because “everything is cooked at the same time to save the little woman from all the hard work of making breakfast”.

Despite the revoltingly sexist overtones, it was delicious.

I’ve made several versions over the years, but this one has a particularly Aussie feel – it uses Margaret River cheddar, backyard eggs and free ham offcuts from my friend Johnny. I reciprocated by delivering an entire slice to him – is there anything more Australian than sharing food with your mates?

I’ve layered the dish with homegrown basil and marinated feta – a nod to the Italian and Greek influences on modern Australian cuisine…

If you’re wondering about the props in photos above and below – Jason stipulates that each dish has to be photographed in the style of Eurovision. As I had no idea what that meant, I improvised with all the 80s bling I could find…

  • one small loaf sourdough bread, or half a large one (about 400g total, once crusts have been removed)
  • 200g ham, preferably off the bone, sliced and then cut into pieces
  • 100g Australian cheddar, grated
  • 100g marinated feta, crumbled
  • basil leaves
  • 375ml (1½ cups) full cream milk
  • 125ml (½ cup) cream
  • 5 free range eggs
  • ½ teaspoon smoked paprika

1. Remove the crust from the sourdough and cut it into 1cm slices. Cut any large slices in half…

2. Oil the base of a baking dish and layer in the bread, followed by half the ham, half the cheddar, a little of the feta and a few basil leaves…

dbts3

3. Add another layer of bread, ham, feta and basil, then top with the rest of the bread and the remaining cheddar…

4. In a large bowl, whisk together the eggs, milk and paprika…

5. Carefully ladle the eggy milk over the dry ingredients. Cover the top with a piece of clingfilm, then press down to make sure the liquid soaks into the bread. Pop into the fridge for at least two hours, but preferably overnight…

6. Remove the dish from the fridge at least half an hour before baking to allow the ingredients to come to room temperature. Pour over half a cup of cream and allow to sit while the oven preheats to 175C with fan…

7. Bake for 45-50 minutes until deep golden brown. Check occasionally to make sure it’s cooking evenly and rotate as required. It’s worth placing a tray on the rack below to catch any drips. Remove from the oven and allow to rest for at least half an hour before serving…

Big Boy was starving, so we cut into this one a bit early…

Serve warm or at room temperature. It becomes easier to slice as it cools…

This is an extremely versatile recipe – apart from the eggs and milk, almost every other ingredient can be substituted for something else. It would work well with brioche instead of sourdough, you could use just about any sort of cheese you might have in the fridge, and grilled veg could be substituted for the ham, if a vegetarian option was desired. Best of all, it can be assembled in advance, making it perfect party food.

. . . . .

Do you have a brunch dish for Jason’s Eurovision Chow Down? If so, please join in the fun! And fear not, J’s assured me that no-one will be made to sing.

For more information, head over to Don’t Boil The Sauce!

Read Full Post »

« Newer Posts - Older Posts »