Feeds:
Posts
Comments

Archive for the ‘Recipes’ Category

On Easter Sunday, my folks came over for dinner and I roasted two small lamb shoulders in the Römertopf bakers.

Seasoned following these Jamie Oliver instructions, the lamb was a huge hit – so much so that it was almost all eaten before I remembered to take a photo. There were only a few pieces of roasted butternut/trombie pumpkin (homegrown) and a little of the lamb meat left…

I thought the leftover pumpkin might make a nice substitute for potatoes in our stottie cakes (the original version is a Dan Lepard recipe from The Handmade Loaf)…

  • 500g bakers/bread flour
  • 180g peeled roasted pumpkin/squash, mashed (original recipe uses 300g of mashed potato, but this was all I had leftover from dinner)
  • leftover garlic and herbs from the roast
  • 10g dry yeast
  • 10g fine sea salt
  • 300g water

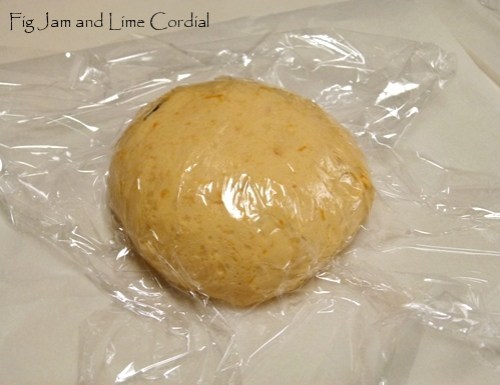
This is quite a sticky dough – you might need to add a bit more flour if it’s too hard to handle. Start by squelching all the ingredients together to form a dough – I included a couple of cloves of peeled roasted garlic and bits of oregano and rosemary leftover from our Easter dinner.

Scrape off your hands and place the dough in a large mixing bowl. Cover and allow to prove for about an hour until roughly doubled in size. Then flour your bench and turn the risen dough out. Use a scraper if necessary (if the dough is too sticky) and fold the dough onto itself a few times. Divide the dough into four pieces.

Shape each piece into a ball and place it on a sheet of parchment. Lightly spray a piece of clingfilm with oil and fit it snugly around the dough ball. Allow to prove for a further 30 – 40 minutes. Preheat the oven to 240C with fan and position pizza stones in place if you’re using them.

Once the dough has risen…

…flatten it out under the clingfilm with your fingers…

Peel off the clingfilm and dust the top of each circle of dough with flour…

Turn the oven down to 220C with fan and bake each round, either on a pizza stone or on an oven tray. After a few minutes the dough will start to puff up – carefully open the oven and remove the parchment paper if you can. Flip the dough over (I use my welding gloves) and allow it to brown on the other side. Repeat again and bake until the stotties are golden…

I served these for lunch topped with homemade hommus and the leftover roast lamb…

The boys loved these, even Small Man who’s not normally a fan of pumpkin. And I loved the fact that none of our Easter leftovers went to waste!

Read Full Post »

If you’ve been reading our blog for a while, you might have twigged to the fact that I only use a few different dough recipes. These form the basis of most of our breads, and can be tweaked with different flavours and shapes to produce enough variety to ensure that my family never get bored with them.

Our basic sweet dough recipe started off as the one from Richard Bertinet’s fabulous beginner’s book Dough. Over time, we’ve changed it up a bit – we now use dried yeast, less salt and UHT (long life) milk. I initially blogged it as a Pain Viennois recipe, but it’s been used so many times and in so many forms since then that I think it warrants another tutorial.

This morning, I turned the dough into three faux brioche loaves. They’re extremely popular, particularly with the little folks in our neighbourhood. One of the loaves went straight out the door to Baby M, and the wolves will eat the other two for lunch. Pete thinks this is perfect toddler food – it’s rich in milk and eggs and carbs – and unlike proper brioche, it only takes a couple of hours from start to finish!

These days I always make a large batch (double the original recipe), and it still never seems to be enough. Here’s the sized up ingredients list…

  • 1kg bread/bakers flour
  • 20g dried/instant yeast
  • 14g fine sea salt
  • 80g caster (superfine) sugar
  • 120g unsalted butter
  • 4 large (59g) eggs
  • 500g full cream milk, at blood temperature, or UHT milk, unrefrigerated

Note: UHT milk has a long shelf life and is purchased in cartons from the supermarket shelf.

1. Whisk together the dried yeast and bread flour in a large, wide mixing bowl.  Add the salt and sugar and whisk in well.

2. Add the unsalted butter, cut into small cubes, then rub the butter into the flour mixture until well crumbled.

140609 006

3. Add the eggs and milk, then mix together with a spatula or a clean hand until it forms a shaggy dough.  Cover with a tea towel and allow to rest for 20 minutes.

140609 009

4. Uncover the bowl and give the dough a brief knead. I usually fold the dough onto itself a few times using a scraper.

5. Cover the bowl with clingfilm and allow to rise until doubled in size (about an hour in our mild climate).

6. Turn the dough onto a lightly floured surface and using your dough scraper, give it a couple of gentle folds. It’s now ready for whatever your imagination has in mind for it. I turned this batch into faux brioche by dividing it into three and then placing the shaped loaves into lined (and greased) tins to prove.

One loaf was made with three large balls of dough, another with seven smaller ones. The final loaf was plaited. The dough was covered and allowed to rise again as the oven preheated to 200C with fan (about half an hour).

Once risen, the loaves were brushed with egg wash…

…and baked until dark brown (20 – 25 minutes)…

Our backyard eggs produce a golden, tender crumb…

. . . . .

Here are some of the other recipes we’ve used this dough for over the years…

Jam Doughnuts – one of the most popular posts on our blog…

. . . . .

Bacon Slices – the dough is equally versatile for both sweet and savoury…

. . . . .

Hot Cross Buns – with just a few additions, these are a perfectly simple Easter treat…

HXB2

. . . . .

Pain Viennois – one of the first recipe we blogged using this dough…

. . . . .

Blackberry Crown, also known as Monkey Bread…

. . . . .

Dinner Rolls, inspired by Pamela at Spoon Feast

. . . . .

Hearts and Scrolls, for Hallmark Day…

. . . . .

I hope you’ll give this simple and incredibly versatile recipe a go. I can’t wait to see what you make with it!

Read Full Post »

Josey Baker Pocketbreads

Hope you’ve all had a wonderful Easter! We’ve had a lovely break, and I’ve spent most of it baking, so there is a string of bread posts to follow!

. . . . .

I’ve realised that the main reason I buy cookbooks these days is not for the recipes.

After all, I have a stack of cookbooks with more recipes in them than I could ever make. Instead, I now buy them – usually in ebook format – because I like the author, and want to support what they’re doing. It’s the fifty year old’s equivalent of buying a band t-shirt and an album at a live gig.

That was the case with this book by Josey Baker, whose surname actually is Baker, and who started his mad bread baking journey only a few years ago. If I lived in San Francisco, I’d drive over and buy a loaf from his bakery, but as I don’t, picking up his ebook from Amazon for $10 feels like the next best thing.

I first came across his video on Jarkko’s Bread Magazine website. Grab a cup of tea and enjoy…

. . . . .

. . . . .

Josey’s book is chatty and full of photos. It’s written as a series of lessons – starting from a basic yeasted loaf, all the way up to elegant sourdoughs that take days to make. For me, there are recipes to attempt as they’re written (like the gluten-free Adventure bread, although finding gf oats here can be tricky), and yet others to take inspiration from and adapt to my own lazy way of baking.

As an e-book, it reads well on the iPad, and all the recipes and chapters are hyperlinked, making navigation pretty easy. The font size varies a bit, but that’s a minor issue, and there are plenty of step by step photos on shaping and dough handling.

I liked Josey’s idea of baking balls of filled dough in muffin tins to make what he calls “pocketbreads”. I adapted his B(L)T recipe and stuffed my latest batch of sourdough with sundried tomatoes and crispy bacon, but you could use whatever bread dough you have on hand. Here’s my recipe…

  • 300g active sourdough starter (fed at a ratio of one cup water to one cup flour)
  • 600g water
  • 500g bakers/bread flour
  • 500g Semola Rimacinata di Grano Duro (fine durum wheat semolina flour)
  • 18g fine sea salt
  • 120g (combined) of crispy fried bacon and sundried tomatoes, chopped
  • fine polenta/cornmeal for dusting

1. Mix all the ingredients together (except the cornmeal) in a large mixing bowl, squelching them together until well combined.  Scrape off your fingers, cover the bowl and allow to rest for half an hour.

2. Uncover and knead briefly in the bowl for a minute, then cover again and allow to prove until doubled in size.

3. Turn the risen dough onto a lightly oiled bench and give it a few folds. Using scales, divide the dough into 18 x 110g pieces (some might be a bit larger). Shape each piece of dough into a tight ball, then roll each ball in cornmeal.

4. Line 18 holes of muffin pans with paper liners, and spray each liner with oil (I forgot to, and had to cut bits of paper off my finished pocketbreads). If your muffin tins are in better condition than mine, you could just spray them directly with oil. Place each cornmeal-coated ball into a hole, cover (I used the lids from my cake carriers), and allow to prove a second time.

5. Preheat oven to 240C with fan. Once the rolls have risen, slash a cross into the top of each one and spritz the tops with water. Place the muffin tins in the oven, reducing the temperature to 220C with fan at the same time. Bake for 15 minutes, then shuffle the trays around, reduce heat to 175C with fan, and bake for a further 15 minutes more, or until well browned.  Allow to cool before scoffing.

. . . . .

These are seriously cute – like little Alice in Wonderland loaves – and a bit too easy to eat. The muffin pans work well, providing an easier option than shaping individual rolls, and the cornmeal coating gives the crust an appealing crispiness (and allows for pleasing alliteration).

If you’re looking for more breadspiration, you might enjoy Jarkko Laine’s digital BREAD Magazine. It’s available by email subscription at a very reasonable price (I bought a 2014 subscription for $8, and all of last year’s copies for $10). You can also download all four editions from 2012 for free.

The magazine has superb photos, interviews with artisan bakers, tips on how to improve your loaves, breads from all over the world, and more. Every time I read it, I find myself rushing into the kitchen to bake!

Read Full Post »

I wrote this bagel tutorial for friends in 2008, a year before we started FJALC. These days we bake a sourdough version as well, but the yeasted ones still make regular weekend appearances. PS. If you do make these, try to use scales rather than cup measures – you’ll get a much better result!

. . . . .

About a year ago, I put together a tutorial for some friends on making bagels at home. I thought it might be nice to upload it here, before it disappears into the ether. It’s really a fun process, if somewhat laborious , and the finished bagels are definitely worth it! Lots of photos to follow, as I think it can be hard to visualise the process otherwise.

The original recipe is based on one from the New York Cookbook by Molly O’Neill, although it’s been tweaked to reduce the amount of salt, and to include malt extract instead of brown sugar. Note that this recipe is for yeasted bagels; if you’d prefer to make a sourdough version, the recipe is here.

Disclaimer: I am neither Jewish nor American, so have never had an “authentic” bagel. Having said that, friends who are native NYers have told me that these bagels make them happy!

Ingredients :

  • 4 cups (600g) bread or bakers flour
  • 1½ tsps (10g) fine sea salt
  • 1 sachet dry yeast (mine had 8g in it)
  • 3 tsps (25g) malt extract (original recipe called for 3 tsps brown sugar)
  • 1½ cups (375ml) filtered water

1. In one mixing bowl, whisk together flour and salt. In another, whisk together water, yeast and malt extract.

2. Mix flour mix into water/yeast mix. Mix together initially with a wooden spoon or spatula, and then get your clean hand right in to mix it all together. Squish the mix in your fingers to make sure it’s all evenly combined.

3. Spray a little oil on the bench, and turn the dough out, scraping out any stuck bits. Knead the dough for 5 minutes or so.

4. Oil the mixing bowl you had the dough in, shape the dough into a ball, and put it back in the bowl to rise. Cover and leave it for about an hour, or until doubled in size.

5. Tip the risen dough out onto the re-oiled bench, and punch it down. Divide into 10 equal pieces (about 100g each), and shape into balls. Then stick your finger in the middle of the ball, and twirl the dough around your index fingers.

6. Shape the dough more by squeezing the “tyre” in the palms of your hands. You want to make the hole big.

7. Place “tyres” onto baking paper on the bench, dust with a little flour, cover with a clean tea towel, and allow to rise for 30 minutes. Halfway through, put the kettle on to get the hot water ready. Also, preheat oven to 400F (200C) fan-forced.

8. Fill a wide shallow pan with boiling water, with 1 Tbsp salt and 1 Tbsp malt syrup added. Bring to a rolling boil, and add bagels gently – don’t overcrowd. Boil or kettle the bagels for 1½ minutes on each side, turning them with a plastic slide, then fish them out and drain them on a rack covered with a clean teatowel.

9. Gently dry the bagels with a clean, lint-free towel (I use a cotton/linen napkin). Place onto baking tray lined with Bake, and brush with eggwash (1 egg beaten with 1 Tbsp water), then sprinkle on toppings.

10. Bake in oven for 12 minutes, then rotate the tray to brown evenly. Bake for a total of about 20 minutes or until golden brown.

=

© copyright 2009 by Fig Jam and Lime Cordial. All rights reserved.

Read Full Post »

Even though I’m taking a break, I couldn’t not have an Easter chocolate post! This is the second of the two we wrote in 2012 (the first is here). If you’d like to try your hand at making chocolates this year, you might find our Chocolate #101: Tempering at Home post useful. Have a fabulous Easter!

. . . . .

We made a batch of experimental Easter chocolates this year, using Callebaut white and a blend of Callebaut 811 (54%) and 70% dark.

The white chocolate was tempered first, drizzled into the moulds, then allowed to set up in the fridge.  The tempered dark chocolate was then ladled over the white.  We made two large eggs – I particularly love how the white and dark mingled in the bottom one to form a lighter shade of brown…

Two-toned lollipops were made by highlighting the design features in white chocolate first, using a small paintbrush…

The bows on these eggs took several coats of white chocolate…

And with all the leftover bits and pieces…

…I made a new cake!  Recipe to follow soon…

Wishing you all a joyous, chocolate-filled Easter!

Read Full Post »

« Newer Posts - Older Posts »