2019 Update:
This tutorial was written more than nine years ago and I now make my sourdough in a very different way. Please refer to the 2018 Sourdough Cooking Class: Step By Step Instructions for our latest instructions, it will help you to produce a much better first loaf. I will leave this post up for archive purposes.
. . . . .
This sourdough tutorial produces a tender, closed crumb bread rather than a crusty, holey loaf. I’ve written it to provide bakers who are new to sourdough with an easy first loaf – the lower hydration dough is easier to handle than the much wetter ones needed to produce more “traditional” crusty loaves.
The aim is to provide a “proof of concept” first loaf – once you know your sourdough starter will actually produce decent bread, you can then experiment to your heart’s content!
. . . . .
Inspired by Rachel’s sourdough diary post, I thought I’d try writing a beginner’s sourdough tutorial in a similar format. I’ve ended up with a very long and detailed post, so please don’t feel you need to read it all if breadmaking isn’t your thing!
Some basic information:
Firstly, sourdough bread refers (generally) to loaves which are baked using wild yeasts rather than commercial bakers’ yeast. These wild yeast organisms are kept alive in the form of a “starter” (also known as a “leaven”), and are fed regularly with flour and water.
Secondly, baking sourdough bread involves a time commitment. Unlike regular yeast breads which can be turned around in a couple of hours, sourdough baking from start to finish can take up to two days (with some artisan bakers taking even longer than that). Generally speaking, the longer the dough takes to rise, the more sour the finished loaf will be.
Thirdly, if at all possible, use scales to weigh out your dough ingredients. I say that even though I feed my starter in cup measures (as that was how I started years ago, and it was too hard to rework my recipes). But for actually making the dough, I always use scales.
Finally, apart from patience, the other important ingredient is bakers’ flour (also known as bread flour). This flour has a significantly higher protein content than plain (AP) flour, and is required to achieve rise in the finished loaf. When I refer to “flour” in the text below, I always means “bakers’ flour”.
Edit: try to feed your starter with filtered water, especially if your tap water is a bit dodgy. I’ve had a few friends who’ve had difficulty with their doughs as a result of heavily chlorinated tap water, so I’ve amended the instructions below accordingly.
. . . . .
Day 1
To begin with, you need a sourdough starter. Lots of people make their own, but I bought mine from the US.
I actually bought two starters and at some point they merged into Priscilla, who lives in a covered container in the fridge.
After a period of time in the fridge, a liquid (“hooch”) might form on the top of the starter. This might be quite dark in colour. Don’t panic! Either tip it out or stir it in, whichever you prefer.
This is what Priscilla looks like after having been ignored for a week…

Before I can bake with her, she needs to be woken up and given a few feeds for optimum potency.
As I was planning to bake on Saturday, at 1.00pm on Friday, I took the container out of the fridge, gave it a stir, and then scooped ½ cup of starter into a large bowl.
Into the bowl, I stirred in ¼ cup each of bakers flour and filtered water. It was then covered with clingfilm and left on the bench.
Into the container, I stirred in ¼ cup each of bakers flour and filtered water. It was then covered and returned to the fridge for next time. Always remember to feed your fridge starter every week or so to keep it alive.

At 5.00pm, I gave the starter on the bench another ¼ cup bakers flour / filtered water feed.
At 10.00pm, I gave her a final feed of ½ cup each of bakers flour and filtered water (the little extra just to get her through the night)…

. . . . .
Day 2
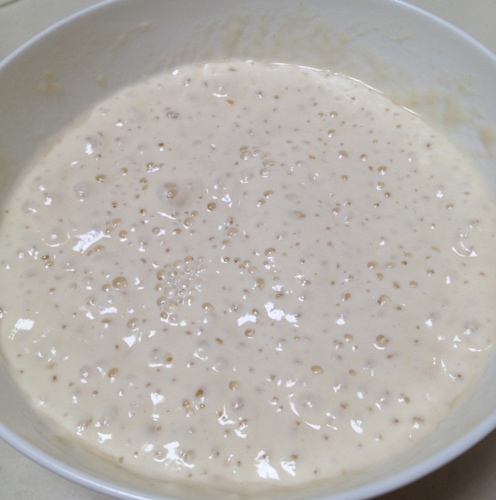
At 6.00 am the following morning, the starter was fluffy and bubbly and frothy.
Please trust me on this: don’t bother trying to bake bread if your starter is sluggish – you’ll just end up with a flat loaf. It should look like this before you begin…
If your starter is still looking a bit flat at this stage, give it another small ¼ cup feed and leave it for a few more hours to get bubbly before making the dough.
Priscilla can be a bit of a diva – sometimes she needs more pampering than others.
7.00 am
In a large mixing bowl, I combined:
- 150g bouncy, ripe starter
- 250g water (filtered, if necessary)
- 25g olive oil
- 500g bakers’ flour
- 10g fine sea salt

The ingredients were squelched together – the aim is to squish them all between your fingers until no dry bits remain (that’s as technical as I can get!)…

After scraping off my fingers, the dough looked like a shaggy mess. It was left to rest, covered, for half an hour – this brief pause makes the kneading process much easier…

7.30am:
I uncovered the dough, and gave it a quick knead in the bowl – I timed myself and kneaded for exactly one minute, which was all it took to work the dough into a reasonably smooth condition.
At this stage, the dough was covered and left to bulk prove for several hours.

1.00pm:
As it was Saturday, Pete and I spent the morning running Small Man to sport and then shopping. We didn’t get back until 1pm, by which time the dough was well and truly risen. It’s very warm here in Sydney at the moment – at different times of the year, the proving time will vary from four to ten hours.
The aim is to allow the dough to double in size (watch the dough, not the time!), but mine went beyond that. It’s a testament to the vitality of Priscilla that she always seems to bounce back, regardless of how long I leave her doughs (other starters might vary)…

I scraped the dough onto a lightly oiled bench…it deflated in the process…

…and then I shaped it into a round ball, by folding the edges into the middle as follows:
I lined a baking tray with parchment paper, and gently positioned the ball of dough onto it. A sheet of clingfilm was sprayed with a little oil, and laid snugly over the dough to stop it forming a skin.
It was left to prove until puffed up, but not quite doubled in size. If it gets too large on this second proving, it might not rise as well in the oven.
(A note: please check the recommended baking temperature for your parchment paper – the brand I use is safe up to 230C. If you’re at all concerned, place the dough directly onto a greased tray.)

1.45pm:
The oven was preheated to maximum.
2.10pm:
Once the dough had risen, I removed the clingfilm…

…and slashed the top with a serrated knife.
As my friend Teck Poh used to say, “Slash with panache!” The dough was quite firm, and coped well with quick, assertive cuts…

2.15pm:
After spritzing the top of the dough with a little water, I popped the tray into the oven, dropping the temperature to 220C with fan at the same time. The dough was baked at this temperature for 20 minutes.
The hot oven causes the yeasts to burst and give the dough one last lift before dying off, in a process known as “oven spring”.
3.05pm:
Here’s a photo of the loaf at the 20 minute mark – as you can see, it had risen considerably by that time. Opening the oven door to take a photo was not a particularly smart thing to do, as it let all the heat out, but I wanted to show you what it looked like at this stage. It was quite brown already…

3.05pm:
I turned the oven down to 175C with fan, and baked the loaf for a further 20 – 30 minutes.
Bake until the crust is hard and quite brown, and the base sounds hollow when tapped (take the loaf out with oven gloves and turn it over in your hand, then knock on the bottom with a knuckle – it should sound drum-like).
In breadmaking, an extra ten minutes won’t do much harm (my loaf needed the full 30 minutes at 175C), and if there is any doubt about whether or not the loaf is ready, it’s usually better to bake it for a bit longer.

The loaf was left to cool completely before slicing (cutting a hot loaf causes it to go stale faster, and can also result in a gummy crumb)…

This method produces a tender crumbed white sourdough loaf with a mild flavour. It isn’t the chewy ciabatta bread that we normally eat at home, but it’s a great first loaf to bake, as the lower hydration makes the dough quite easy to handle.
There will be leftover starter in the bowl, which can be stashed in the fridge for later use, or turned into sourdough pancakes.
If you have any questions, please feel free to leave them below, and if I can’t answer them, I’m sure one of my many sourdough baking buddies will be able to help!
. . . . .
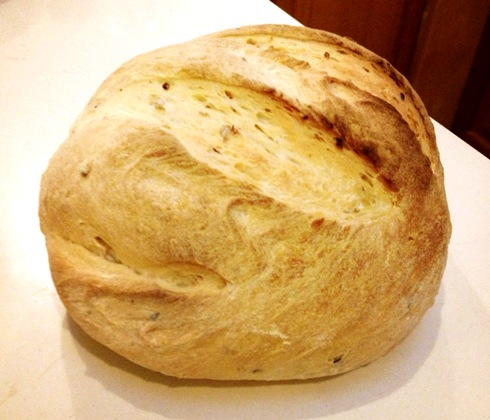
PS: My neighbour Michelle, whom I taught to bake bread a couple of weeks ago, tested this recipe for me. She added soaked grains to her dough. This was her first sourdough loaf ever, and look at what a wonderful job she did!
Read Full Post »