Feeds:
Posts
Comments

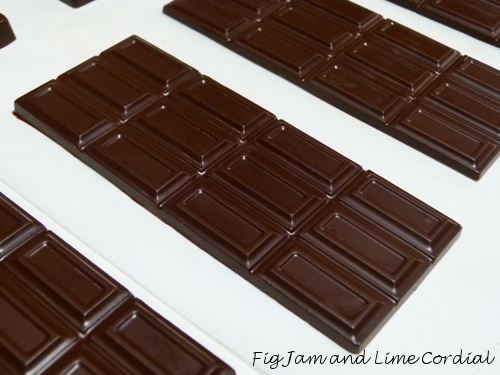
I’ve waxed lyrical about this before, but chestnut flour really is a wonderful option for gluten-intolerant eaters. It seems to complement chocolate particularly well, and our Chestnut Flour Brownies (Mark I) were even  more popular with the masses than the original wheat flour version.

My friend Lisa has given up gluten recently, so I’ve started experimenting with new baked treats for her. I tweaked Nigel Slater’s wonderful brownie recipe to use chestnut flour, and the results were deeply flavoured and very  moreish…

  • 300g (10.5 oz) caster (superfine) sugar
  • 250g (1 cup) unsalted butter
  • 250g (8.8oz) dark chocolate (70%) – I used Callebaut callets
  • 3 large (59g) eggs, plus 1 extra yolk
  • 60g (2oz) chestnut flour
  • 60g (2oz) dutched cocoa (or the best quality cocoa you have)
  • ½ teaspoon baking powder
  • pinch of salt

1. Line a 23cm square baking tin with parchment paper.  Preheat the oven to 175C (350F) or 160C (320F) with fan.

2. Melt 200g (7oz) of the chocolate, either in a pyrex bowl in the microwave on short bursts, or over a pan of simmering water.  Remove from heat as soon as the chocolate is melted. If you’re not using callets, chop the remaining chocolate into small pieces.

3. In a medium bowl, sift together the cocoa, chestnut flour and baking powder. Don’t skimp on this step, as both the chestnut flour and cocoa really need sifting, or you’ll get hard lumps in the finished brownie.  Stir in a pinch of salt.

4. In a small bowl, lightly beat together the eggs and yolk with a fork.

5. In a large bowl, use an electric mixer to beat the sugar and butter until very light and fluffy.  Gradually mix in the beaten eggs, mixing well between each addition.

6. Using a spatula, gently mix in both the melted chocolate and chocolate pieces, then carefully fold in the chestnut flour-cocoa mixture.  Use a light touch, and try to keep as much air in the mix as possible.

7. Scrape the mixture into the prepared baking tin, smooth the top, and bake for 30 minutes, or until a tester inserted into the centre comes out a little moist, but free of raw batter.  The brownie will firm up on cooling, so be careful not to overbake it.  Allow to cool for at least an hour before serving.

I met a pelican at the Sydney Fish Markets last week…

He grabbed his piece of fish and took off suddenly, scaring me silly in the process…

The sun was shining on the fleet of small fishing boats…

And as always, the seafood was amazing!

We’ve been really busy these past few weeks!

That doesn’t mean I’ve stopped baking – in fact, spending a little time in the kitchen is both therapeutic and time efficient. When things are really frantic, I can always pull out a loaf of sourdough from the freezer and serve it with really good extra virgin olive oil and cheese, and nobody complains…

What it does mean, though, is that I haven’t really tried anything new for a couple of weeks now. So here are photos of some old favourites that have been been gracing our kitchen benches this past week.

I made a large batch of sourdough bagels – the enormous joy these bring to our ex-New York neighbours Jane and Bernie always makes the effort worthwhile…

I couldn’t find any poppy seeds in the fridge, so these were topped with a mix of sesame seeds and black salt.  I wrote a yeasted bagel tutorial here, and added the sourdough version a few months later…

When I’m really busy, the breadbaking goes large scale – I made a 3.75kg  batch of dough using my basic shaping dough, and turned it into eighteen rosetta rolls and three fat baguettes…

The good thing about rolls is that the teenage wolves take one or two out of the freezer at a time, rather than defrosting (and then eating) a whole loaf…

There are always eggs from the chooks, raspberries in the freezer and chocolate in the pantry, and therefore there are always friands in the kitchen…

Finally, Pete and I were out of Wednesday night, so I baked a quick slab pizza for the boys – half with olives and anchovies for Small Man, and the other half with Spanish onion and prosciutto for Big Boy. They’re both very fussy about their pizza toppings!

How are you all traveling? I hope things are calmer at your end.

I sometimes wonder whether it’s the time of year, or whether being in our late 40s with teenage sons means that this is simply a busy time of life.  Either way, tomorrow is Saturday, and I’m looking forward to a little downtime.

Wishing you all a brilliant and hopefully restful weekend!

Now that it’s well established, our garden is very low maintenance – on average, we would spend less than two hours a week on it.

As I’ve mentioned several times before, the chickens do most of the hard work. They rotovate the soil, eat the weeds and grubs, and fertilise the beds for us. Worms help a lot too, both in the ground and in the worm farm, where they produce liquid fertiliser and castings that further enrich the soil.

The final essential element in our low maintenance approach is mulch.

We had originally hoped to make our own mulch as per Linda’s plan – but it didn’t work out.  We just couldn’t source the necessary organic material to create sufficient groundcover.

In our second year, we started buying mulch, and it has made the world of difference. Apart from conserving water and keeping the weeds in check, the mulch makes the  beds look pretty, which in turn makes the whole gardening experience far more enjoyable.

We mulch heavily when we plant out a bed, and don’t add to that cover until the next rotation (unless we’re hilling up potatoes).  The weeds that do manage to grow through are easily seen and pulled out.  By the time the mulch has started to break down and the weeds are beginning to spread, the bed is just about ready for the chickens to do their thing.

It’s taken a little trial and error to figure out which mulch best suits our garden.

We started with lucerne hay, but found it hard to use, as the hay is baled very tightly and difficult to tease out.  Then we tried pea straw, which is great for the soil, but has two major drawbacks – firstly, it’s often full of peas which shoot all over the beds, and secondly, the birds seem to love it and will often scratch out seedlings planted in the beds.

At the moment, we’re using organic sugar cane mulch.  It costs $15/bag, which will cover nearly two beds to a thickness of 5cm (2″).  It seems to be doing the trick – the birds have learnt to leave it alone, as it’s free of any seed or other edible material.

Mulch shades the ground on hot summer days and helps to hold moisture in the soil. I honestly don’t know how we ever managed to garden without it!

I have treasure in my kitchen.

Amedei Chuao is a dark 70% single origin chocolate from Venezuela. It is the stuff that legends are made of.  As I wrote in a previous post:

. . . . .

Amedei came about after brother and sister Alessio and Cecilia Tessieri, Italian sellers of baking ingredients, approached Valrhona seeking to distribute their products.   Story has it that Valrhona rejected their request, telling them that Italy wasn’t “capable of appreciating fine French chocolate”.

Furiously insulted, the Tessieris formed Amedei, which almost immediately started producing amazing chocolate.  Their true moment of triumph though, came when Alessio managed to secure exclusive access to the renowned Chuao cacao plantations, locking Valrhona out of their premium source of beans.  It’s a fabulous story – you can read more about it here and here.

. . . . .

Amedei Chuao is regarded by many as the finest chocolate in the world, but until a few days ago, I’d never tried it. Part of the problem was availability, but there was also the issue of cost – at a recommended retail price of $18.50 for a 50g block, it was way out of my price range.

So…when I discovered that my friend Tania worked for Lario International, the Australian importer of Amedei, and that she could source some Chuao for me at wholesale prices, I leapt at the opportunity.  The chocolate comes in elegant one kilogram blocks, wrapped in black and gold…

I chopped up a large quantity for tempering…

…and ended up with nine glossy bars and a dozen or so small fleur de lys chocolates. It was a delight to work with, tempering to a crisp snap and shiny finish…

The chocolate is extremely fine and has a distinct flavour – slightly smoky with delicious plummy notes and a smooth, almost buttery, finish. As Monkey Girl pointed out, the pleasant hint of bitterness fades in the mouth and is replaced with sweetness and well balanced acid. (I love that Big Boy’s girlfriend has such a fine palate!)

The teenagers were hovering as I unmoulded the chocolate, and I tried to explain to them how rare the product was, and how much it cost, and the wonderful story behind it.  Unfortunately that didn’t stop them eating it as fast as they could – in the end I had to chase them out of the kitchen!

It is such a treat to have this chocolate to savour and experiment with, especially after reading so much about it.  Tania, I can’t thank you enough!