This wickedly good recipe from David Lebovitz’ new book, Room for Dessert, is a cross between a brownie and fudge.
It’s made in an interesting way – part of the process involves beating the mix by hand, until it “snaps”, in much the same way as fudge does. This slight change in state gives it a delicious texture – though if you don’t beat it enough, the brownie will be grainy.
The recipe is easy to make, using only one saucepan and mere minutes of preparation time. Ensure you have everything measured out before you begin, as the process is very quick once you get started. Also, use the very best chocolate you can afford, as it’s the main ingredient in this recipe.
On the topic of chocolate – it’s important to note that this won’t work (at least not in my experience) if you use high cocoa chocolate in in the initial melting part of the recipe. The brownies are perfect when butter and 54% Callebaut callets are melted together, and passable with 64% cacao chocolate, but the 70% resulted in an oily mass that cooked up hard with a film of grease over the top. I think that’s because the quantities in this recipe are so small that if you alter the fat balance (which is what increasing the cocoa mass does) without adjusting the other ingredients, the balance goes completely out of whack.
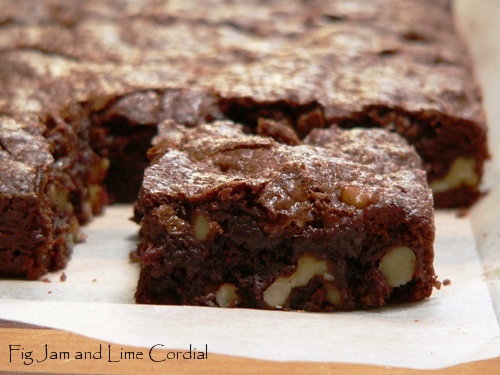
I’ve now made this dish a dozen times and offer two variations – one with nuts as specified in the original recipe (photo above) and the other with extra chocolate. No prizes for guessing which one my boys prefer!
. . . . .
Fudge Brownies
(based on Robert’s Absolute Best Brownies in David Lebovitz’ Room for Dessert)
- 90g (6 tablespoons) unsalted butter
- 225g (8oz) 50 – 60% cacao semisweet chocolate (I used Callebaut 54%)
- 150g (¾ cup) sugar
- 1 teaspoon vanilla extract
- 2 large (59g) eggs, at room temperature
- 40g (¼ cup) plain (AP) flour
- 135g (1 cup) toasted and chopped nuts, OR 150g (1 cup) chocolate bits (Note: for the all chocolate version, I used 100g Callebaut 44% bake stable sticks, broken up AND 50g Callebaut 70% callets)
. . . . .
1. Preheat oven to 175C/350F or 160C/320F with fan.
2. Measure out all your ingredients and have them ready to go. Line a 20cm (8″) baking pan with parchment paper.

3. In a medium saucepan, melt the butter, then add the chocolate and stir over low heat until melted and smooth. Remove from the heat and stir in the sugar and vanilla until combined.

4. Stir in the eggs one at a time. Add the flour all at once and stir vigorously until you can feel the batter “snap”. I’ve taken some photos to try and show you what happens – please excuse the slightly blurry one below.
The batter starts out grainy and fairly loose. As you beat it by hand, it will initially feel like nothing is happening, and then it will suddenly feel a bit stiffer – that’s when you’ll know a state change has occurred. This might take one minute, or it might take several. Stop occasionally to check how it’s going. Unlike true fudge, it’s not a huge “snap”, but the texture will definitely change noticeably – it will feel stiffer, look smoother, and pull away from the sides and bottom of the pan.
Edit Jan 2019: It’s been nearly nine years since I wrote this post, and my hands are nine years older as well, so these days I use a handheld mixer to beat the batter. It only takes a minute or two, but it’s just easier.


5. Gently stir in the inclusions.

6. Scrape the batter into the lined tin and smooth out the top. Bake for 25-30 minutes until just firm. Do not overbake. Allow the brownies to cool completely before lifting them out of the pan and slicing.


These are very easy to make and incredibly moreish. Pete recently announced (proclaimed?) the all chocolate version below to be his new favourite brownie!