Feeds:
Posts
Comments

Archive for October, 2013

Spritz Cookies

When I was growing up, there would often be round blue tins of “Danish butter cookies” in the house (like these ones by Royal Dansk). They were filled with an assortment of small, crumbly shortbreads, stacked in paper liners, and my sister and I adored them.

These Spritz Cookies are very reminiscent of those (minus the sugary topping). A couple of years ago, I picked up a cookie press on sale…

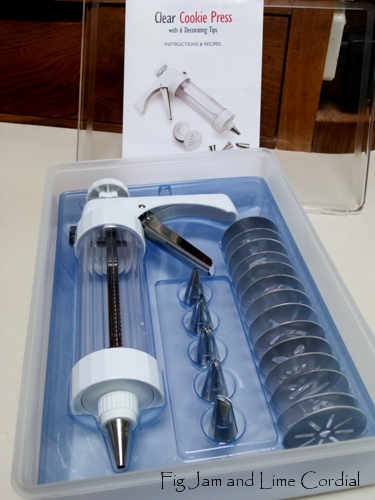
It’s taken me a while to get around to using it, but when I came across this simple recipe from Nick Malgieri’s Cookies Unlimited cookbook, I thought it was worth having a go. They didn’t all come out perfectly formed, but for a first attempt, I was really pleased with them. The dough made 108 cookies!

  • 250g (1 cup) unsalted butter, softened
  • 165g (¾ cup) sugar
  • pinch of fine sea salt
  • 1 teaspoon vanilla extract (I used homemade)
  • 3 large (59g) free range egg yolks
  • 375g (2½ cups) plain (AP) flour

Note: the original recipe specifies lining baking trays with either parchment or foil. We tried both, and found the foil lined tray far easier to use – the cookie dough needs to grip the tray in order to form properly, and the parchment paper was too non-stick.

1. Preheat oven to 175C (350F) or 160C (320F) with fan. Malgieri’s original recipe bakes at 375F, but I think my cookies were smaller than his. Mine were done in the recommended time on the lower heat. Line two large trays with foil.

2. In the large bowl of a stand mixer, beat the butter, sugar, salt and vanilla until very light and fluffy. This will take several minutes – keep going until the colour lightens. Scrape down the side of the bowl as needed. Beat in the egg yolks one at a time, beating well after each addition.

3. Add the flour and mix very gently until just combined. The mix will be soft, be careful not to overwork it at this stage. Stir in any last bits of flour by hand.

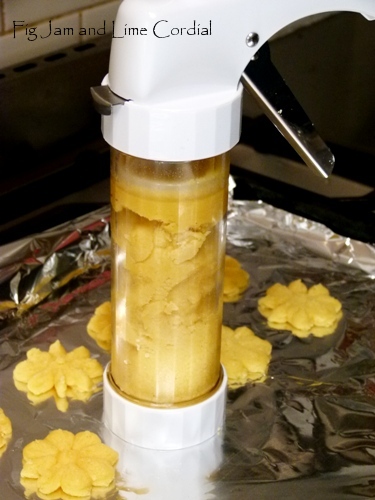
4. Divide the dough into quarters and roll a portion into a log shape, then insert it into the cookie press barrel. Press out shapes onto the lined trays (you’ll need to experiment a little first – just recycle any failed ones back into the dough bowl).

5. Bake for 10 – 12 minutes, until lightly golden. Rotate the trays once during the baking time. Slide the foil liner off the tray onto the bench to cool. The cookies might stick a little, but should come loose once they’ve cooled slightly.

We made butterflies, clouds and flowers…

The cookies are quite fragile, so stack them carefully in muffin liners in an airtight container. They seem to improve with a day’s rest…

These were short, crumbly and a little too easy to eat. They’ll definitely be on this year’s Christmas baking list!

Read Full Post »

Wholemeal Spelt

It’s going to be a tough few weeks, financially.

As with all old houses, maintenance issues crop up from time to time, and this month we’ve had major problems with the sewer line (I can hear some of you groaning from here).  It’s not resolved yet, so a bill hasn’t arrived, but I’ll make sure I’m sitting down when it does. There have been a few other expenses as well, but they’re pretty trivial compared to the plumbing.

So…in the midst of trying to finesse our cashflow, I was delighted to uncover a lost bag of high protein wholemeal spelt flour in the freezer…

I fed up Priscilla (my sourdough starter) and that night, made a ciabatta-style dough…

It’s always worth cutting the water back a little for spelt (I probably should have used less), but I was hoping to make holey loaves. I squelched everything together, gave it a couple of folds twenty minutes later, then left it in a large plastic tub and went to bed.

The next morning, the dough poured out of the container like a thick, gluggy soup. I dusted the bench with fine semolina, gave the dough a couple of folds, then cut it into loaves. These were plonked onto parchment paper and baked on stones in a preheated oven for 45 minutes (in total). There are more detailed instructions here. Spelt always bakes to the most glorious golden brown…

The wonkiness of the loaves is a testament to how wet and fiddly the dough was. At our house, we refer to it as “rustic”…

The finished ciabattas had a dark, holey crumb with a distinctive nutty flavour…

There’s something almost magical about baking bread.

We’re expecting a bill for (possibly) thousands of dollars worth of plumbing, yet somehow, being able to bake eight “free” loaves of sourdough eased the pain just a little. Best of all, there was plenty to go around – we ate two loaves; one went to our neighbour Mark, another to Dredgey and a third to Liz, who ate it with her mulberry jam. That left three loaves for the freezer. Not a bad result from a “found” bag of flour!

Read Full Post »

Ahh, Jamie Oliver.

Despite his tendency to stick his foot in his mouth, I am very fond of him, and I always find his recipes wonderfully intuitive and foolproof. His latest cookbook, Save With Jamie, seems particularly good and full of recipes which can easily be adapted to whatever ingredients the reader has on hand…

Our most recent “emergency” dinner was based on his Hit ‘N’ Run Traybaked Chicken, and the philosophy behind the dish is a good one – we all need a recipe that we can mix together quickly and bung into the oven on nights when things get too hard.

We were missing a few fresh ingredients, so substituted items from our pantry. It was a delicious meal, and definitely one we’ll be making again!

  • 1.5kg free range chicken thigh fillets
  • 1 tin San Marzano tomatoes
  • large spoonful of jarred roasted capsicums, well-drained (ours was in strips)
  • 2 large Spanish onions, peeled and cut into wedges
  • 8 cloves of garlic (ours came straight out of the freezer)
  • picked leaves from a few sprigs of thyme
  • 2 teaspoons mild Hungarian paprika
  • sliced jalapeño chillies, to taste
  • 2 tablespoons of olive oil
  • fine sea salt and freshly ground black pepper, to taste

Note: the original recipe specified fresh tomatoes and capsicums, but we didn’t have either on hand. It also used two tablespoons of balsamic vinegar which we omitted, as the jarred capsicums and jalapeños (our addition) already had a little vinegar in them.

Drain the tomatoes, saving the juice. Break the larger tomatoes in half. Spread the onions and garlic out on a foil and parchment lined baking tray (foil first, then parchment – we find this minimises washing up), then lay the tomatoes on top. In a separate bowl, mix together the chicken, capsicum, paprika, thyme leaves, jalapeños, olive oil, salt and pepper, then lay it all out over the onions. Drizzle over a little of the reserved tomato juice. Bake in a pre-heated 170C fan-forced oven for about an hour. Stir occasionally and baste with the remaining tomato juice during the cooking time, as needed.

We served this dish with a defrosted sourdough ciabatta loaf (this really was a last minute meal) and freshly made coleslaw, using our sweetheart cabbage and a freshly laid egg. Simple and easy, yet tasty enough to serve to guests!

Read Full Post »

Tempering chocolate is a wonderful skill to master, and once you can reliably turn out a well tempered block, it seems a shame to simply reproduce what’s on offer in the stores.

Blending different chocolates is a great way to create a unique product – one that can become your own signature item for eating and gift-giving.

In our kitchen, we mostly use Callebaut products (which we buy from Chefs’ Warehouse) – they come in easy-to-use callet form, and because they’re reasonably priced, we can afford to buy their fair-trade and origin chocolates.  In our pantry at any given time, we usually have:

  • Basic dark – 811 – 54% cacao (fairtrade)
  • Basic milk – 823 – 32% cacao (fairtrade)
  • Strong dark – 70 – 80% (varies depending on what we buy)
  • 100% cacao mass (unsweetened)
  • Origin chocolates – 70 – 75%

Edit: for those outside Sydney – my friend Pam @ Grow, Bake, Run buys her Callebaut chocolate from Paragon Foods online. I haven’t bought from them (so this isn’t a personal recommendation), but they do offer a wide range of Callebaut at quite reasonable prices.

Here are the formulas we’re currently using:

Milk Chocolate

We all find the Callebaut 823 Milk too sweet on its own, so we always make a darkened blend by combining 811 (54% dark) and 823 (32% milk). We’ll often fill this with pailleté feuilletine to make a crisp wafery bar, or with whatever we can find in the pantry to create a chocolate bark or rocky road

A note on tempering: we combine 250g each of dark (811) and milk (823) callets and heat to 110F before seeding and allowing the mix to drop to a working temperature of 86 – 88F (more detailed tempering instructions are here). These dragons were made with our darkened milk blend…

. . . . .

“Workhorse” Dark Blend

Most of the dark chocolate I use for enrobing or dipping is made with a blend of 811 (54%) and darker callets (70 – 80%).  Again, we find the straight 54% too sweet for our tastes, particularly if we’re stirring in sweet additions such as marshmallows, dried fruit or sugar roasted almonds

There are, of course, exceptions – the dark caramel in Pete’s hazelnut praline necessitated a sweeter chocolate on that particular occasion…

. . . . .

Dark Eating Blends

Pete and I both adore very dark chocolate – Pete is a big fan of Sao Thomé origin (70%) and I love both the Tanzanie (75%) and Callebaut’s new Kumabo blend (80%). It’s great fun to play around with different combinations and proportions to see we can come up with…

. . . . .

Since I wrote my first Chocolate #101 Tempering Tutorial, I’ve been really chuffed to hear back from several people who have given it a go!

If you’ve been bitten by the tempering bug and are now considering making chocolates for Christmas (as my friend Carol is), please let me encourage you to experiment with blending. By playing around with different combinations, you’ll create bespoke treats specifically tailored to your personal palate and those of your family members. More importantly, it’s great fun, and you’ll end up with a unique product that won’t be found in even the fanciest chocolate shops!

. . . . .

Previous Chocolate #101 Tutorials

Tempering at Home

Enrobing

Chocolate-Coated Biscotti

Read Full Post »

Slice and Bake Cookies

I grow old…I grow old…I shall wear the bottoms of my trousers rolled…

The Love Song of J. Alfred Prufrock by T. S. Eliot

. . . . .

One of the unfortunate consequences of growing older is that everything starts to ache. As a result, we’ve had to make some changes to the way we do things in the kitchen. The cast iron pots are gone, having been replaced with much lighter (and dishwasher friendly) clay ones and my breadmaking now involves almost no kneading.

In addition, drop cookies have mostly fallen off my baking agenda. Three years ago, I  already needed a wrist guard to shape balls of dough, and I’ll now only make traditionally shaped cookies in single batches.

These days, I’m far more likely to either bake my cookie dough in a slab, or shape it into a log which I pop into the fridge or freezer…

This weekend, I’ve made three different types of cookies, all of the “slice and bake” variety.

The first batch, which fed my craving for a good dunking bikkie, was a reworking of our gingernut recipe.  Using the basic recipe, I shaped the dough into two logs, one of which went into the fridge (shown on the left in the photo below) and the other into the freezer for future baking …

The refrigerated log was cut into 1cm/½” slices, and baked in a preheated 150C fan-forced oven for 20 minutes…

. . . . .

The second batch was a simple shortbread, based on the Jammy Dodger recipe. This is a very simple dough to make (it comes together in minutes in the food processor) and both my parents and Small Man adore it. It’s extremely versatile and worth keeping in the freezer for a last minute afternoon tea or dessert.

I have a large food processor – if you’d like to make a smaller batch, the quantities and original recipe are here

  • 350g plain flour
  • pinch of sea salt
  • 150g icing sugar or icing sugar mixture, sifted
  • 250g unsalted butter (cold, and cut into pieces)
  • 2 large free range egg yolks
  • 2 teaspoon vanilla extract (I used homemade)

Blitz the flour, salt and icing sugar in the food processor, then add the butter and pulse until the mixture resembles coarse breadcrumbs.  Beat the yolks and vanilla together and add to the food processor, pulsing to combine. Once the dough starts to form a ball in the machine, it’s ready.

Divide the dough into two and shape them into logs. Wrap in parchment paper and chill in the fridge (or wrap in a further layer of foil and stash in the freezer).

Once the dough is cold and you’re ready to bake, line trays with parchment paper and preheat the oven to 150C with fan.

Remove the dough from the fridge and using a sharp thin knife, slice it into 4mm thick discs…

I like to trim the circles with my fluted cutter, but that’s definitely optional…

Bake for approximately 20 minutes or until golden brown, rotating the trays once during the baking time…

And don’t waste the eggwhites – I combined ours with 120g caster sugar and a dash of vanilla and turned them into meringues (recipe is here)…

. . . . .

Our third batch of cookies was a less than successful experiment – I tried combining a couple of recipes together to make a Cacao Nib, Hazelnut and Oatmeal cookie. Pete likes these, but they’re a bit too low sugar for me – we’ll see how they “mature”…

. . . . .

Have you had to make changes to the way you cook as you’ve grown older?  We’ve found it an interesting transition, but we want to keep making as much as we can from scratch for as long as we can, so we keep trying to find easier ways to do things. I’d love to know of any tips you might have!

Read Full Post »

« Newer Posts - Older Posts »