Feeds:
Posts
Comments

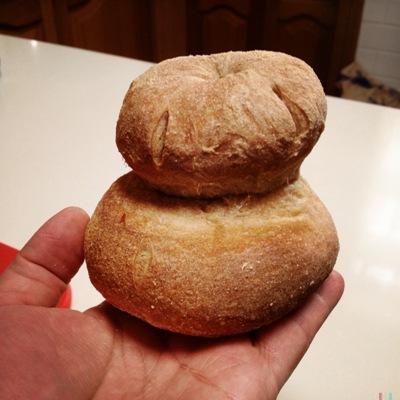
My lardy cake adventure began with a tiny cottage loaf.

I tweeted the photo below and asked my English friend Matthew if he’d eaten this style of bread as a child…

Matt replied that he’d actually grown up eating lardy cakes.

And after some discussion, I thought it might be fun to try making one. I remembered reading a recipe in Dan Lepard’s The Handmade Loaf

Having previously had a bad experience with supermarket lard, I thought it might be worthwhile trying to make my own.  After all, if I had a stash in the freezer, I might be able to make a slightly less ludicrous attempt at tamales.

Ideally, leaf lard (made from the fat surrounding the pig’s kidneys) should be used in sweet pastries, but the butcher told me that it’s a very difficult product to source in Australia.  So I came home instead with a one kilo block of frozen free range female pork fat (which he insisted would be far less smelly than boar fat)…

I chopped up the fat and scraped it into my Emile Henry casserole pot with half a cup of water. The photos below show 300g of the pork fat being rendered. The pot was simmered very gently over a low heat until the pieces had crackled up and sunk to the bottom. The fat and solids were then poured through a Chux-lined sieve.  The liquid lard was a light brown colour, but set to a snowy white in the fridge…

The following day, I attempted the lardy cake. I based it on Dan’s recipe, but I simplified the methodology a little, added  currants and raisins, changed the spice, and used dried yeast instead of fresh…

  • 500g bakers/bread flour
  • 8g fine sea salt
  • 200g active sourdough starter (Dan’s recipes use an 80% starter, so feed a small portion of starter with 100g bakers flour and 80g water)
  • 250g water
  • 1¼ teaspoons dried yeast
  • 150g pork lard (cold from the fridge)
  • 150g caster sugar
  • dried fruit – I used a mix of currants and golden raisins
  • pinch of cinnamon
  • extra caster sugar for topping

1. Grease a 23cm springform cake tin, and line the base with parchment paper.  Wrap the outside of the tin with foil to prevent leakage.

2. In a large mixing bowl, stir together the starter, water and dried yeast.  Add the flour and salt, and squelch the whole lot together with a clean hand to form a fairly stiff dough. Scrape off your fingers and cover the bowl with clingfilm.  Allow to rest for 15 minutes.

3. Uncover the dough and give it a quick knead in the bowl, working the dough until smooth. It should only take a couple of minutes. Cover the bowl again and allow to prove until doubled in size, about an hour.

4. This is the fun bit. Turn the dough onto a clean floured surface and using your fingers, press it into a rectangle.  Smear the lard over two-thirds of the dough, then scatter 150g of caster sugar over the top.  The photos are a bit dodgy from here on, as I was manoeuvring the iPhone camera with my un-larded hand…

5. Fold the uncoated third over the middle third, and then flip it over the remaining third to enclose all the lard and sugar.  Carefully flatten the dough again with your fingers or a rolling pin, and fold it over itself in thirds again.  The aim is to encase the lard and sugar, and to build up layers of dough. Now cover the dough and let it rest for half an hour or so.

6. Uncover the dough and roll it out into a rectangle.  Be gentle, or the dough will tear and lard will ooze out everywhere.  Scatter over the currants and raisins…

7. Roll the dough up, encasing the dried fruit, then cover and allow it to rest briefly…

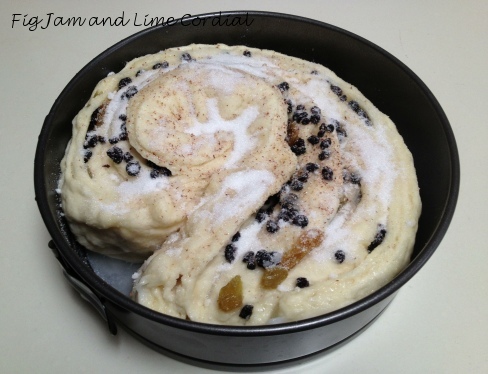
8. Slash across the top of the dough, cutting about a third of the way into the log…

…then swirl the dough into a snail shape. Pick it up carefully and place it into the prepared cake tin.  Cover and let it rise until it’s puffed up and well-risen, which should take about an hour…

9. After 45 minutes, preheat the oven to 200C or 190C with fan. When the dough is ready, sprinkle with a little cinnamon and scatter over a couple of tablespoons of caster sugar…

10. Bake the lardy cake in the oven for 20 minutes at 190C with fan, then reduce the temperature to 170C with fan and bake for a further 40 minutes or so until well browned. Keep a watchful eye on it, to ensure it doesn’t burn. Allow to rest in the tin for 15 minutes before transferring to a wire rack to finish cooling.

So what was the verdict?

Pete wasn’t a huge fan (he’s a butter man), but Big Boy adored it. So much so that he asked me to hide the last bit as he couldn’t stop eating it.  I took half the cake to Kevin and Carol’s house that afternoon, where it was consumed with great gusto.

It’s not overly sweet, it’s not at all porky and it has an irresistibly crispy sugary topping. It reminds me a little of brioche, and a little of Portuguese sweet doughs.

Definitely an adventure, and one I’ll have to repeat when our friend Matthew comes over!

Perfecting the recipe: our further lardy cake adventures here…

My friend Joanna referred to these as a chocolate treasure chest, and she’s right!  I was so pleased with how they turned out that I wanted to share the photos with you.

When I was last at Harkola, I found a new ma’moul mould…

I ladled tempered Amedei Chuao into the mould…and ended up with these sharp, crisp designs that remind me of gold coins and jewels. They’re miniature versions of the chocolate wheels I made a couple of months ago. Treasure indeed!

Hope you’re all having a fabulous weekend!

Pete: “What are you making?”

Me: “Three cheese biscuits for my husband..”

Pete: “Wow. You must be pretty keen on him!”

Turns out I’m pretty keen on both him and these biscuits (cookies), because I scoffed three of them off the tray before they’d had a chance to cool.  They’re dead easy to make, and a riff on an old Dan Lepard recipe, adapted to use up the cheeses I had in the fridge. Making them in the food processor results (I think) in a smoother dough.

  • 175g plain (AP) flour
  • ½ teaspoon fine sea salt
  • half a dozen grinder twists of black pepper
  • ¼ teaspoon Kashmiri chilli pepper
  • 125g unsalted butter, cut into cubes
  • 100g Red Leicester cheese, grated
  • 50g Manchego cheese, grated
  • 50g Parmesan cheese, grated

In the large bowl of the food processor, pulse together all the ingredients excluding the cheeses until the mixture has a crumbly texture and the butter is incorporated. Add the cheeses and pulse until the mix gathers together into a ball.

Tip the dough onto a sheet of clingfilm and shape it into a log (about 4cm thick).  Wrap it up and pop it in the fridge for at least an hour.

Preheat the oven to 180C or 160C with fan. Line a baking tray with parchment paper. Remove the dough log from the fridge and unwrap it, then slice it into 0.75cm thick discs. Lay the biscuits on the lined tray and bake for 20 minutes.

Try not to eat them all before they’ve had a chance to cool on a wire rack!

A very geeky bread post, for my fellow bakers…

. . . . .

My friend Tania (of My Kitchen Stories) works for Lario International, a Sydney based importer of fine Italian wine and produce.

One of the many products they stock is this amazing Buratto flour.  At $45 per 5kg bag, it’s waaay out of my price range (particularly given the rate at which my sons consume bread), so I was pretty excited when Tania offered me this broken bag of flour to play with…

Produced by Mulino Marino, this organic Italian flour is stone ground first to retain its germ and bran, then carefully roller-milled at a low temperature. The process preserves the wheat germ oil, producing a “fatty” flour with a buttery quality (and hence the name “Buratto”).  The flour is then sieved – I believe to 80% extraction – to produce a largely white flour with a higher protein content suitable for bread making. More technical details can be found in this information sheet that Tania sent me.

The flour itself is intriguing – it comes out of the bag very clumpy and needs to be sieved before use…

According to the package label, the flour is made from a soft wheat, which is evident during the kneading process – the dough doesn’t feel as elastic or strong as it does when made with regular bakers flour. Here’s the formula I used:

  • 300g ripe sourdough starter (at 166% hydration, fed at a ratio of equal parts water to bakers flour, by volume)
  • 600g cold water
  • 1kg flour
  • 18g fine sea salt

I made two sourdoughs – a half batch with 100% Buratto flour, and a 50/50 bakers/Buratto hybrid.  Both doughs rose beautifully over seven hours.

The 100% was shaped into a round boule…

and the 50/50 into batards…

The hybrid loaves were very nice, and I loved the rabbit shape in this crumb shot…

..but the 100% Buratto loaf was amazing

The crust was hard and chewy, and the light grey crumb was elastic and firm, with a delicious, nutty flavour. It was also noticeably more sour than the hybrid loaves (Pete has a theory on that – he thinks: higher fat = lower carbohydrates, so the yeast organisms consume them faster during the proving process, and therefore the dough starts to sour sooner)…

. . . . .

On my second attempt, I made a high hydration (78%) sourdough using all Buratto flour. The dough rose slowly but surely…

The finished crumb was elastic and full of giant holes…

I’ve had a fabulous time playing with gorgeous flour. Thanks again, Tania!

Over the past month, we’ve spent a bit of time out and about, enjoying the (mostly) pleasant Sydney autumn weather. Here are a few snippets from our travels…

♦ ♦ ♦ ♦ ♦

We met up with our adorable friend Lucas at Sydney University to sample the wares of the Singapore Shiok food truck…

The truck was only in town for a limited time, but the food was delicious – I had popiah, a rice paper roll filled with turnip and swede (but more traditionally with yam bean), and a classic nasi lemak

And even though I’m in my late 40s, I felt like a young uni student again, sitting in Victoria Park in my Indian butterfly pants (thanks Beej!), chatting away to Pete and Lucas as we ate…

♦ ♦ ♦ ♦ ♦

We were honoured to attend the christening of young Tomas in Wollongong. The little man screamed through the whole service (displaying a very healthy set of lungs, much to the delight of his trombonist father).

I took this iPhone photo from our seat in the second row (Hipstamatic, Abbie Lens, D-Type Plate film)…

It was a warm, sunny day in the ‘Gong…

After the ceremony, we were invited to lunch at the Lagoon seafood restaurant in North Beach.  My prawn cocktail was very retro – complete with melon balls in a tall wineglass – and absolutely sublime

♦ ♦ ♦ ♦ ♦

“You’ll love this place!”, I told my friend Robbie as we drove to Youeni in Surry Hills for lunch.  On our way to the car, we’d picked a handful of aspagarus spears from the garden to take as a gift (it’s such a joy to know folks who are as excited about fresh produce as we are).

Instead of simply scoffing the asparagus, the incredibly lovely Youeni-ers lightly sauteed them in a little butter and lemon juice and brought them back to the table for us.  We ate a couple and then shared the rest around…

♦ ♦ ♦ ♦ ♦

I’m not sure when (or if) the Anish Kapoor exhibition will be back in Sydney, so we organised another visit to the MCA before it closed. Pete missed out the first time, and I was eager to share it with him. It turned into a fabulous day trip with the neighbours!

This time the sun was shining and the sky mirror was in its full reflective glory…

We stood on the convex side for a group photo…

And just like the first time, I was completely blown away by the exhibition. More importantly, so was my brilliant engineer husband, who was excited by both the creativity and the detailed technical aspects of the art pieces.

I took a few photos using the new panorama function on the iPhone camera…

The photo below shows the front and back of the “S-Curve” – a deceptively complicated piece – note how the reflected image is upside down on the right…

Even the food at the MCA is a work of art…

♦ ♦ ♦ ♦ ♦

Never having been to a “pop-up” restaurant before, we were keen to try La Lupita in Canterbury.  Run by the owner of Sydney food truck Al Carbón, the food was simple, spicy and tasty…

Once we’d paid for our tacos, we were free to adorn them with a selection of condiments…

The nachos were $10 a serve and Big Boy loved them so much that he ate two.

If you do decide to visit, be warned that it’s very loud inside, and that you’ll have to pay for water (which I’m not sure is entirely legal – in Australia, I believe restaurants are obliged to offer tap water for free).  When you’re eating spicy Mexican food, water at $3 a bottle adds up pretty quickly!

♦ ♦ ♦ ♦ ♦

Finally, we feasted at Let’s Eat in Marrickville – a little Thai restaurant offering flavour-filled dishes at very reasonable prices.  Dinner for four, including five mains and three desserts, cost us less than $25 per person. Pete pointed out that every dish had a distinctly different flavour (which is not always the case with suburban Thai cuisine)…

Sago pudding is one of my favourite desserts, especially done Thai style with salty coconut milk…

♦ ♦ ♦ ♦ ♦

Life in Sydney is always filled with adventures – I’m so pleased that my iPhone camera now lets me share them with you! How has your month been?