Feeds:
Posts
Comments

Archive for the ‘Frugal Living’ Category

After you’ve read this, please have a look at our updated tutorial and tips here! x

. . . . .

Last Christmas, our lovely friend Diana gave us a beeswax wrap to experiment with.

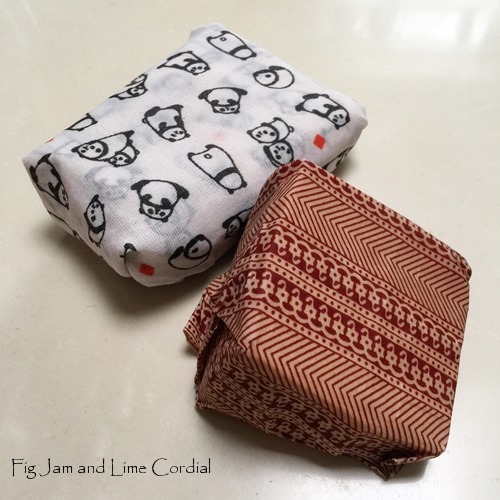
It proved to a handy replacement for plastic bags and cling film, and an ideal way to wrap loaves of sourdough…

As it’s our goal to try and live greener in 2018, and given that commercial beeswax wraps are prohibitively expensive, we thought we’d have a go at making our own (thanks for the suggestion, Margo!). There are oodles of tutorials and methods on the internet, with some more complicated than others.

Pete and I came up with a very simple technique, inspired by this informative video…

. . . . .

. . . . .

And this one from the wonderful 1 Million Women blog...

. . . . .

The only beeswax we had in the house were leftover sheets from candle making nearly a decade ago, but these proved to be perfect for the job. It took a couple of attempts to get them right, but we’re now pretty happy with the result.

Here’s what you’ll need…

  • 1 foundation sheet of natural (uncoloured) beeswax – these are available online on Ebay and Amazon, and from craft, candlemaking and beekeeping supply stores.
  • washed and ironed cotton fabric – not too thick, and make sure it’s colour fast
  • two large sheets of parchment paper
  • old towel
  • iron

1. Fold the towel in half and lay it on an ironing board. Place a large sheet of parchment paper on top.

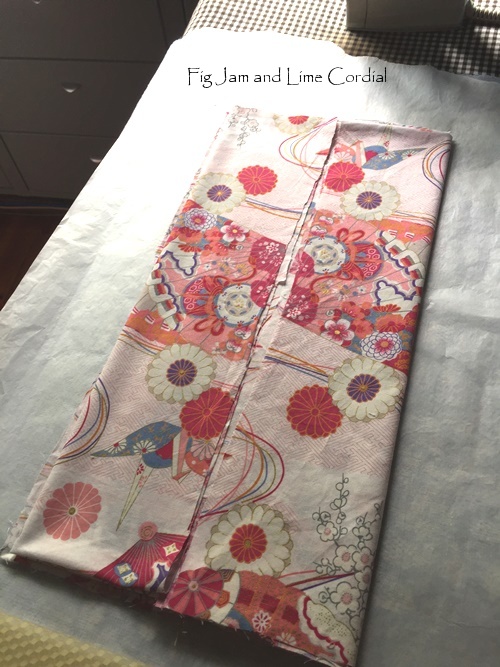
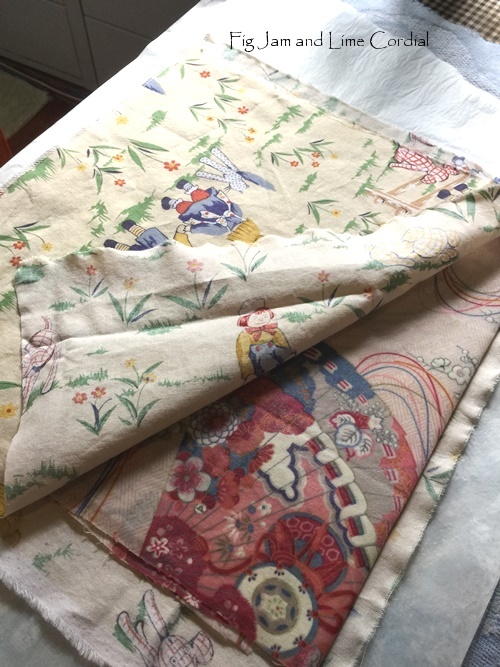
2. Fold the cotton fabric so that it’s the same size as the wax sheet. It can be between six to eight layers deep, depending on the thickness of your fabric. In this example, I’ve used the sleeves from an old Japanese yukata that I’d saved from the 1990s. The fabric is six layers thick in the photo below. Place it on top of the parchment paper…

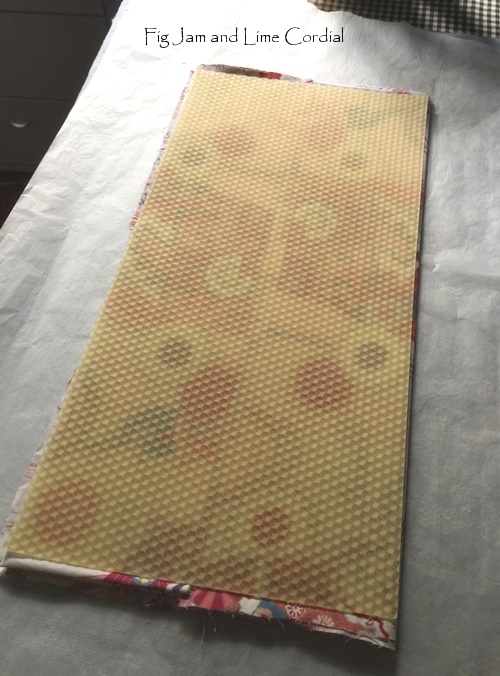
3. Put the wax sheet on top, lining it up as best you can…

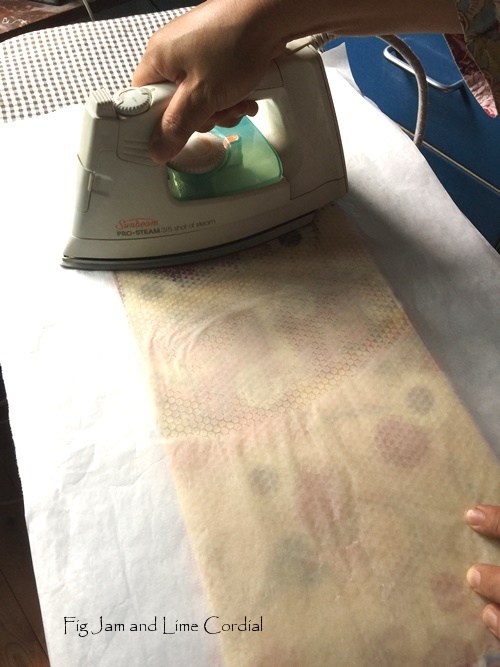
4. Cover with the other sheet of parchment paper, then iron over the top, pressing down and moving slowly over the area until the wax melts. It should seep through all the layers. Some tutorials say to use a warm iron, but I had mine on the cotton setting and it was fine…

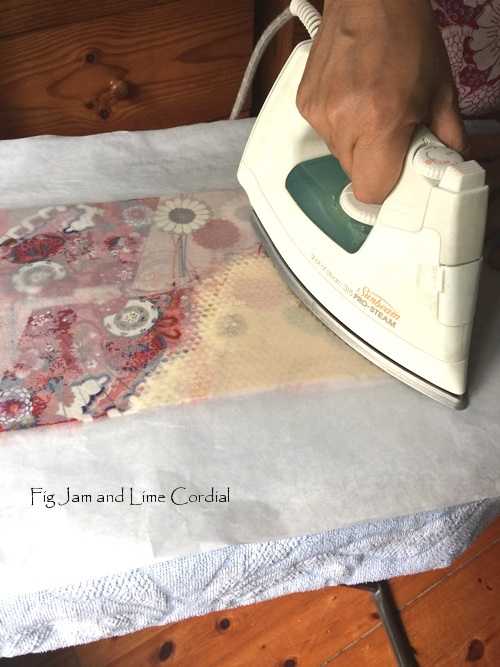
5. Holding onto both sheets of parchment, carefully flip the whole thing over and check to see if the wax has penetrated through to the bottom layer. Iron again on the flip side to help even it all out.

6. If you have excess wax (which  might happen if your fabric is quite thin), peel back the paper and place another piece of cloth over the wax-infused fabric. Cover again with the parchment and iron a bit more. There might be enough wax to soak into another cloth, but if not, just keep the partially done one for next time…

7. When the beeswax is evenly distributed (there shouldn’t be any dry patches in the fabric), remove the top layer of parchment and gently peel apart the layers. Be careful as they might be hot. Wave the finished fabric around a bit, then drape it over a drying rack or the back of a chair to let it cool completely. This won’t take very long at all. The wrap will feel waxy and a bit stiff. If you like, trim the edges with pinking shears, although they shouldn’t fray too badly…

These wraps won’t work quite as well as the commercial ones, as they don’t include pine rosin or jojoba oil, which I’ve read is added to help it “cling”. Edit: This article warning against pine rosin, so we won’t be trying it, but we did try one batch with added jojoba oil and honestly didn’t notice much difference.

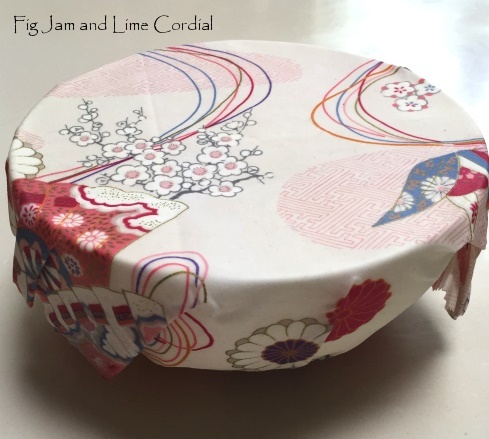
To cover a bowl, you need to hold the wrap in place for a while until the warmth of your hands shapes it a bit.I usually add a rubber or silicon band for added security…

These are really very cheap to make – we had everything we needed at home, but if you had to buy them, the foundation beeswax sheets are now about $3.50 each. I picked up a few more today at Stacks of Wax in Newtown. We’ve found that pure cotton fabrics – patchwork or sheeting weight – work best. You’re looking for a close weave with a bit of weight to it, but not too much – thick, coarse weave tea towels for example, won’t work. Make sure the fabric is colour fast before you start (avoid things like batik prints and indigo dyes) and wash and iron it first.

Edit Jan 2019: after a year of using them, the ones made with sheeting fabric have far outlasted and out-performed the others. These days I make the wraps with Sheridan sheeting offcuts that I bought years ago from Reverse Garbage, as well as retired bedsheets. Make sure you only use pure cotton sheeting.

The internet will tell you that these can be used with almost any food item other than meat. I’ve found it best to wrap anything oily (like focaccia) or sappy (cut pumpkins or sweet potato) in kitchen paper first, and then in the beeswax wrap.

After use, the wraps can be wiped down, rinsed off, or washed in gentle detergent and cool water, then left to dry before reusing. After six to twelve months, they can be re-waxed if needed. We’ve stored ours in a sealed Tupperware container, as apparently the wax can occasionally attract cockroaches.

These will make a great gift for friends, so I’m off to raid my fabric stash for more cotton!

Read Full Post »

Mesh Bags

As we stood in the checkout queue at the fruit shop yesterday, I had a happy realisation. Every single person in line had brought their own bags.

Harris Farm Markets stopped supplying plastic shopping bags on 1 January 2018 – they still have small thin ones on offer for individual items, but even those were being used sparingly. The young man in front of us was piling unbagged fruit and veg on to the counter for weighing, and the well-trained cashier was placing them carefully into his backpack after ringing up. As always, it’s a joy to live in Sydney’s Inner West, where the community is happy to embrace initiatives like this without so much as a murmur.

I always travel with a couple of furoshiki in my handbag these days…

As I’ve mentioned previously, Harris Farm offers a range of imperfect fruit and vegetables – a boon to both the farmer and the purchaser. I was so impressed with the green mesh bags provided for these items that I wanted to make my own. It was a great use for the roll of mosquito netting that has been sitting in my sewing room for twenty years, and the bag of lanyards I picked up at Reverse Garbage six months ago. Not being a minimalist occasionally pays off…

The prototype worked so well that I came home and whipped up a dozen more. The fabric doesn’t fray, so it was a doddle to adapt the glasses case pattern from my Useful Bag post…

We picked up a mesh bag full of imperfect apricots for $3.99/kg (as opposed to $12.99/kg for the perfect ones) so that Pete could make our favourite jam. Of course, first we had to make pectin from Granny Smith apples (lucky they had seconds of those too). It’s been a very long time since we’ve had any of our own homemade jam, so this was a real treat…

My friends in the UK tell me that shops are now required to charge for plastic bags over there, which has greatly reduced their use. We still use more at home than we’re happy with, although we make a concerted effort to wash and recycle them wherever possible. How are you going with reducing your plastic usage?

Read Full Post »

I know, I know. I bang on about this all the time.

The very best part of sourdough baking (for me) is being able to share bread with others.

And as my friends on the Bay Run found out recently, if you stand still long enough, I’m likely to hand you a loaf. In turn, Sue and Mel shared their warm baguettes with our favourite barista Samira, and when I popped in for a coffee the following day, she asked me if I’d bake a fruit loaf for her.

I don’t normally bake to order, but I couldn’t refuse Sami – after all, she’s been cheerfully making brilliant decaf piccolos for me for over a year. So I took the box of dried fruit she gave me and baked three sourdough fruit loaves for her the next morning…

She was excited, but didn’t want to take all three loaves. I figured she could share one and take two home, which is exactly what she did. By the time Mel and Sue had made their way over for coffee, Sami had already cut up and handed out a whole loaf to customers. How cool is that!

Big Boy and I shared a hot buttered slice as we walked, and it was divine

I came home, fed up Priscilla, and made another batch. Here’s the formula I used:

  • 100g bubbly sourdough starter (see note)
  • 1kg bread/bakers flour
  • 700g – 750g water (the flour I’m currently using is very thirsty, so adjust the water quantity as needed)
  • 18g fine sea salt
  • ½ teaspoon ground cinnamon
  • 100g dried dates, chopped
  • 50g dried apple, finely chopped
  • 50g dried apricots, chopped
  • 100g walnut pieces

Note: Over the past couple of years, I’ve adopted the current trend of using less starter in my sourdoughs, and the results have been very pleasing. You could, however, simply add the dried fruit and cinnamon to the basic overnight sourdough recipe and it should work fine.

1. In a large mixing bowl, stir together the starter, water, cinnamon and dried fruit.

2. Add the flour and salt, and squelch everything together with a clean hand. Cover and allow the dough to rest for about half an hour.

3. Uncover the dough and give it a brief knead in the bowl (less than a minute), then cover it again and allow to prove overnight.

4. The following morning, the dough should be well risen and puffy. Dust the bench with flour or fine semolina (my preference) and scrape out the dough. Stretch and fold it onto itself so that all sides are coated in flour – this makes it easier to work with. There are photos of this process in our earlier tutorial.

5. Divide the dough into two or three even pieces. I bake three smaller loaves in my ginormous oven, but you could just as easily bake two larger ones. If you have a tiny oven, just halve the quantities and bake a single loaf. Shape each piece into a ball, then let it sit on the bench for 15 minutes, covered in a tea towel. This short rest will make shaping the loaves much easier.

6. Shape each ball into a round or oval loaf, trying to keep as much fruit inside the loaf as possible. Sit each loaf on a sheet of parchment, or nestle it seam-side up in a tea-towel lined banneton. If you’re going to use bannetons, I suggest rolling the shaped dough in fine semolina first, which will help prevent sticking. Preheat the oven to 220C with fan. Allow the dough to prove until puffed up – about 30 minutes to an hour.

I line my bannetons with Tenegui (coarse weave cotton hand towels) from Daiso. They work brilliantly!

. . . . .

7. If using bannetons, carefully turn the loaves onto sheets of parchment and slash a long cut on the top, either in the middle or offset to one side. Try to avoid any bits of fruit.  Place each loaf into an enamel roaster and cover with lid. Bake in the oven for 20 minutes.

My grotty enamel roasters. I never bother to wash them!

8. Remove the lid and bake for a further 20 minutes (you might need a bit more time if you’re baking larger loaves). I like to reduce the temperature to 210C with fan at this point, as the sugars in the fruit can cause the top to burn a bit. Bake until well browned and hollow sounding.

. . . . .

In theory, you should let the loaves cool before slicing, but this bread was so delicious hot and smothered in butter that all I can really recommend is letting it rest for half an hour or so before cutting into it.

This is hands down my favourite fruit and nut sourdough so far! It doesn’t have raisins or sultanas in it, nor is there any added sugar, yet the dates, apples and apricots add rich sweetness and depth of flavour. The walnuts turn the dough a gorgeous purpley-grey which carries through to the finished bread.

I took a leaf out of Sami’s book and invited all the neighbours over for a slice…

. . . . .

Break bread with others, folks. Share the sourdough love as often as you can! ♥

PS. If you’re just starting out, you might enjoy our earlier sourdough tutorials:

Overnight Sourdough Tutorial

Overnight High Hydration Sourdough Tutorial

Read Full Post »

I’m always a bit conflicted when I post photos that I’ve taken at the White Rabbit Gallery.

On the one hand, I really want to encourage everyone in Sydney who has an interest in contemporary Chinese art to visit, and I don’t want my photos to gazump the magic of seeing an incredible piece for the first time. Additionally, many of the artworks are large and immersive, and it’s hard to do them justice in two dimensions. On the other hand, I know many of you don’t live in Sydney and will never get to see these amazing and unique pieces in person.

My compromise is to offer you a taster – a small snippet of what’s on offer over the three gallery floors. And it was hard to pare the photos down for this post, because Ritual Spirit is one of the most beautiful White Rabbit exhibitions ever.

. . . . .

Farfur the Martyr (2008) by Peng Hung-Chih, a stainless steel creation juxtaposing different religious views on the meaning of martyrdom, stands in the entrance foyer…

. . . . .

Defence (2014) by Xia Hang is a large stainless steel clockwork construction. Like all things steampunk, I found it hypnotically beautiful and instantly appealing…

. . . . .

Mr Sea (2014) by Geng Xue combines video with exquisitely expressive porcelain puppets…

. . . . .

Play 201301 (2013) by Xu Zhen is a tied and suspended cathedral created from leather and BDSM accessories. It fills an entire room…

. . . . .

100 Years of Repose (2011) by Yu Hong poignantly depicts what the artist refers to as China’s “sleeping sickness”. The pressures of modern Chinese life are so great that people fall asleep anywhere they can – on trains, benches or even under parked trucks…

. . . . .

Finally, a clip of the ethereally beautiful Scripting (2011) by Luxury Logico of Taiwan. Thirteen suspended fluorescent tubes move in time with John Cage’s haunting music. The artwork is massively enhanced by the clever curatorial decision to place it in a darkened room over a reflective black vinyl floor…

. . . . .

Every piece comes with its own story, and I’ve included links in the post above so that you can read a bit more about the individual artists.

The White Rabbit Gallery is one of Sydney’s great treasures and I’d urge you to visit if you ever get the opportunity to do so. Focusing on works of contemporary Chinese art made in the 21st century, the gallery continues to share these with the public completely for free. Their exhibitions are always brilliantly curated, thought-provoking and often very poignant.

. . . . .

White Rabbit Gallery
30 Balfour Street
Chippendale NSW 2008

RITUAL SPIRIT is open 10am to 5pm, Wed-Sun.
The exhibition runs until 28 January 2018

Read Full Post »

Origami Stars

When I was young, I used to make these little paper stars until my hands hurt.

They were folded from strips of paper, which came in assorted colours that cost about 50c a packet. When I found them again recently in Japantown, San Francisco, I couldn’t resist buying some to teach my young friend Tully how to fold them.

The technique is quite simple and well explained in this excellent YouTube video…

. . . . .

. . . . .

The strips are 1cm wide by 25cm long – you could cut them by hand, but they’re so cheap to buy that it hardly seems worth it. If you’re in the US, this bulk set from Amazon is good value, otherwise they’re easy to order from Ebay…

Warning: it can quickly become an addictive pastime!

It’s easy to recycle treasured papers as well – these wrappers from the Dandelion Chocolate bars (mentioned in the previous post) were far too pretty to waste, so we steamed off the labels and guillotined them into strips. We still have three bars to eat, but when they’re finished, I should have enough stars to fill a small glass bottle. It will be a perfect holiday souvenir!

Read Full Post »

« Newer Posts - Older Posts »