Feeds:
Posts
Comments

Archive for the ‘Recipes’ Category

Last weekend, I taught a couple of friends how to bake sourdough from scratch.

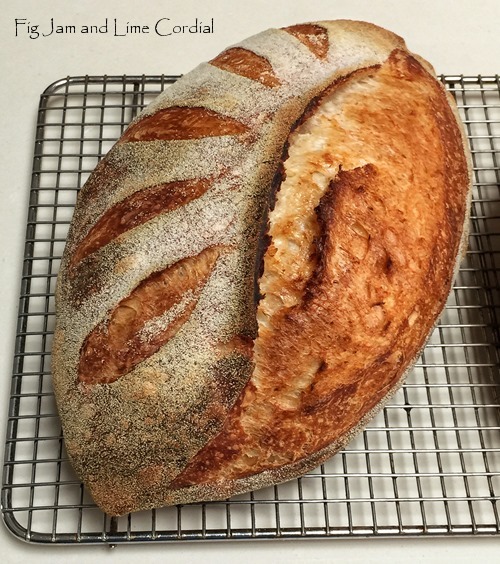
Over the course of the morning, I discovered that as a face to face teacher, I have limitations. I try to provide a lot of information, which can be difficult to take in fully during a few hours on a Saturday morning. Sometimes it works well – Helen sent this photo of her first solo loaf the following day, and it was perfect

A couple of days later, I had a text from my other friend which began with…“Ok, so the Japanese tea towel caught fire..”

Hmm. I thought I’d better write notes.

I’ve written several sourdough tutorials over the years – our original Overnight Sourdough Tutorial, which I wrote in 2014, is still one of the most popular posts on our blog. Following that came our High Hydration Overnight Tutorial in 2016, which was almost as popular. But the way I make my dough is constantly evolving – the High Hydration tutorial adopted the newer trend of using a much smaller proportion of starter to flour, and I’ve reduced it even further after reading Emilie’s excellent book, Artisan Sourdough Made Simple.

So this blog post is a rundown on how I’m teaching my friends to make sourdough in 2018. I’ve cheated a bit and used notes and photos from our previous tutorials – the method has been tweaked, but it’s still basically the same. There are also a couple of new videos showing the current shaping and slashing techniques I’m using.

. . . . .

An integral part of the process is the baking of the dough in an enamel roaster. This makes a world of difference to the finished loaf. If you haven’t already invested in one, they’re very affordable, especially compared to enameled cast iron. You can buy the Wiltshire brand at David Jones, or the Falcon brand at Peters of Kensington. If you’re in the US, there are heaps available on Amazon at very reasonable prices…

. . . . .

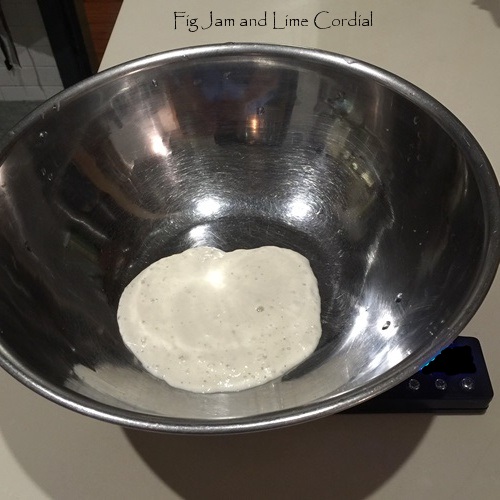
Begin with your starter bubbly and active. Start feeding it up about eight hours before you need it. Don’t even contemplate making dough if it doesn’t look like this. Test it by putting a small spoonful into a glass of water – if it’s ready, it will float.

Please, please, please read this post on how to feed and care for your starter…

Start at least an hour before you’re ready to go to bed and measure out 100g of bubbly starter into a large mixing bowl…

Add 700g of cool or room temperature water…

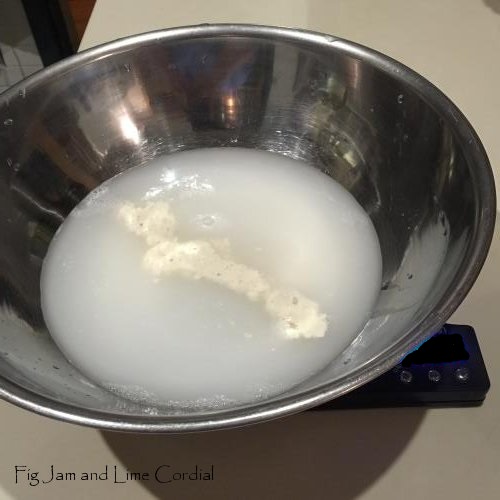
Add 1kg bakers or bread flour…

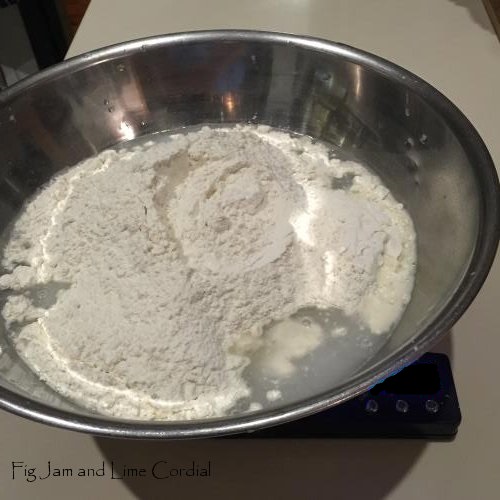
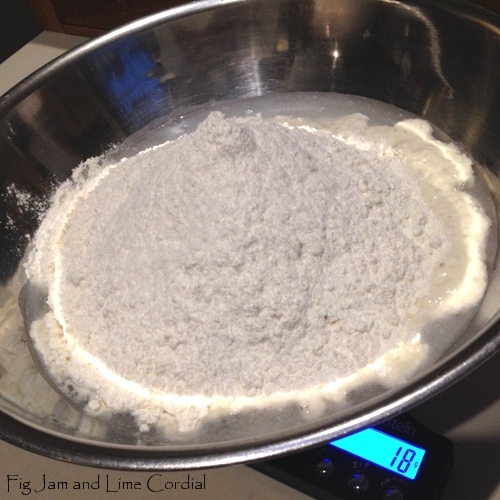
Add 18g fine sea salt…

With a clean hand, squelch everything together, then scrape off your hand and cover the dough with a shower cap or tea towel. Let it sit on the bench for half an hour or so…

ostn6

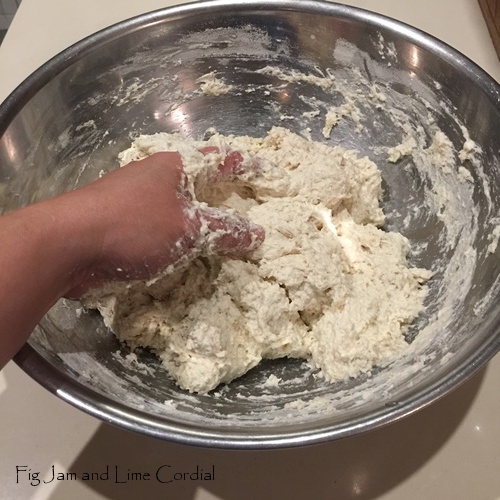
After the dough has rested, uncover it and give it a quick knead (for about a minute or so)…

Cover the dough with a shower cap, beeswax wrap or wok lid and leave it on the bench overnight.

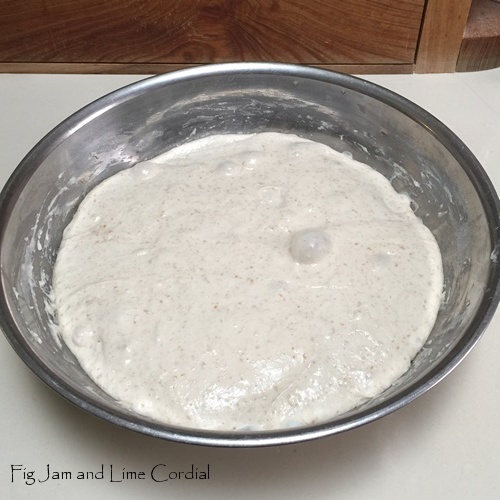
The following morning, it will look like this (but without the speckly bits as I no longer add wholemeal – sorry, it’s a recycled photo)…

ostn9

Dust the bench really well with fine semolina (rye flour, rice flour or just bakers flour will also work). Scrape out the dough…

ostn9a

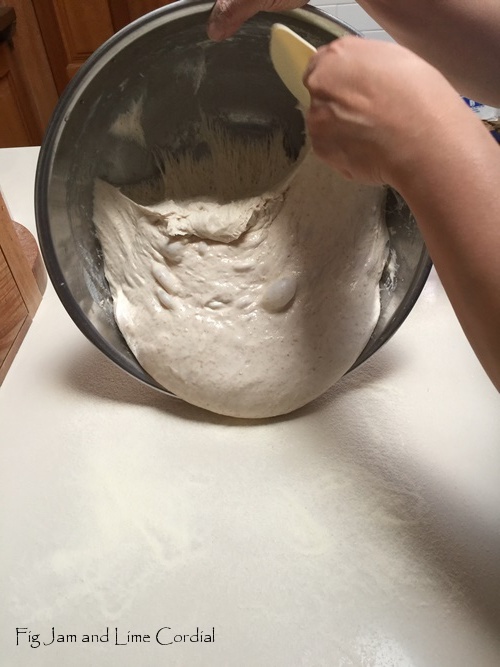
It will be soft and puffy, and a bit sticky…

ostn9b

Now here’s the trick…using your spatula, scrape under the dough on one side and stretch it up…

ostn9c

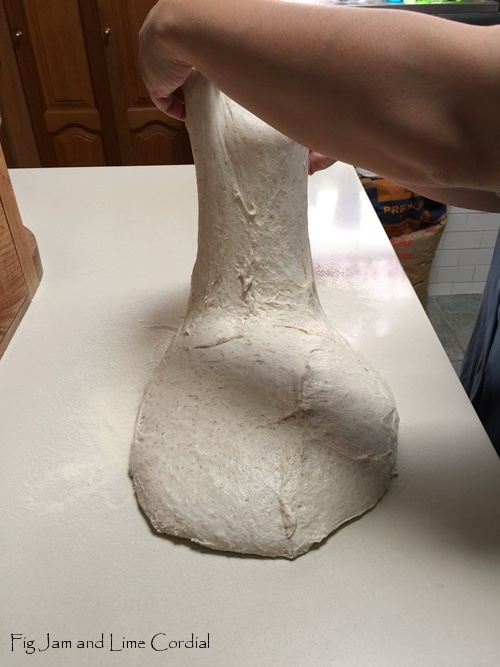
Fold it over the top of the dough…

ostn9d

Repeat with the other side…

ostn9e

Do the same thing with the bottom part of the dough…

ostn9f

And again with the top section…

ostn9g

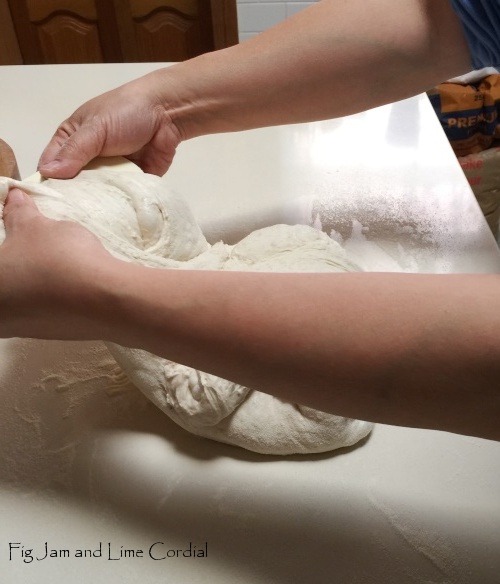
These four folds enclose all the sticky bits of the dough inside, leaving a completely semolina dusted (and therefore much easier) exterior to work with…

ostn9h

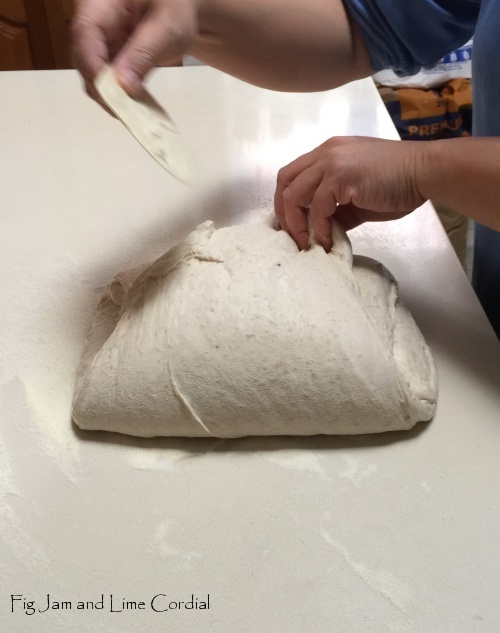
Using your spatula, divide the dough in half.

A note at this point: I have a large oven and several enamel roasters, so I always bake at least two loaves at the same time (usually three). If your oven can only fit one loaf at a time, you can either make a half batch, or divide the dough in two and return one half to the covered mixing bowl. Begin preshaping the second loaf when you place the first loaf into the oven…

ostn9i

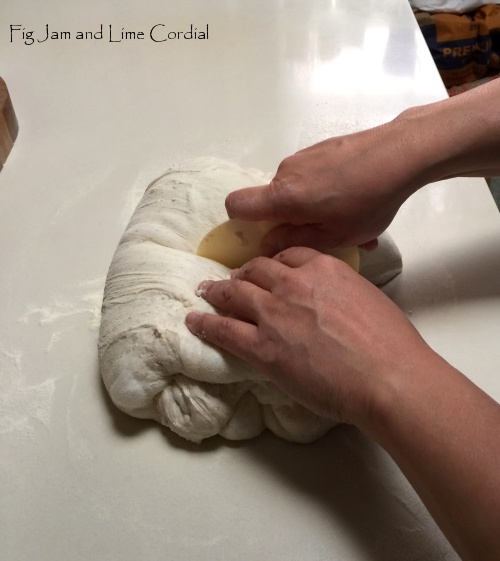
Shape each half into a rough ball by folding the edges into the middle…

. . . . .

. . . . .

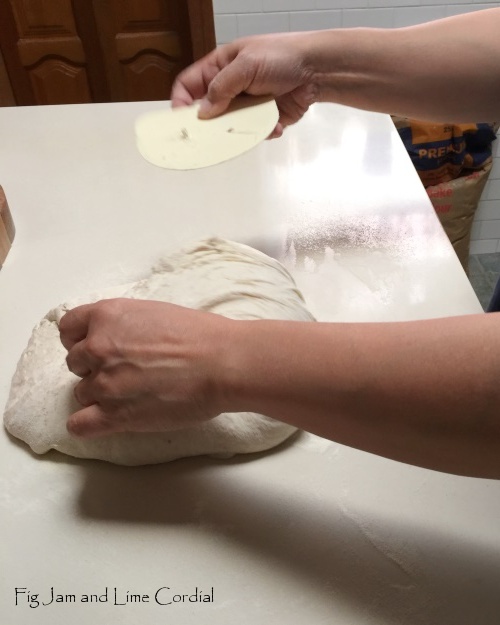
Leaving the dough balls seam side up, dust the tops with semolina…

ostn9k

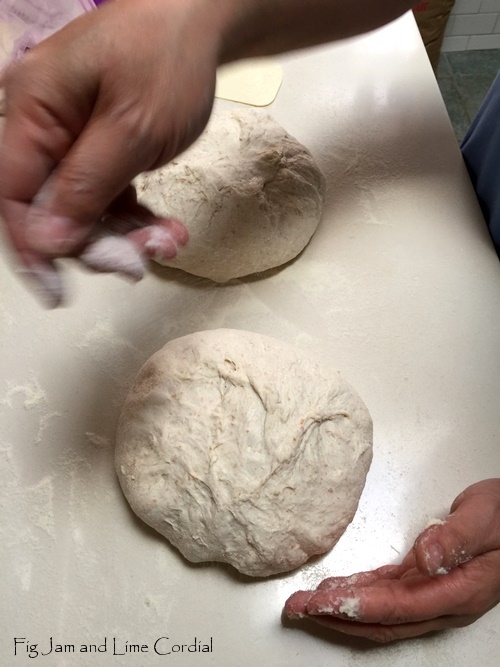
Cover with a clean tea towel and allow the dough to rest for about 15 minutes. This preshaping process makes the dough much easier to handle…

ostn9l

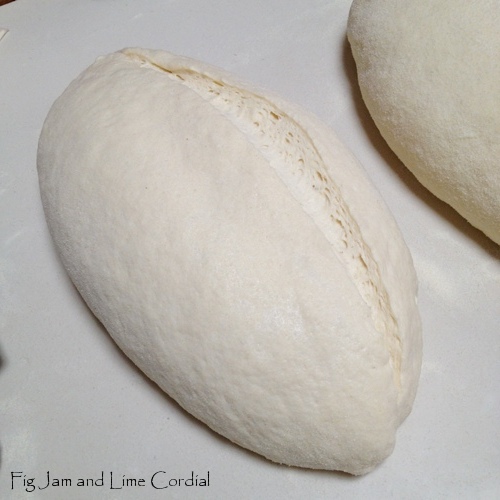
Uncover the dough and flatten each ball, then shape them into oval loaves. I do this by folding the edges in at the top and bottom, then folding the dough in half. Here’s a new video of my current shaping technique…

. . . . .

. . . . .

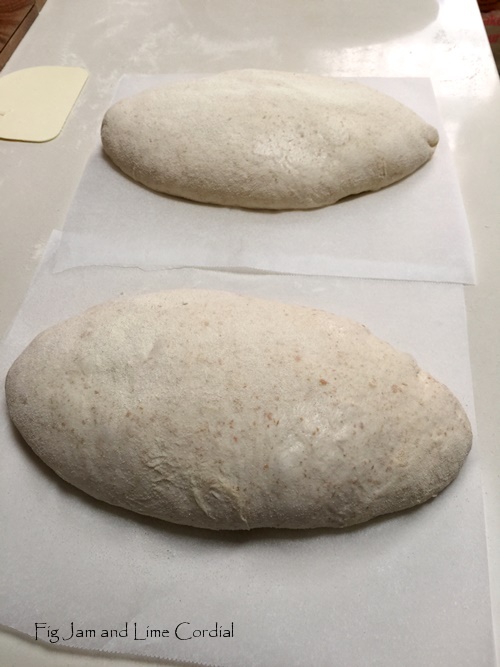
Place each shaped loaf onto a sheet of parchment paper, seam side down, then cover them with the tea towel again and allow them to prove for a further 30 – 60 minutes…

ostn9m

Alternatively, you could put them into tea towel lined bannetons – roll the shaped loaves gently in fine semolina first if you’re planning to do that, and put them gently into the baskets seam-side up (you’ll invert them out onto the parchment paper later).  Let the dough rise for a further 30 – 60 minutes, depending on the ambient temperature in your kitchen.

At this point, turn your oven on and preheat it to 230C with fan.

Once the loaves have puffed up a bit, it’s time to slash. If the dough is in bannetons, turn it out carefully onto parchment paper.

The easiest thing to do is to make just one long slash down the side, and it’s a technique that works well. You can use a serrated knife, a lame or a razor blade…

If you’d like to try something fancier, you might like our “half starburst” slash. Use a sharp razor if you’re going to attempt it – the single slash will be fine if made with a serrated knife, but the fancier patterns need a thinner blade. Remember to slash with panache!

ostn9o

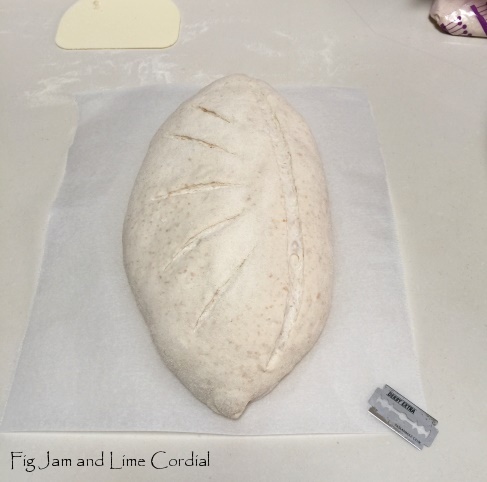
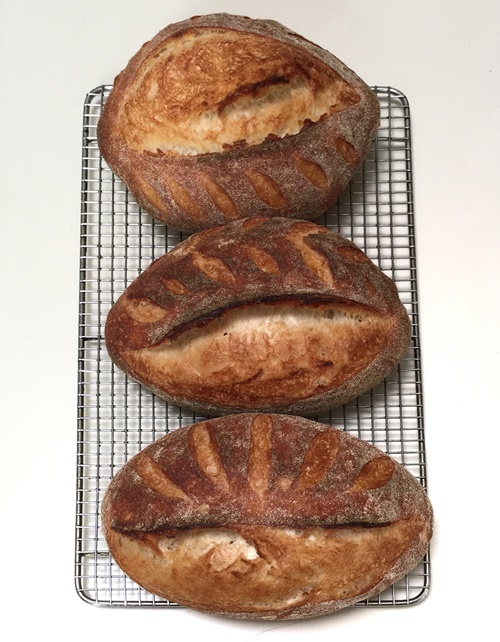
Here’s a new video of my slashing patterns – I gave up on using a lame ages ago and now just wield my razor commando style. I end up with a lot of tiny cuts on my fingers, but I like the control…

. . . . .

. . . . .

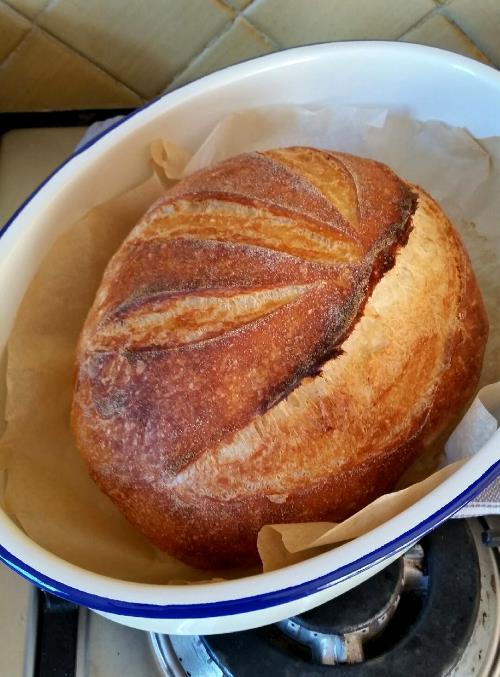
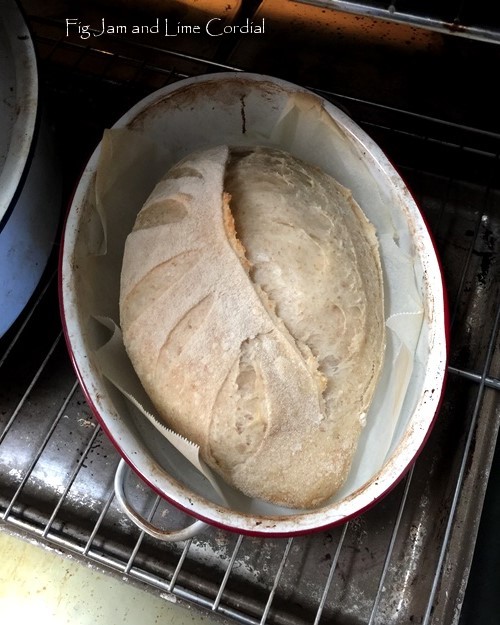
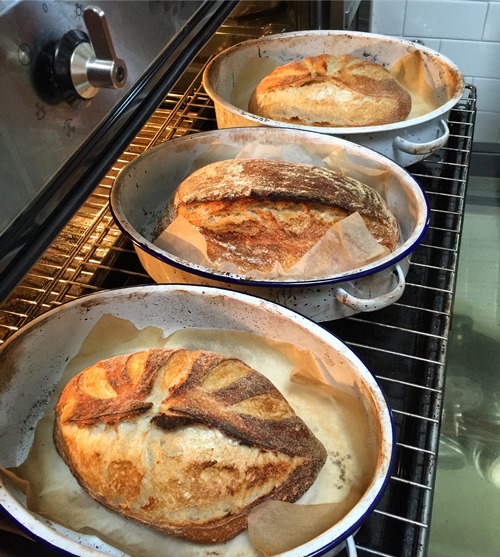
Lifting by the sides of the parchment paper, lower each loaf into an enamel roaster. Spritz the top of each loaf with a little water, if you like (it’s not essential). Cover with the lids, then put them into the oven, reducing the heat to 220C with fan. Note that the pots are cold – I don’t think it’s necessary to preheat them.

Set the timer for 20 – 25 minutes (you’ll figure out how your oven bakes after the first couple of tries. I now bake for 23 minutes with the lid on!)…

ostn9p

At the 20 (to 25) minute mark, uncover the pots to release any remaining steam – the loaves should be well risen and just starting to brown. Leaving the lids off, rotate the pots, then close the oven again and set the timer for a further 15 -20 minutes (again, you’ll figure it after your first bakes – I now do 15 – 16 minutes lid off, depending on how Bobby is behaving that day).

One other thing to note – I usually bake three loaves at a time, if you’re baking a single, you might need less time. Experiment and find the timing that best suits your oven.

ostn9q

After the second 15 – 20 minutes, the crust will be dark brown and crisp. At this point, I pull the loaves out of the oven and let them cool on a wire rack. If you’d like the loaves darker, take them out of the pot and place them directly on the rack for a further 5 – 10 minutes.

Here’s a photo taken from our cooking class…

The finished loaf should feel light and crusty. It will sound like a hollow drum when tapped on the bottom. Allow to cool completely on a wire rack before slicing…

ostn9t

Here are the loaves I slashed in the video above…

I’ve found that the loaves keep well for a couple of days in a beeswax wrap (make sure they’re cool first)..

If you’re new to sourdough, I hope you’ll give this method a go. I don’t have any starter to share at the moment, but lovely Emilie’s book has clear instructions on how to grow your own, and I believe she’s also selling her starter Dillon via mailorder. Have fun! ♥

Read Full Post »

Christmas Fruit Loaf

A super quick post…

This year, I’ve baked Christmas fruit loaves for the neighbours. They’re packed with colourful dried fruit, nuts and cinnamon (but no added sugar), and they’re very tasty…

Here’s the formula I used:

  • 100g bubbly active sourdough starter
  • 1kg bread/bakers flour
  • 750g water
  • 18g fine sea salt
  • 100g walnut pieces
  • 100g chopped dried figs
  • 100g dried cranberries
  • 50g chopped dried apples
  • 50g chopped glace orange slices
  • 1 teaspoon cinnamon

I followed the instructions in our overnight high hydration tutorial, adding the fruit, nuts and cinnamon with the water. The dough will turn a gorgeous purpley hue. The only other change is to drop the temperature of the oven by 10 degrees once the lids of the roasters have been removed – the dried fruit has a tendency to burn otherwise.

I wrapped each loaf in a paper bag and sealed it with washi tape. Easy, delicious and very festive! ♥

Read Full Post »

Picanha, also known as beef rump cap, is traditionally cooked hot and fast, then served rare.

I saw it advertised for sale last week at our local Harris Farm Market for just $12.99/kg. It was a locally raised, grassfed bargain, so I shouldered my old backpack and walked to the nearest store. Of course, I’d forgotten that I can’t seem to enter a Harris Farm and not leave with a full load, so the 2km walk home was a bit tricky…

At this point, may I take a brief moment to rave about Harris Farm Markets? For two seconds in the early 1990s, I worked with Cathy Harris (she was in PR back then) and met her and David on the odd social occasion. They were the nicest people – smart and entrepreneurial, but also kind and very family focused. So I was delighted but not at all surprised to read recently that Harris Farm Markets continues to be a family business, now run by three of their five sons.

As a shopper, I like everything about them (I have no idea what they’re like to work for or with). They offer a large and diverse range, they don’t sell caged eggs in their stores, they’re getting rid of plastic bags altogether, and much of their meat is grassfed and free range. A few years ago (and months before the supermarkets), they started selling imperfect fruit and vegetables at greatly reduced prices, to the benefit of both farmer and consumer. And they have pretty fabulous specials, which they email out every week to subscribers.

Which brings me back to my rump cap. There were a few brands on offer, but I bought this grassfed Angus beef from the Australian Meat Group…

The meat wasn’t marbled, but it did come with a generous “cap” of fat…

As I said at the beginning, the traditional way of cooking picanha is hot and fast, until the fat renders and crisps but the meat is still quite rare. I, on the other hand, had been craving slow cooked beef all week.

I dragged out my trusty Römertopf clay pot and popped it into a sinkful of water to soak for 20 minutes…

romertopf

This photo was taken when my pot was new. It’s not so clean now (sigh)…

The fat on the cap was scored deeply and the whole piece rubbed generously with salt and pepper, before being nestled (fat side up) into the soaked pot – I had to squish it a bit to fit. With the lid on, the pot went into a cold oven and I turned the heat up to 200C with fan.

After an hour, I took the pot out carefully and sat it on a folded tea towel (the Romy is quite sensitive to thermal shock, so plonking a hot pot onto a cold bench could cause it to crack). I poured boiling water in almost to the fat level, and added a couple of large pinches of salt.

The lid went on and the pot went back into the oven, with the heat reduced to 150C with fan, for a further two hours. By that stage the meat was very tender – we carefully removed it from the pot and wrapped it in foil to rest. The fat was skimmed off and used  to flavour roast potatoes, and Pete turned the stock into a delicious gravy.

Here’s the end result…tender and incredibly flavoursome slow cooked Aussie beef, cut with the grain to keep the slices intact. The 1.75kg piece cost us $22.50 and produced enough food to feed four adults generously or five comfortably…

We served it with homemade caponatina, potatoes roasted in the beef fat, focaccia croutons and Pete’s perfect gravy…

This was sooo good that I raced back to Harris Farm the following day and bought a couple more rump caps for the freezer!

Read Full Post »

The Power of Scrimping

My friend Al laughed at me recently.

“You’re always figuring out how much everything costs!”, she said.

I had to laugh with her – I’ve been doing it for so long now that I don’t even notice. It was ironic too, because while I was telling her about buying broken bags of salt at bargain prices, we were busy eating at Anason in Barangaroo. The food was excellent, but certainly not cheap…

You see, whilst the adding up and counting costs began out of necessity, a lot of time has passed since then. It was important when Small Man was sick in hospital and Pete had been retrenched, but that was decades ago. And although we live a fairly moderate lifestyle now, we certainly aren’t stingy on ourselves.

So it’s intriguing that I still find so much joy in scrimping and saving. Is it that my Asian genes love a bargain? Maybe that plays a part. But after giving it more thought, I’ve decided that it also has to do with empowerment. I find it very reassuring to know that if the time ever came again that we had to survive on very little, we could.

Actually, survive isn’t the right word. I reckon we could thrive. We would eat our homemade sourdough at 60c a loaf, turn chicken bones into hearty meals, bake cakes with discounted tinned fruit, and cook up nourishing pasta soups.

Which is, in fact, how we eat now – not because we have to, but because we enjoy it. It feels like an important life lesson to pass on to Big Boy and Small Man – work hard, enjoy yourselves, but understand that if times ever get tough, you can always survive thrive on very little. I know too many people who equate contentment with a certain level of income, but life has shown us the hard way that it’s not something we always have control over. By practising frugality even when we don’t need to, we hope to model a mindset to our sons that will not just prepare them for, but allow them to embrace, the unpredictability of life.

. . . . .

On our last trip to Costco, baby barramundi from Humpty-Doo (it’s a real place, google it!) was discounted by 50%. We brought home two fish, cut off the heads, then filleted them. The four fillets (skin on) and the bones were dusted in seasoned flour and simply pan fried, then I microwaved the heads with black beans and spring onions.

Accompanied by stir fried garden vegetables and steamed rice, this was a delicious meal for four adults using just $10 worth of fresh local fish. See, I’m still adding up! Do you do it too? ♥

Read Full Post »

I know, I know. I bang on about this all the time.

The very best part of sourdough baking (for me) is being able to share bread with others.

And as my friends on the Bay Run found out recently, if you stand still long enough, I’m likely to hand you a loaf. In turn, Sue and Mel shared their warm baguettes with our favourite barista Samira, and when I popped in for a coffee the following day, she asked me if I’d bake a fruit loaf for her.

I don’t normally bake to order, but I couldn’t refuse Sami – after all, she’s been cheerfully making brilliant decaf piccolos for me for over a year. So I took the box of dried fruit she gave me and baked three sourdough fruit loaves for her the next morning…

She was excited, but didn’t want to take all three loaves. I figured she could share one and take two home, which is exactly what she did. By the time Mel and Sue had made their way over for coffee, Sami had already cut up and handed out a whole loaf to customers. How cool is that!

Big Boy and I shared a hot buttered slice as we walked, and it was divine

I came home, fed up Priscilla, and made another batch. Here’s the formula I used:

  • 100g bubbly sourdough starter (see note)
  • 1kg bread/bakers flour
  • 700g – 750g water (the flour I’m currently using is very thirsty, so adjust the water quantity as needed)
  • 18g fine sea salt
  • ½ teaspoon ground cinnamon
  • 100g dried dates, chopped
  • 50g dried apple, finely chopped
  • 50g dried apricots, chopped
  • 100g walnut pieces

Note: Over the past couple of years, I’ve adopted the current trend of using less starter in my sourdoughs, and the results have been very pleasing. You could, however, simply add the dried fruit and cinnamon to the basic overnight sourdough recipe and it should work fine.

1. In a large mixing bowl, stir together the starter, water, cinnamon and dried fruit.

2. Add the flour and salt, and squelch everything together with a clean hand. Cover and allow the dough to rest for about half an hour.

3. Uncover the dough and give it a brief knead in the bowl (less than a minute), then cover it again and allow to prove overnight.

4. The following morning, the dough should be well risen and puffy. Dust the bench with flour or fine semolina (my preference) and scrape out the dough. Stretch and fold it onto itself so that all sides are coated in flour – this makes it easier to work with. There are photos of this process in our earlier tutorial.

5. Divide the dough into two or three even pieces. I bake three smaller loaves in my ginormous oven, but you could just as easily bake two larger ones. If you have a tiny oven, just halve the quantities and bake a single loaf. Shape each piece into a ball, then let it sit on the bench for 15 minutes, covered in a tea towel. This short rest will make shaping the loaves much easier.

6. Shape each ball into a round or oval loaf, trying to keep as much fruit inside the loaf as possible. Sit each loaf on a sheet of parchment, or nestle it seam-side up in a tea-towel lined banneton. If you’re going to use bannetons, I suggest rolling the shaped dough in fine semolina first, which will help prevent sticking. Preheat the oven to 220C with fan. Allow the dough to prove until puffed up – about 30 minutes to an hour.

I line my bannetons with Tenegui (coarse weave cotton hand towels) from Daiso. They work brilliantly!

. . . . .

7. If using bannetons, carefully turn the loaves onto sheets of parchment and slash a long cut on the top, either in the middle or offset to one side. Try to avoid any bits of fruit.  Place each loaf into an enamel roaster and cover with lid. Bake in the oven for 20 minutes.

My grotty enamel roasters. I never bother to wash them!

8. Remove the lid and bake for a further 20 minutes (you might need a bit more time if you’re baking larger loaves). I like to reduce the temperature to 210C with fan at this point, as the sugars in the fruit can cause the top to burn a bit. Bake until well browned and hollow sounding.

. . . . .

In theory, you should let the loaves cool before slicing, but this bread was so delicious hot and smothered in butter that all I can really recommend is letting it rest for half an hour or so before cutting into it.

This is hands down my favourite fruit and nut sourdough so far! It doesn’t have raisins or sultanas in it, nor is there any added sugar, yet the dates, apples and apricots add rich sweetness and depth of flavour. The walnuts turn the dough a gorgeous purpley-grey which carries through to the finished bread.

I took a leaf out of Sami’s book and invited all the neighbours over for a slice…

. . . . .

Break bread with others, folks. Share the sourdough love as often as you can! ♥

PS. If you’re just starting out, you might enjoy our earlier sourdough tutorials:

Overnight Sourdough Tutorial

Overnight High Hydration Sourdough Tutorial

Read Full Post »

« Newer Posts - Older Posts »