I’ve been responding to quite a lot of emails from new Priscilla bakers, so I thought I’d write an FAQ post. For more tips on sourdough baking, please check out Emilie’s fabulous primer here.
. . . . .
1. Flour
I always feed Priscilla with bog standard white bread (bakers) flour. It needs to be bread (bakers) flour because the wild yeasts need the higher protein to feed on and that isn’t available in plain (AP) flour. I know many people who successfully feed their starters with rye flour, but I’m not a huge fan of the flavour, so I don’t do that.
I know that ideologically it would be lovely, but I’ve found that stoneground organic flours don’t work. They’re ok for actually making the dough with, particularly if you’re a fan of heavier loaves, but I’ve never known anyone to successfully activate or keep lively a Priscilla starter with them. That’s because stonegrinding produces a heavy, coarser particle, whereas steel rollermilling (which is how regular white bakers flour is made) results in a much finer, consistent flour.
I currently alternate between the Manildra and Ben Furney Flour Mills brands, both of which are excellent. Bakers in Victoria have had great success with the Wallaby brand as well.

. . . . .
2. Water
Water has proven to be a bugbear for a few sourdough bakers. In parts of Australia, our water can be heavily chlorinated which can kill the starter off. I always use filtered water to feed the starter, but I find I can get away with tap water to make the actual dough. If you’re still having trouble and you’re using filtered water, you might want to check that your filter cartridge doesn’t need replacing.
If you don’t have filtered water, both Jason and Maz have had great success with using water that has been boiled first then allowed to cool.
. . . . .
3. Storing the Starter
When I first started baking sourdough, I couldn’t bring myself to throw any excess starter away (I still have trouble with it now). As a result, I ended up with lots of jars of starter in the fridge, busily trying to keep them all alive.
I’ve since learnt that this is false economy. When the amount of starter in the fridge gets too large, the small weekly feeds aren’t enough to keep it going, and the starter can stagnate and start to die off. So these days I keep no more than 1 – 1½ cups of starter in the fridge at any given time. Here is a photo of my fridge starter, just after feeding and before going back into fridge…

My maintenance routine is this: whenever I bake, I take the starter out of the fridge (where it’s stored in a covered container), give it a stir and pour about ¼ – ½ cup into a large bowl.
Into the container, I stir in ¼ cup each of bakers flour and filtered water. It is then covered and immediately returned to the fridge for next time. If you’re not baking regularly, feed the starter like this once a week to keep it healthy. Make sure to discard a little bit each time.
Into the bowl, I stir in ¼ cup each of bakers flour and filtered water. It is then covered with a plastic shower cap and left on the bench. About 4 hours later, I stir in ¼ cup of flour and water. A few hours after that, the starter is usually raring to go (but if it’s not, I’ll feed it again and adjust my baking schedule). The starter should be super bubbly before it’s used to make dough…

Don’t panic if your starter looks like this when you take it out of the fridge after a week. Depending on the weather and how often it’s been fed, the starter can look pretty sorry at times. Occasionally it can build up liquid on the top known as “hooch”, which I believe is the alcoholic byproduct of fermentation. Just pour this off…

Edit: here’s a great tip from my friend Emilie. To test if your starter is ready for making dough, drop a spoonful into a tall glass of water. If it floats, it’s ready to go!

. . . . .
4. Sharing the Starter
One of the great joys of having a thriving sourdough starter is being able to share it around! If you’re passing it on to a friend in person, just take a bit of the starter, feed it up until it’s bubbling, then pop it into a takeaway container and hand it over.
If you’re planning to mail the starter, it’s best to dry it. Get the starter really bubbly, then spread a bit out thinly onto a silicone mat or plastic plate and leave it in a warm spot to dry for a few days. Once it’s dry, crumble it up (I use a mini food processor), then bag it up (airtight if possible) and store it in the fridge until ready to share. This is also worth doing so that you always have backup in the fridge should anything happen to your main starter. I wrote a bit more about the process here…

. . . . .
5. Timing
Every sourdough baker eventually figures out a routine and schedule that suits their lifestyle. It takes a bit of time to work this out – I start feeding a bowl of starter at lunch time, make the dough before bed, and bake the following morning (as per our overnight sourdough tutorial). For folks who work regular hours though, it might be easier to take the starter out when they get home on Friday night, feed it immediately, then give it a really large feed before going to bed, ready to bake the following morning.
The starter works to its own schedule – it can bubble up frantically at 2am in the morning and then be flat and subdued again by 6am. It takes a bit of trial and error to figure out how to get to it when it’s at its peak. If I’m planning to make dough in the morning, I’ll often give my bowl of starter a huge feed before going to bed (sometimes as much as a cup each of flour and water) to make sure it’s got enough food to see it through the night.
Once you’ve made the dough, the time it takes to prove will also vary. On a hot day, it might be ready within four or five hours, but in the middle of winter, it can sometimes take 12 hours to prove. Priscilla always seems to bounce back regardless of how much time she’s had (although I haven’t tested her with a bench prove longer than about 14 hours) – not all starters are as resilient.
. . . . .
6. Dough Hydration
The hydration of the dough refers to the percentage of total liquid to flour. So if a dough has 750g of liquid (water, oil, milk etc) to 1kg of flour, the hydration of the dough would be 75%. This is slightly more complicated with sourdough, as the amount of water and flour in the starter needs to be taken into account as well.
The numbers aren’t really a huge deal – here’s what’s important about hydration:
- a lower hydration (drier) dough will be easier to shape and slash. It will produce a loaf with a tender, more closed crumb and is great for sandwich bread and rolls.
- a higher hydration (wetter) dough will be soupier and trickier to manipulate, but the pay-off is a more “artisan” loaf, with large holes and a more elastic crumb.
Most bakers will start with a drier dough and work up to a wetter one as their skills improve. Experiment and see how you go! I’ve had great results from baking higher hydration loaves in a closed pot (more here).
. . . . .
7. Mixing it up!
One of the best ways to create interesting loaves is to experiment with different flours. I’ve found the easiest way to do this is to substitute half the bakers flour in a dough with an alternate flour – wholemeal, rye, spelt, kamut, remilled semolina. Some of these have a lower protein content than white bakers flour, so it can be tricky to make 100% loaves with them. Adjust the water accordingly, as some of these flours can be quite thirsty.
Another way to expand your sourdough portfolio is to add inclusions in your dough such as dried fruit or nuts. On our bread page there is a list of Bread #101 Sourdough tutorials with suggestions on how to vary your basic loaf (I’ve listed these at the bottom of this post as well).
. . . . .
8. Basic Shaping
To shape a round loaf, flatten the dough out and fold the outsides into the middle. Then turn the ball of dough over and cuddle it with the palms of your hands to round it up…
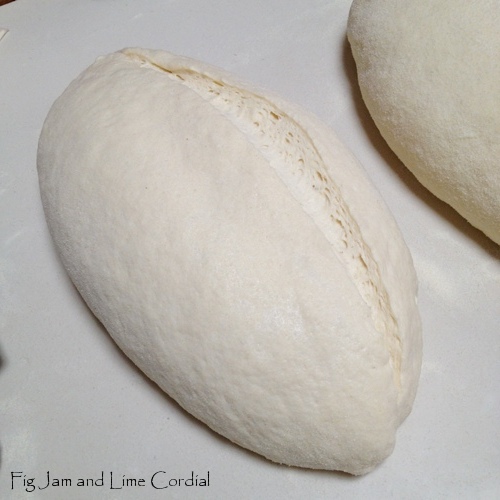
To shape an oval loaf, begin with a round loaf. Flip it over and flatten it out, then fold in the top and bottom…

Then fold the dough in half and squish the two sides together (either with your fingers or the heel of your palm)…

Flip the dough over and allow to prove, then slash. I like to make a single deep cut with a serrated bread knife…
The dough above was baked in a closed enamel roaster…

. . . . .
9. Baking the Loaf
Once the dough has had its second rise, there are a multitude of ways to bake it. My preference is to use a preheated oven, but that’s not necessary – a lot of people pop their dough into a cold oven and get fabulous loaves. I prefer the crust and crumb from a loaf baked in a hot oven though, so I always preheat.
A shaped dough can be baked uncovered on a tray or a preheated pizza stone, and for most of my bread baking life, that’s what I’ve done. In the past year though, I’ve learnt to bake in a covered pot (thanks Em!) and my loaves have gone from homemade to artisan in appearance.
Here’s why it works so well – when the dough is placed inside a closed container, the moisture in the dough which is released as it heats up is captured as steam inside the pot. The steam prevents the crust from hardening too quickly, which enables the dough to rise to its maximum capacity. When the lid is removed, the steam is released and the crust gets a chance to brown up and set. Trying to keep the outside of the dough moist and expanding for as long as possible is the reason bakers add ice cubes or mist their oven (they’re trying to create steam).
Most pot bakers use enameled cast iron pots, but I find them too heavy. I now use cheap, lightweight enamel roasters which are heat safe to 270C and work brilliantly. If you do use cast iron, remember to check that your pot can cope with the high temperatures. Some of them have plastic handles which melt at anything over 190C.
Edit 21/10/16: both the Wiltshire and Falcon enamel roasters work well – the one in the photo below is a 30cm Falcon. I’ve bought both brands online – here are the links:

Hot or Cold Pot?
I used to preheat my enamel roasters in the oven, then manoeuvre them out with welding gloves and plonk my shaped dough into the hot pot. I still think that gives me the best results – I like the crispiness of the crust that I get that way. That’s the technique I originally suggested in the Overnight Sourdough Tutorial.
However…these days I’m more likely to put the dough into a cold pot, simply because it’s easier. The results are still excellent, particularly with the enamel roasters which are lightweight and therefore heat up almost instantly in the oven. I line the base of the roaster with a sheet of parchment paper, as I’ve found that putting the dough into a cold pot makes it more likely to stick than when it goes into a hot one. Once the shaped dough is risen, I slash it, place it into the pot, cover it, and put the whole lot into a preheated oven. It works a treat!

. . . . .
10. Storing the Loaf and Using Up Excess Starter
Always allow your loaf to cool to at least lukewarm before slicing it – otherwise the crumb could go gummy. I store my loaves in sturdy plastic bags and we try to eat them over a couple of days. Surplus loaves are frozen or turned into bread rusks – the latter keep well in an airtight container for weeks. Never store bread in the fridge, as it tends to go stale faster that way.
Excess sourdough starter is perfect for pancakes. We make a batch most weekends and my boys absolutely love them. I also use excess starter in Cuban bread (although that just results in more bread in the house)…

. . . . .
11. Artisan Sourdough Made Simple, by Emilie Raffa

If you haven’t already purchased a copy of my darling friend’s book, then I’d strongly urge you to do so, not just because it’s brilliant, but also because it’s been specifically written for everyone who is baking with a Priscilla starter. I wrote two whole posts about it here and here.
. . . . .
Do you have any questions about your Priscilla sourdough starter that I haven’t answered here? If so, please let me know – I’ll keep adding to this post as I think of more tips to share!
. . . . .